

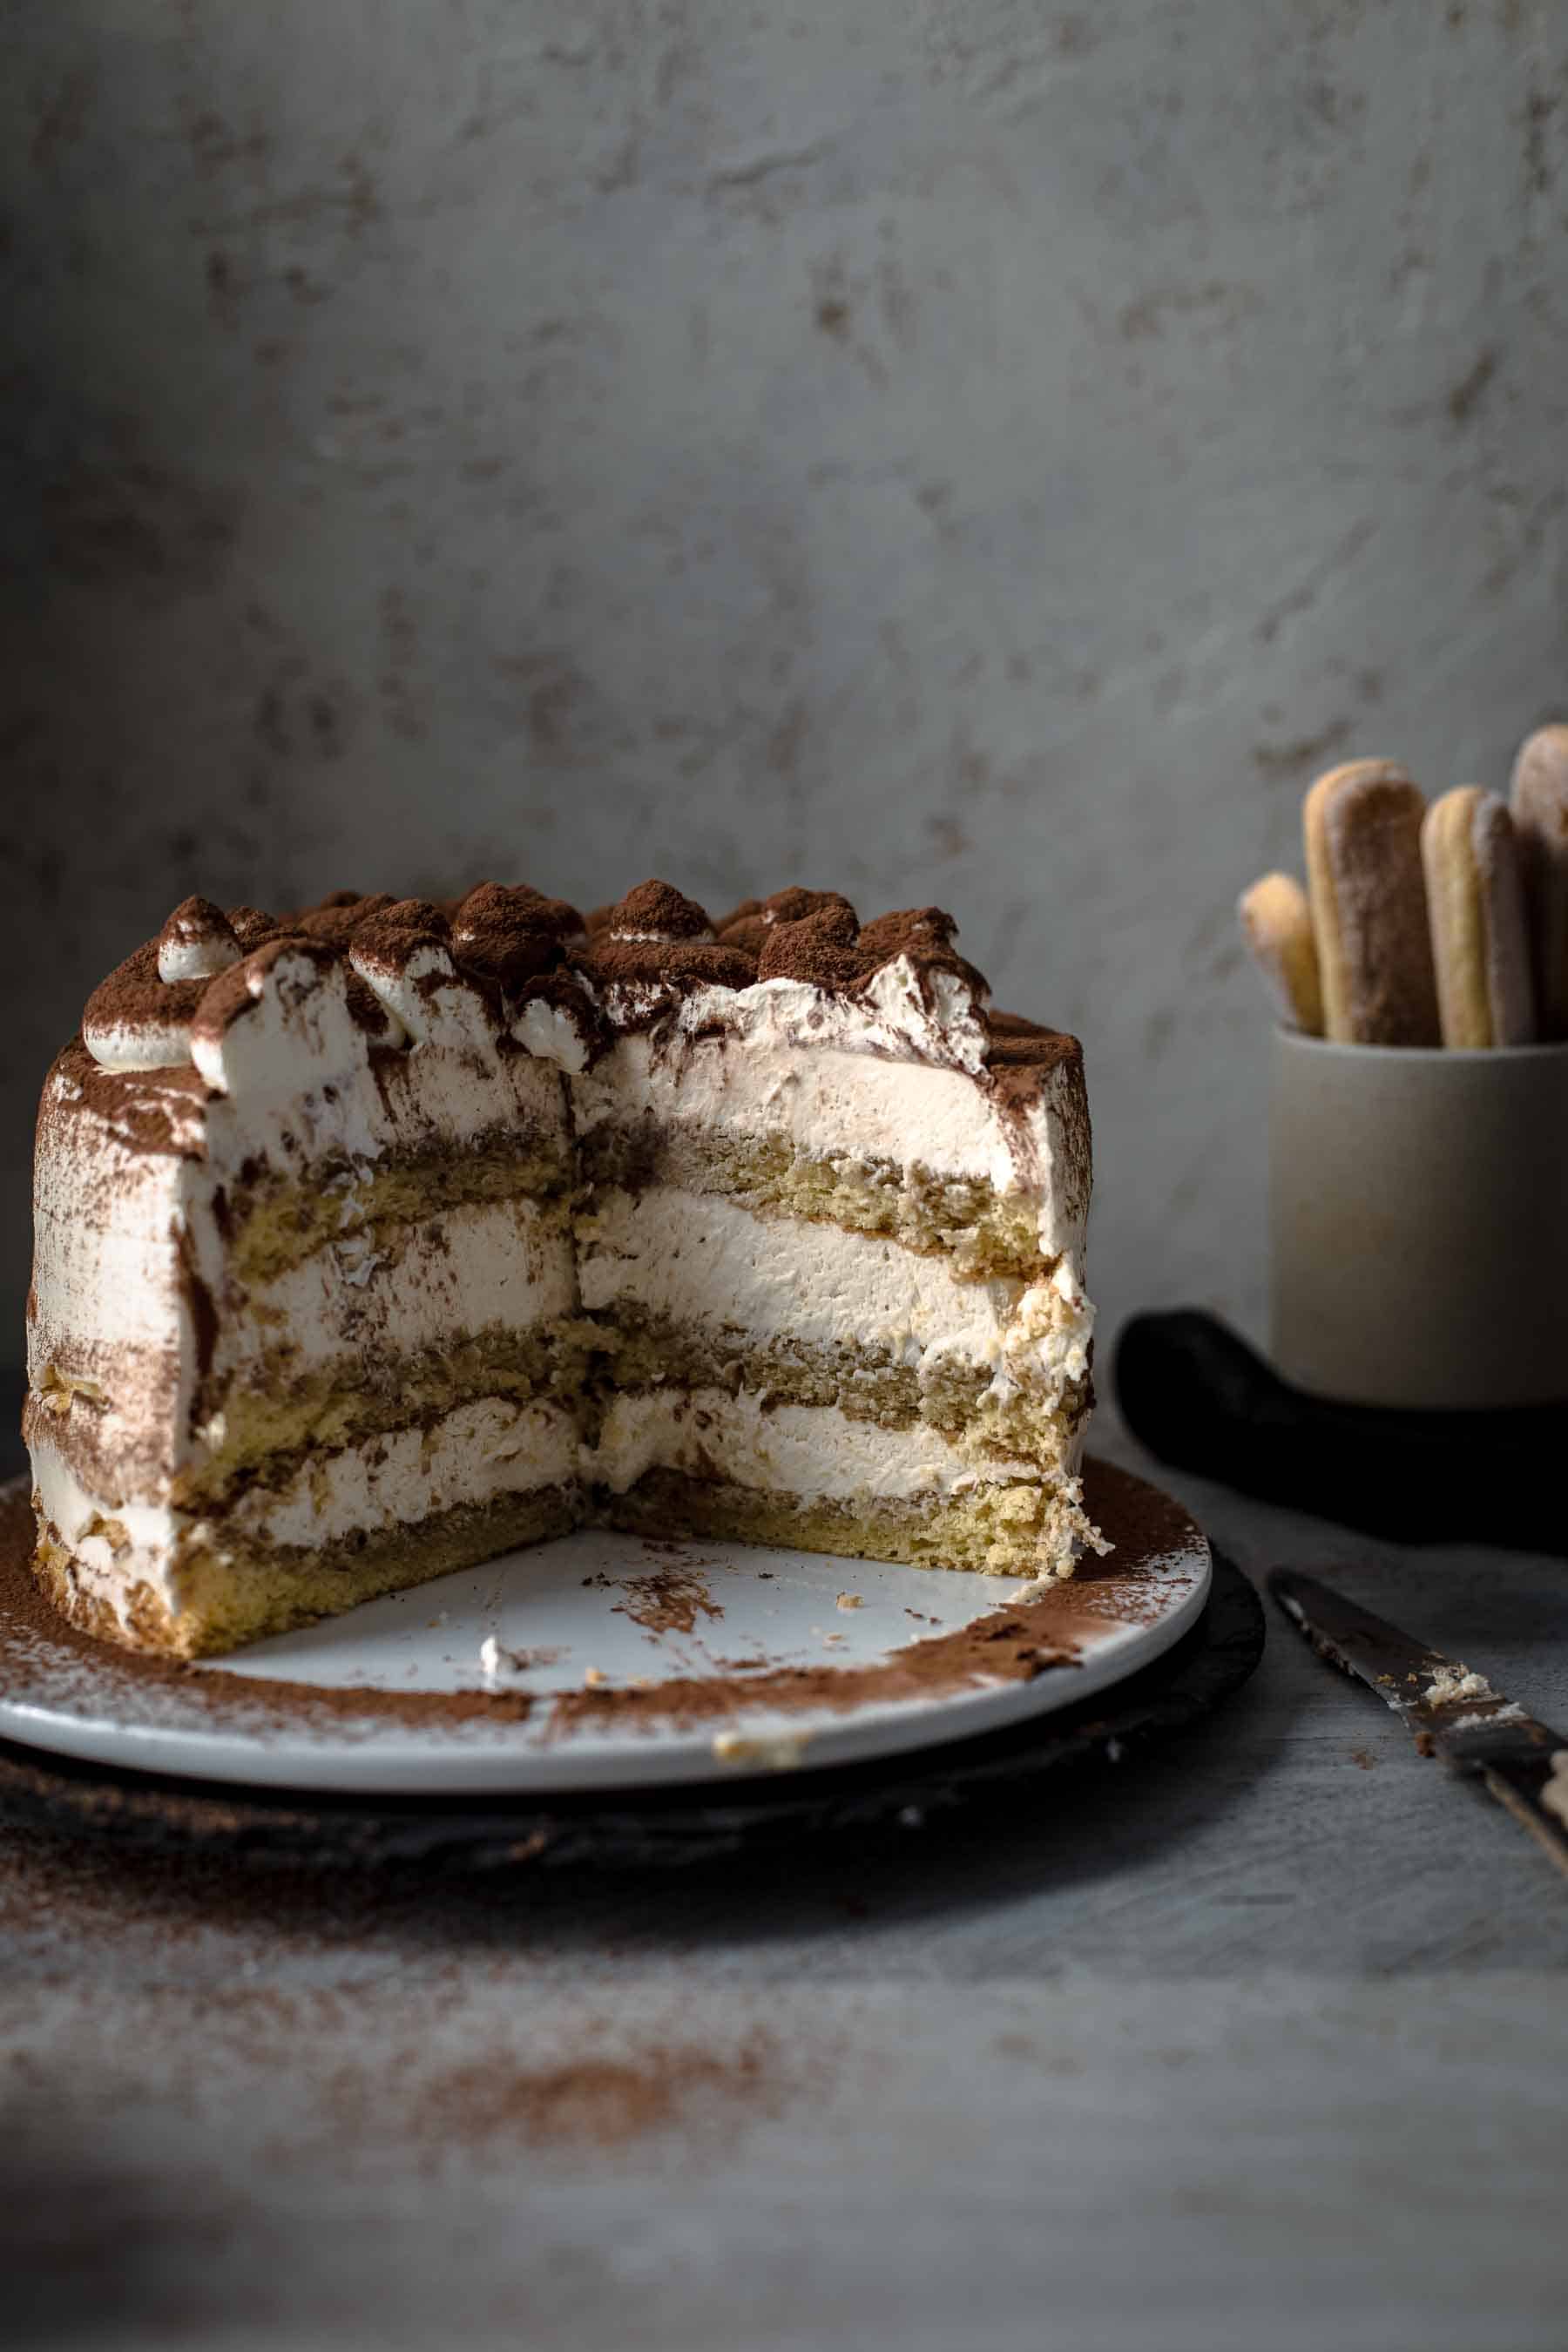
This Tiramisu Cake is made of genoise cake layers brushed with espresso and filled with irresistibly creamy coffee mascarpone cream. There are no raw eggs in the frosting and is therefore safe to eat. All you need are just 10 ingredients! By the way, have you tried my tiramisu recipe?
Jump to:
Photo tutorial
Genoise cake layers
Note: You can mix the cake batter with a handheld mixer, but I encourage you to use a stand mixer (if you have one) just because it is so much easier and also faster. The cake batter needs to be mixed about 10 minutes when mixed with a stand mixer when you use a hand mixer plan 3-5 minutes longer to get the required consistency.
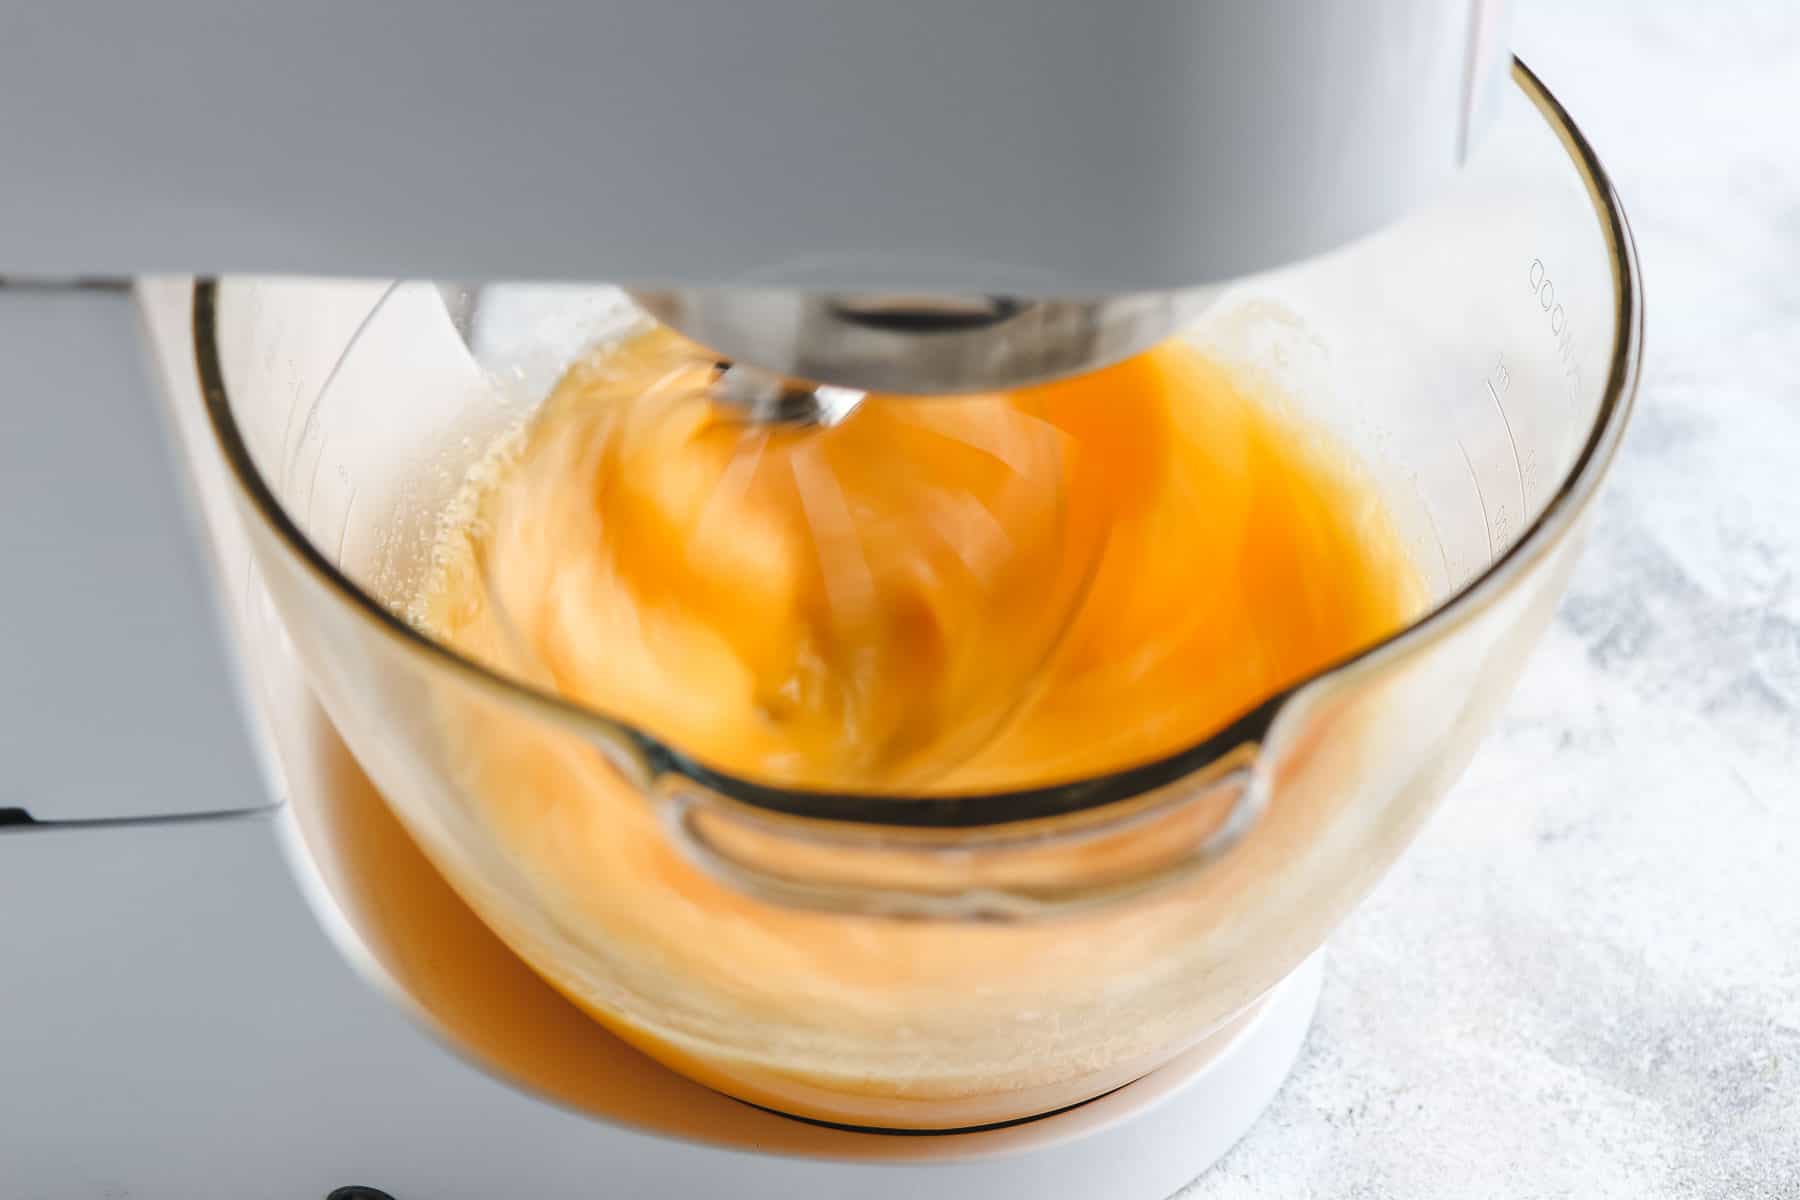
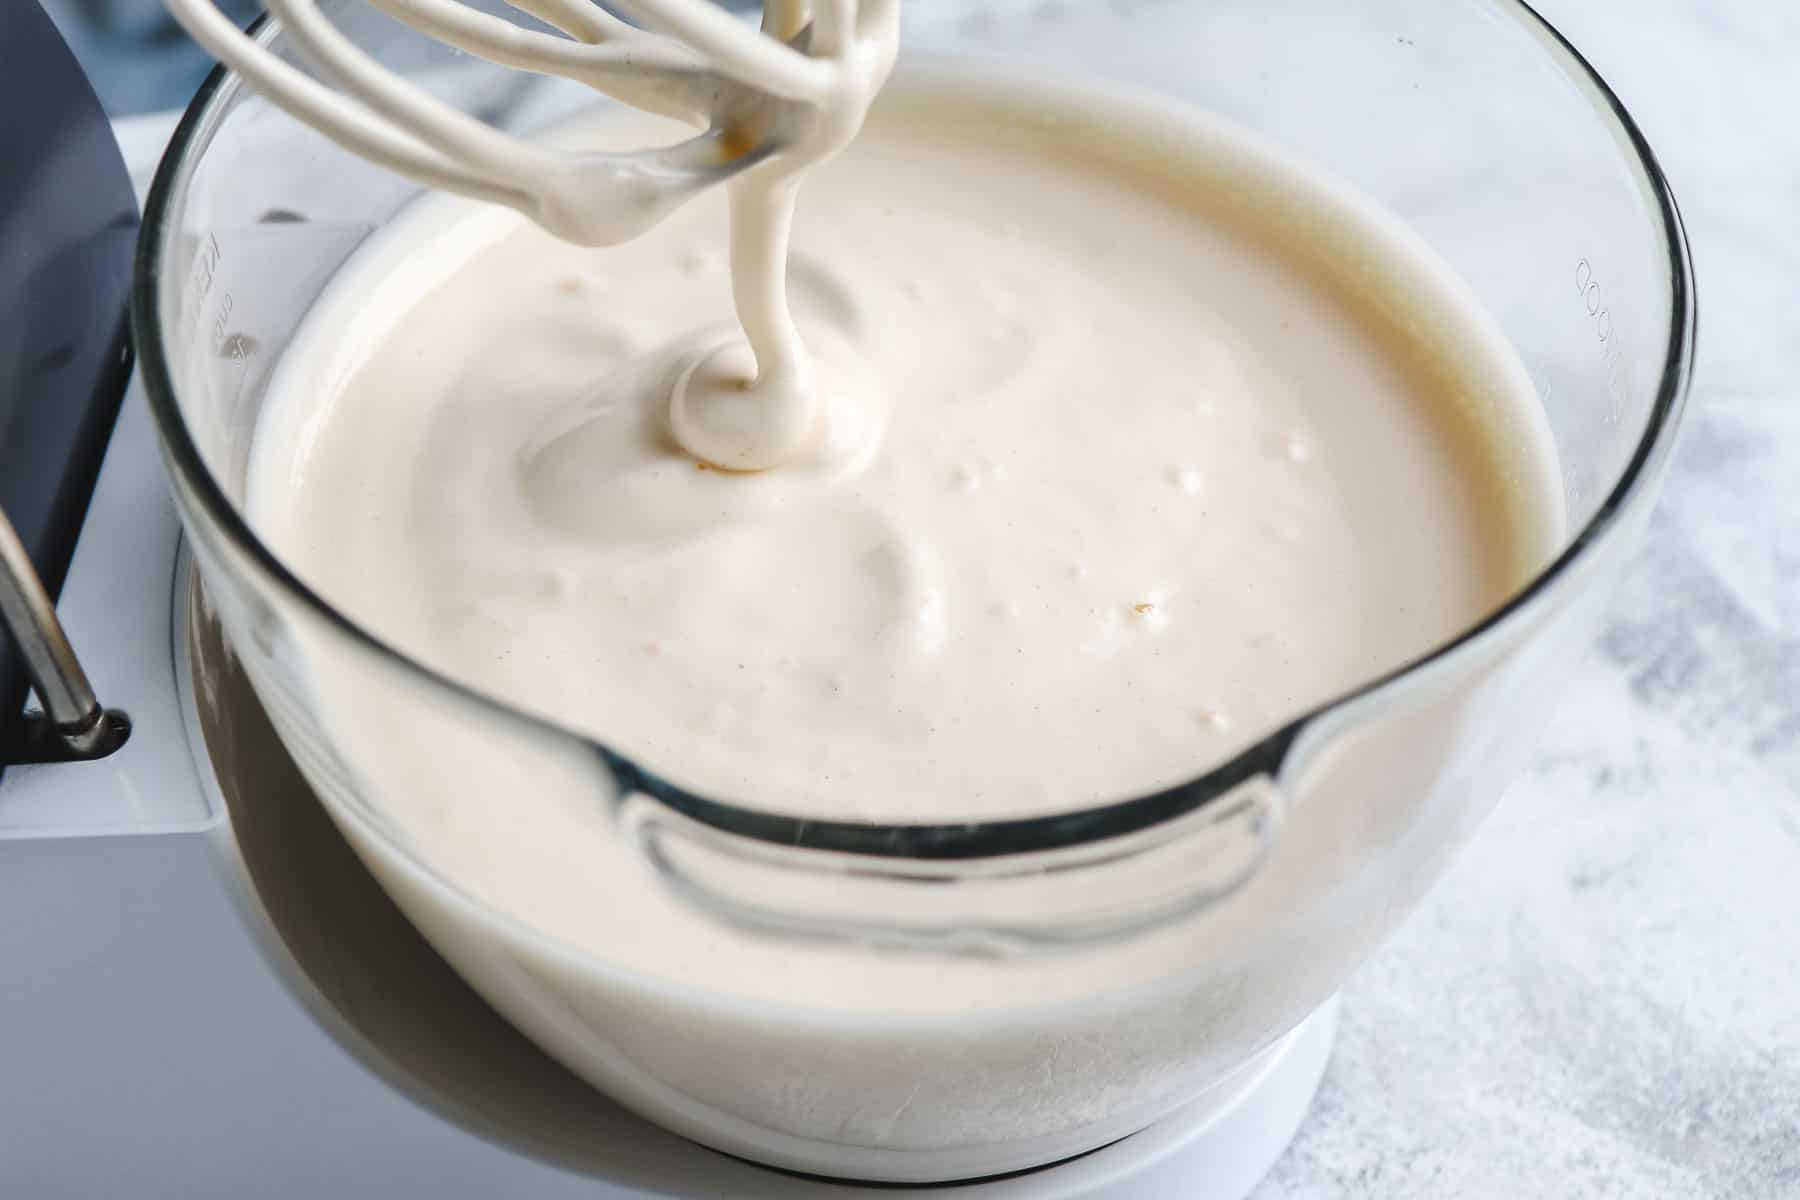
Start with mixing the eggs just until combined. Then add sugar and mix for 10-15 minutes on medium-high speed. Watch the following pictures to see how the egg/sugar mixture transforms while mixing it.
Mixing progress after 1 minute:
Mixing progress after 5 minutes:
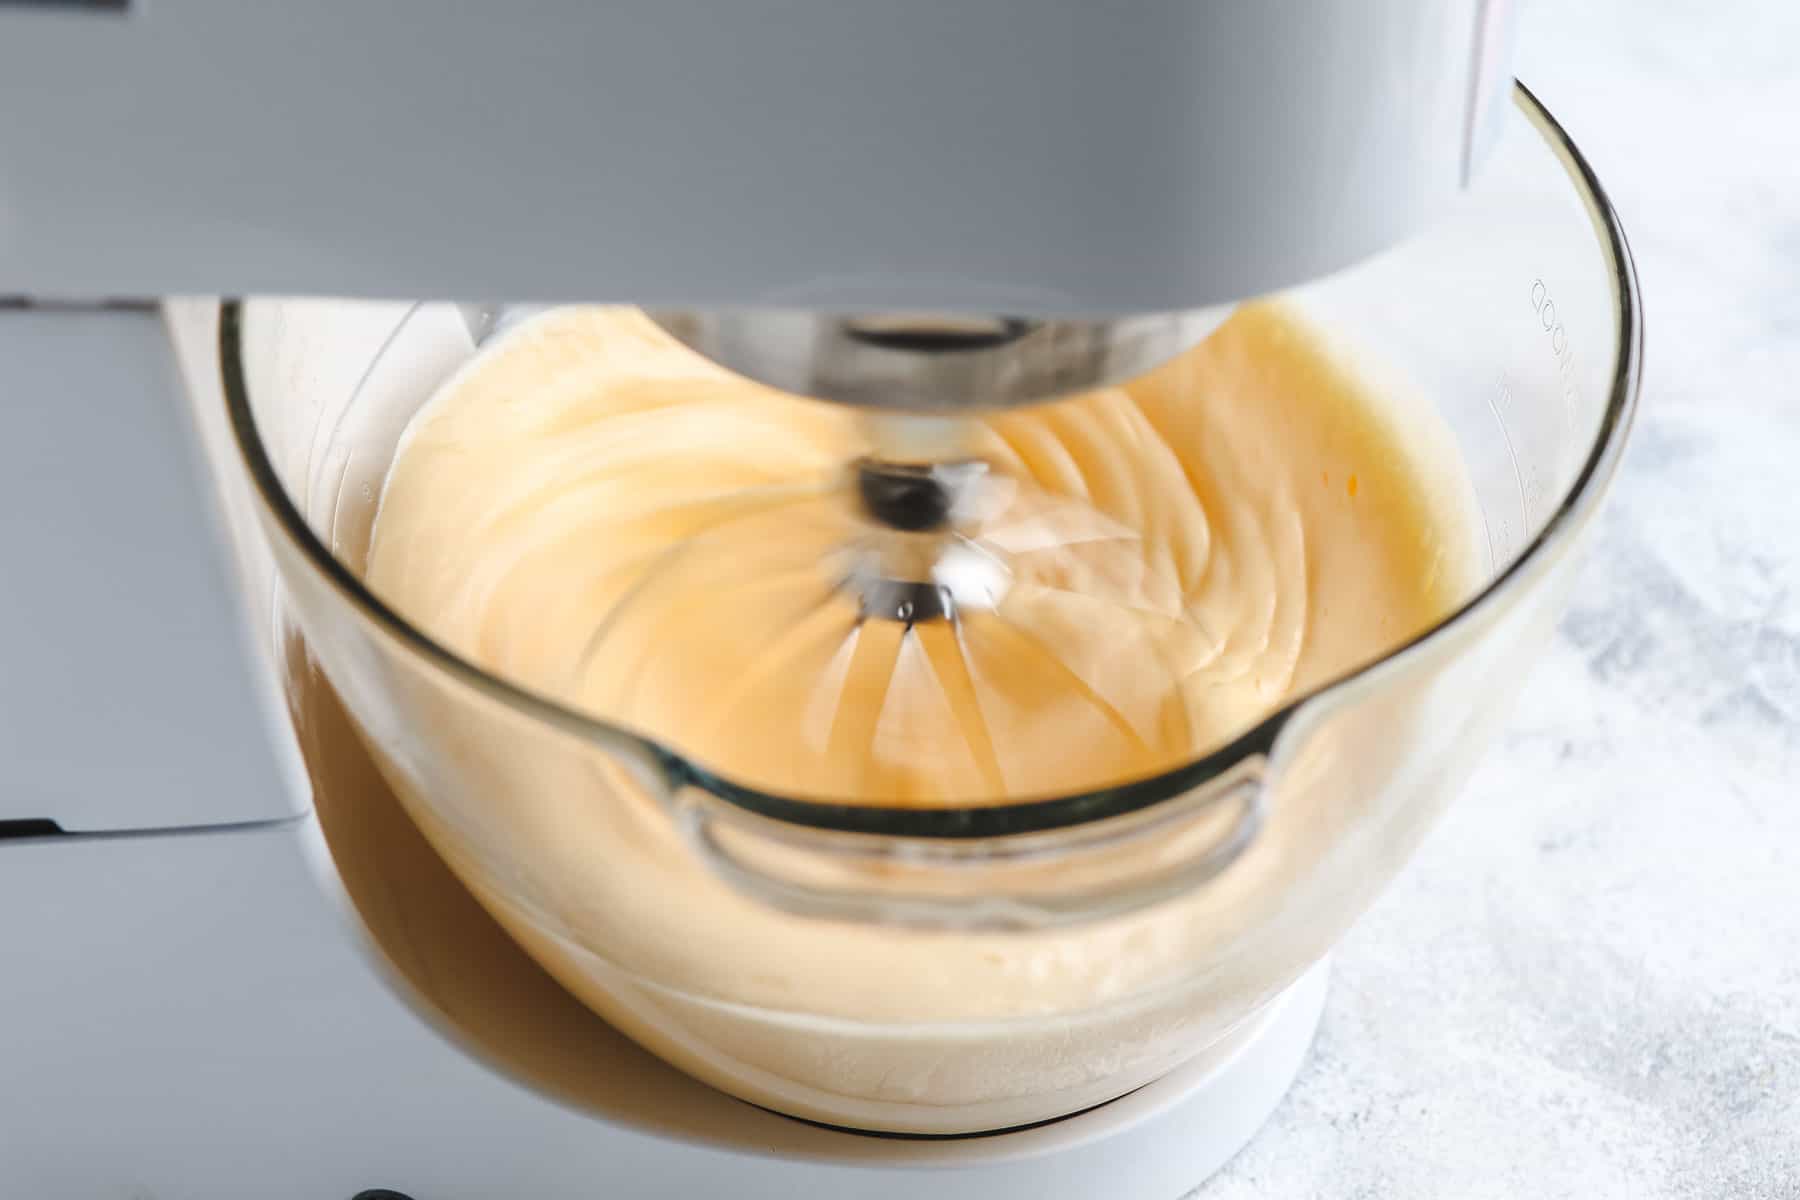
Mixing progress after 8 minutes:
After about 10 minutes mixing with a stand mixer or 15 minutes with a hand mixer, the egg mixture is pale white, fluffy, and tripled in size. You know that the batter has the required consistency when you drip off batter from the mixing attachment on top of the mixed batter. The drop should be visible for 10 seconds. If it sinks into the batter before the 10 seconds are over, you need to mix longer.
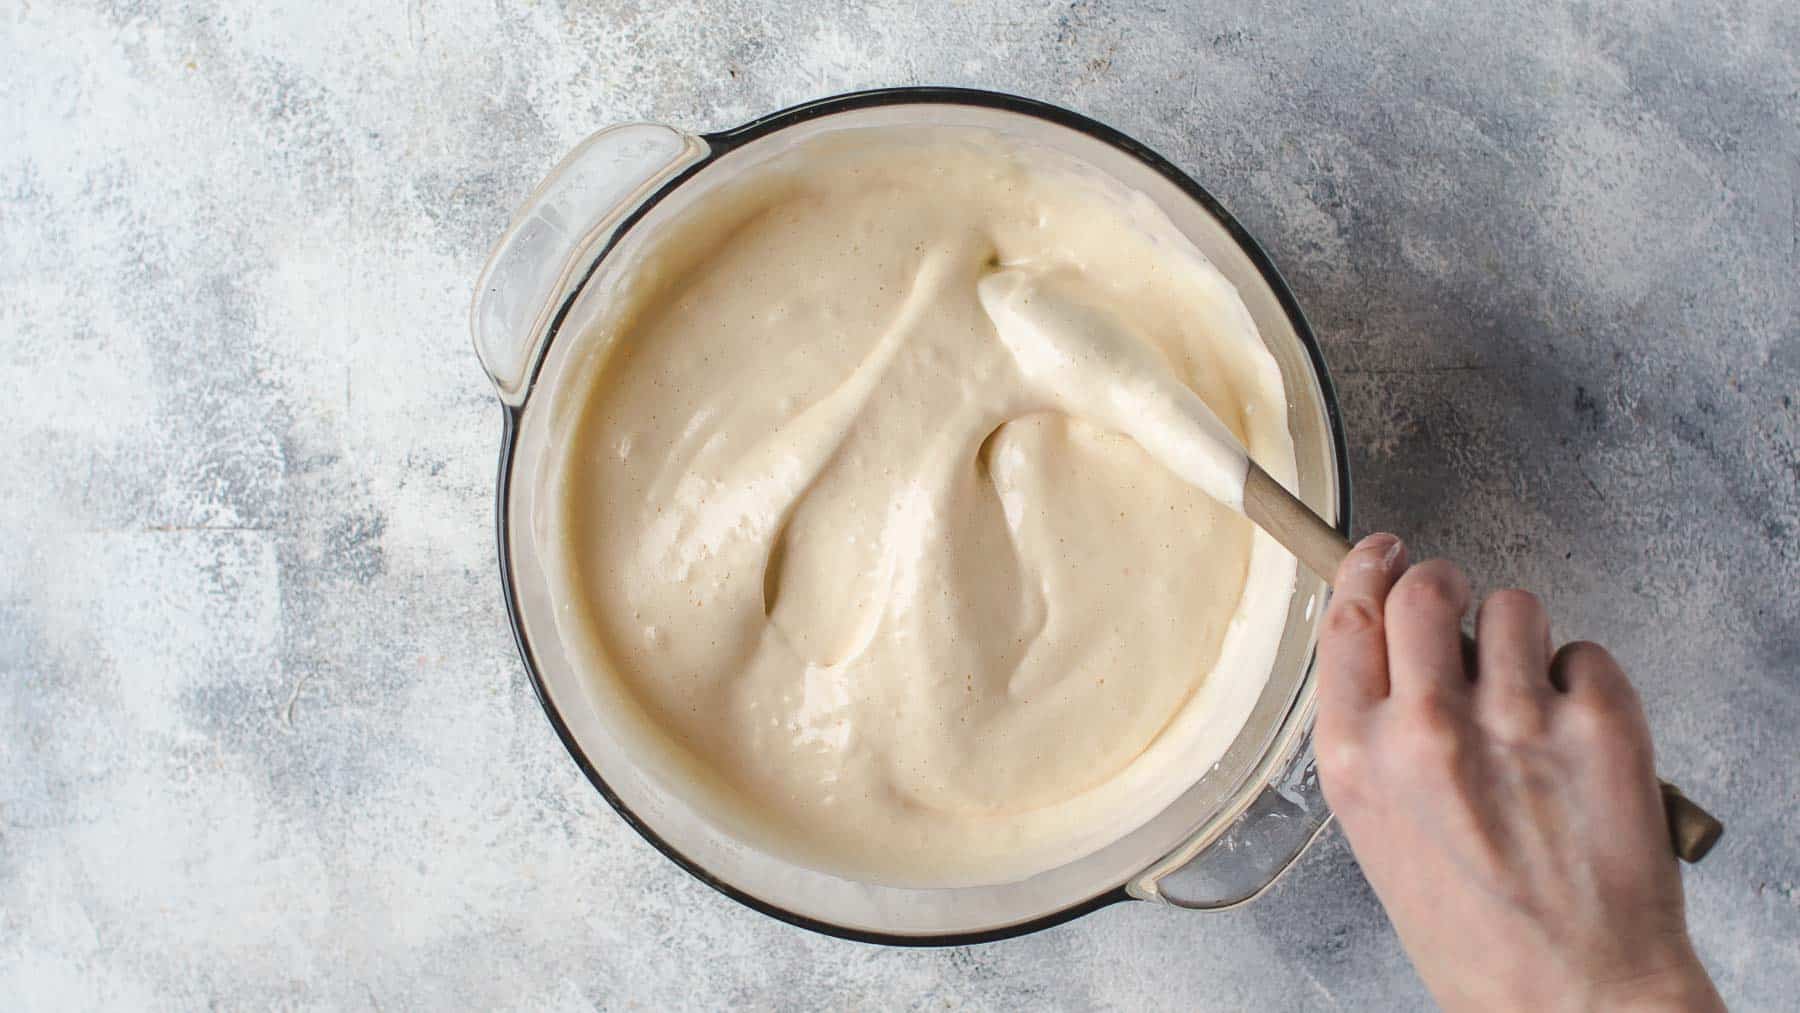
Using a wooden spoon, carefully fold in flour, cornstarch, and baking powder. Do not overwork the batter or work too fast. Otherwise, you will destroy all the air pockets which are necessary to create light and airy cake layers, which don't fall flat.
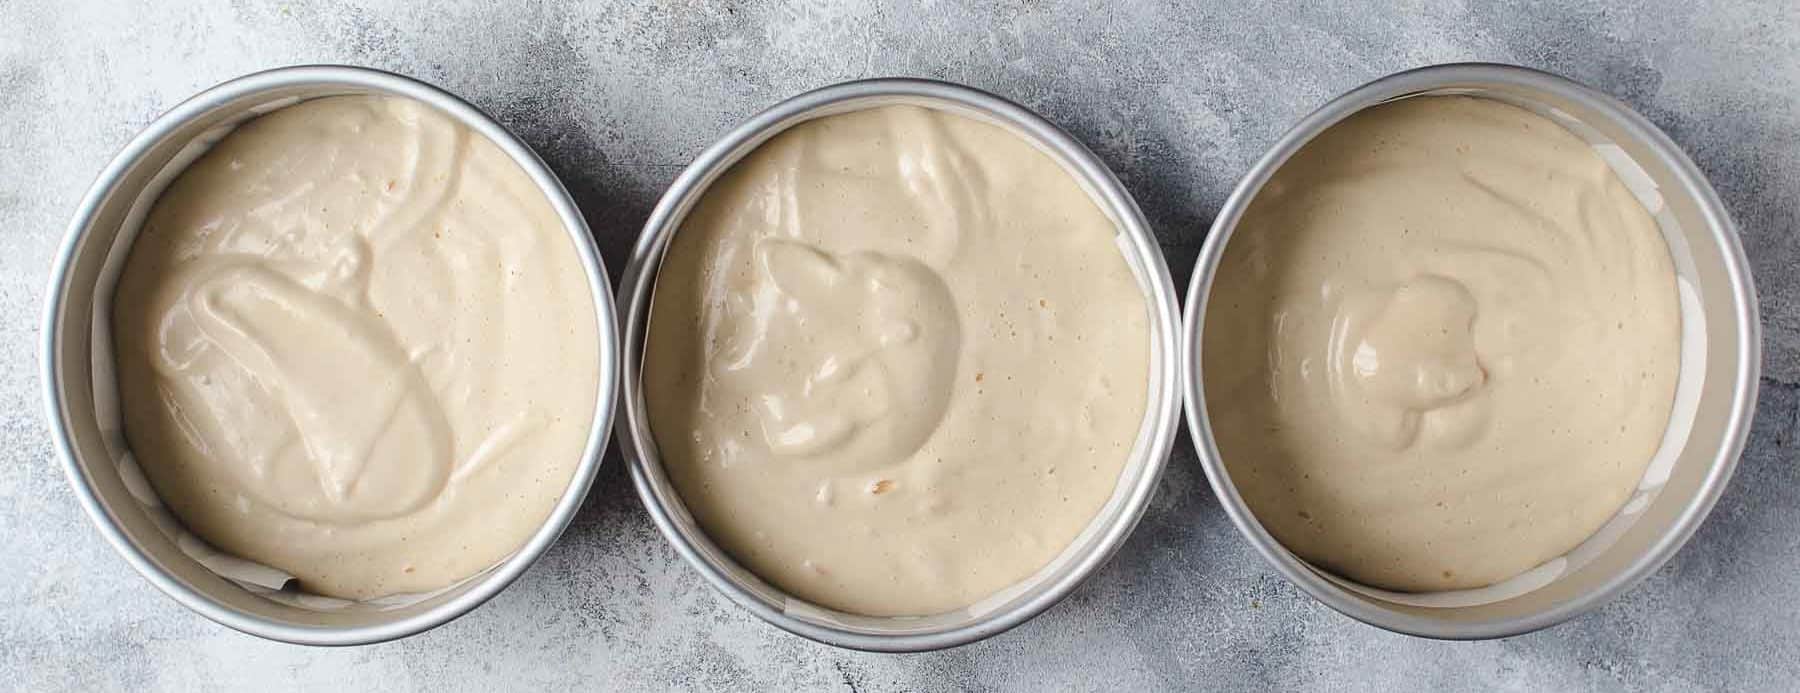
For easy removing the cake from the pan after baking, line the bottom, and the sides of three 8" baking pans with parchment paper. Therefore cut out a circle for the bottom and stripes for the sides. I always spray a little bit of non-stick spray under the paper that it sticks to the pan.

Divide the batter into the three baking pans equally. Immediately after filling the batter into the pans, bake all three pans at the same time. When the batter stands too long before baking, it loses too much air, and the genoise cake gets flat and eggy.
After baking let stand for 5 minutes, then remove the cakes from the pans and remove the paper immediately (caution: it's still hot). Let cool on a wire rack. The cake needs to be room temperature before filling.
Mascarpone frosting
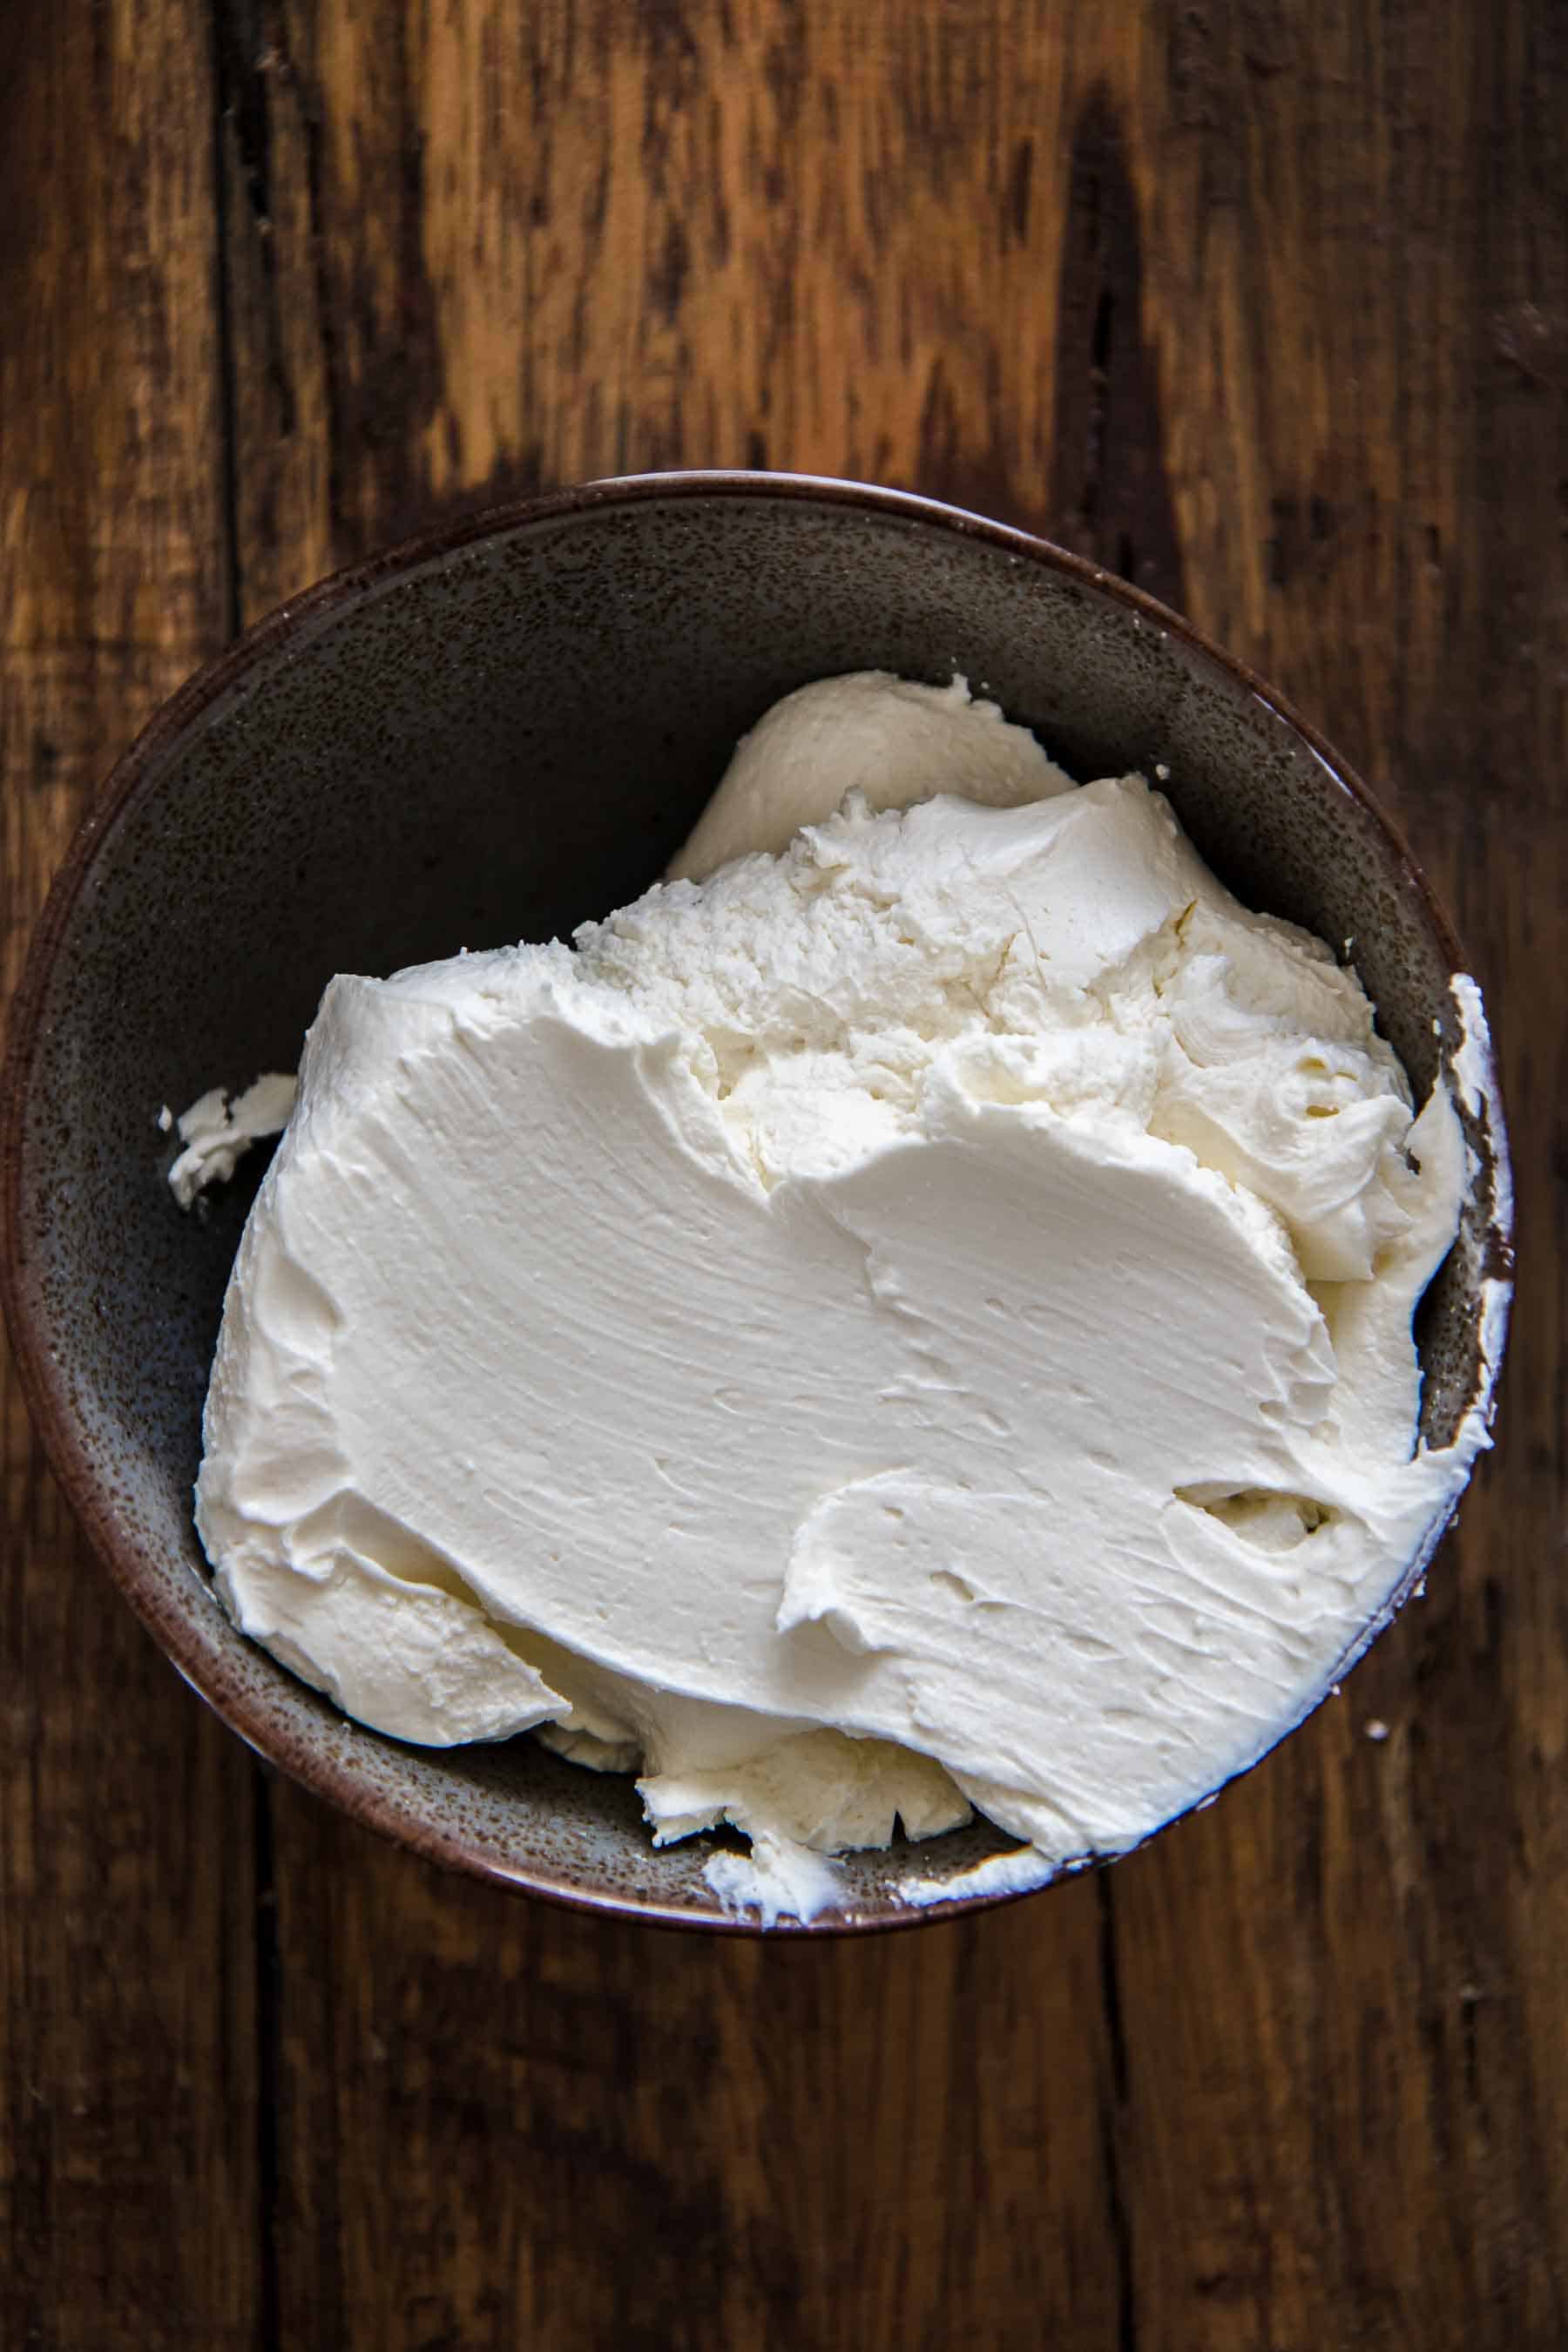
Mix the mascarpone on medium speed just until it is creamy for about 1-2 minutes.
Sift in powdered sugar and mix on medium speed until creamy and combined about 1-2 minutes.
Add the strong coffee and don't stop mixing until it is completely combined and creamy. The coffee needs to be cold and chilled. Watch the two photos below to see how it looks when you add the coffee and when it is completely combined. You see that it looks curdled in the beginning, but this is normal. Keep mixing until it comes together (it will). Mix on medium speed for about 2-3 minutes.

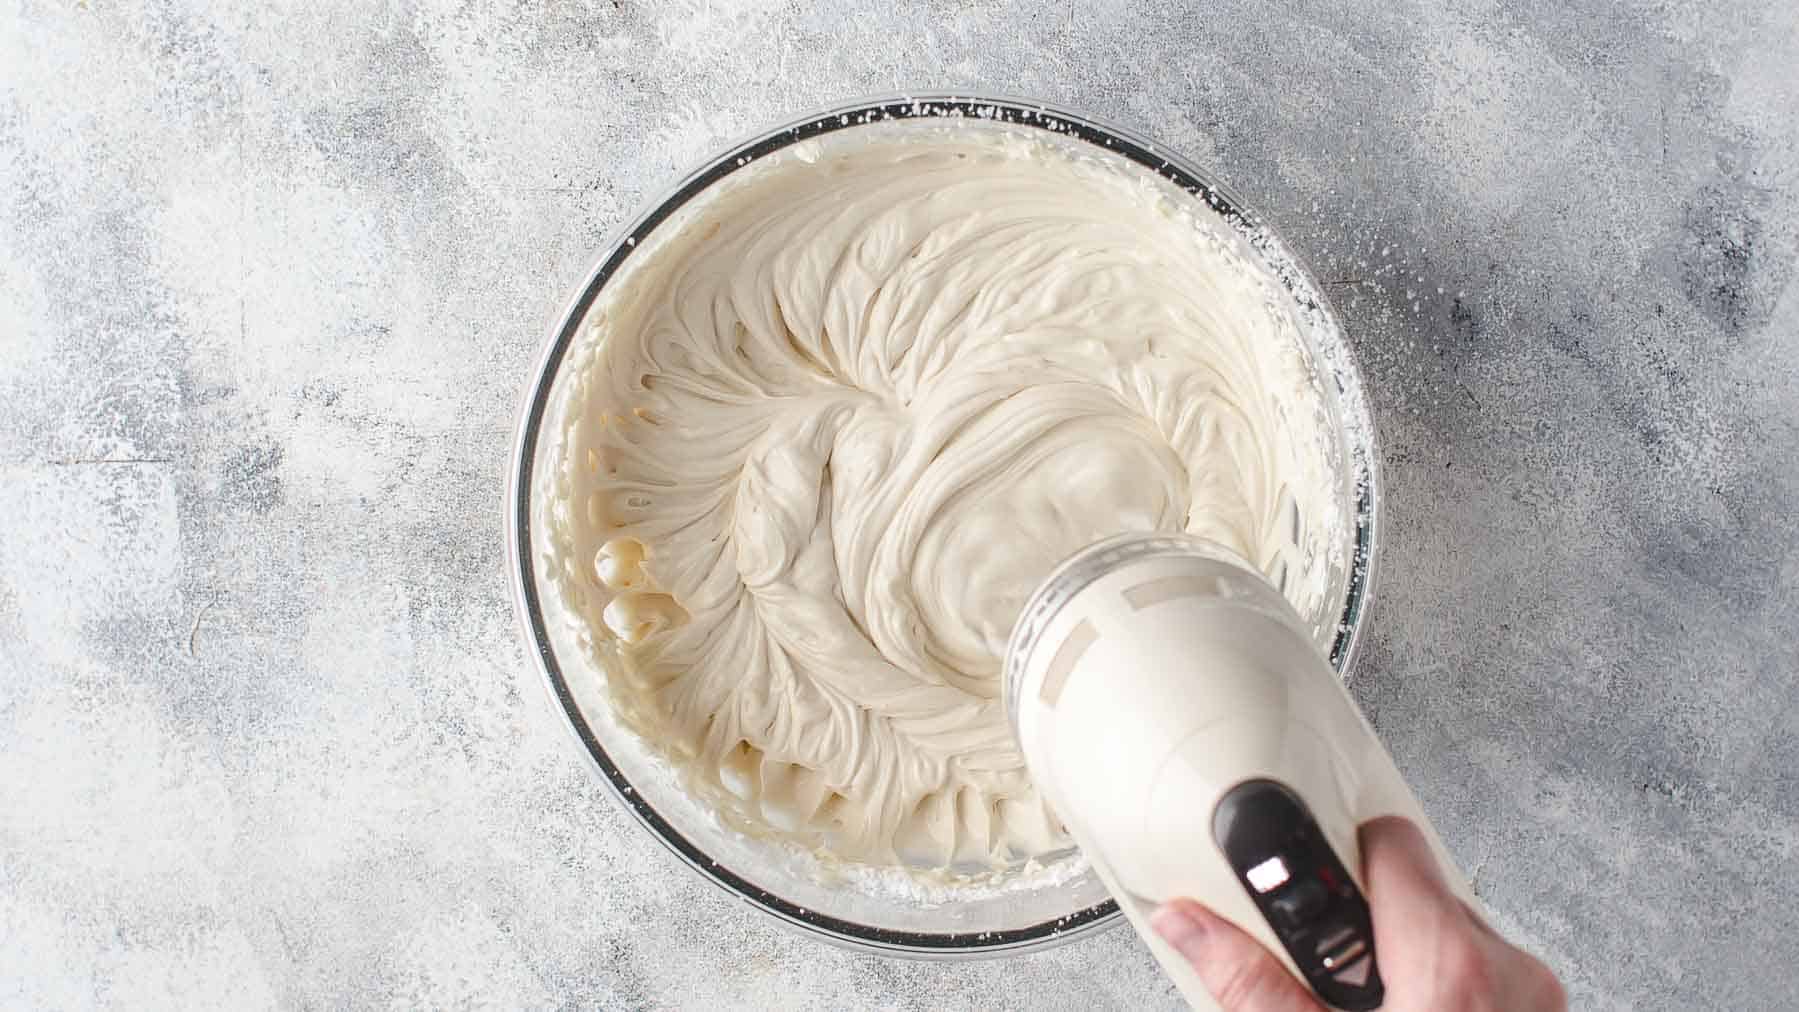
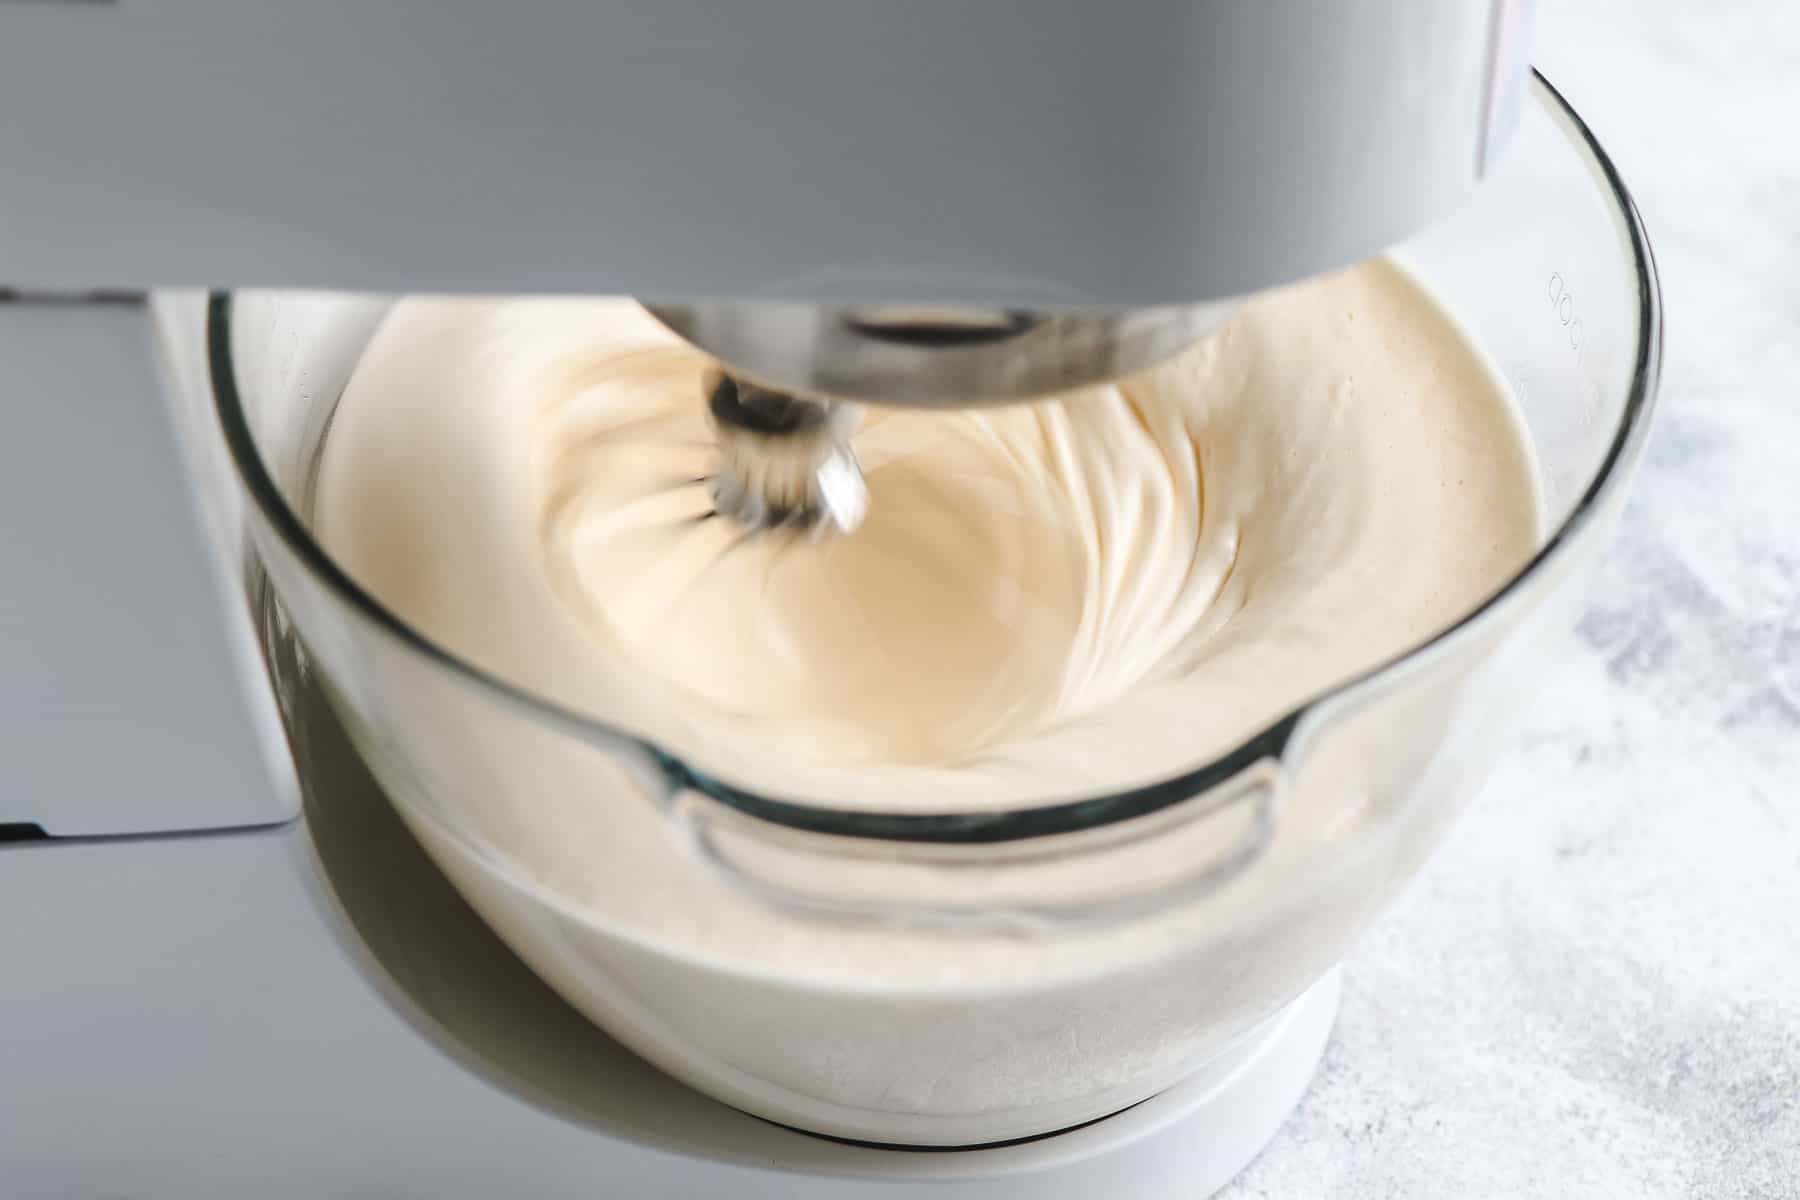
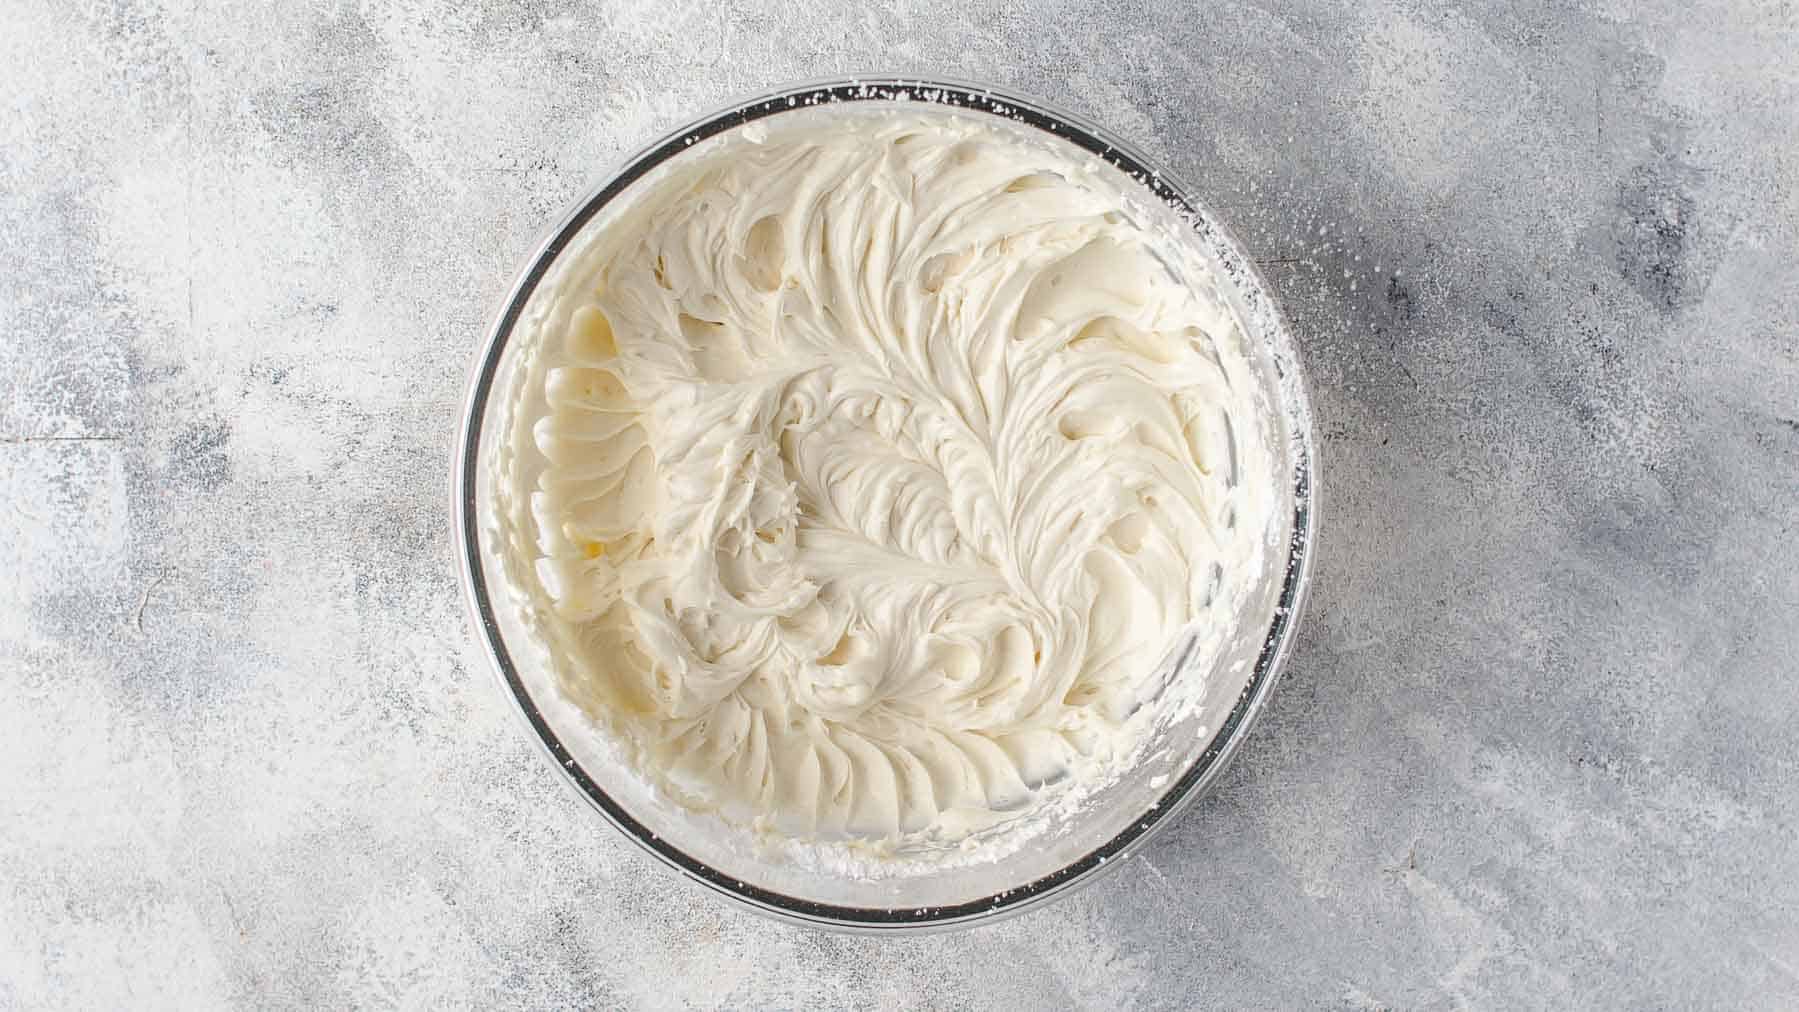
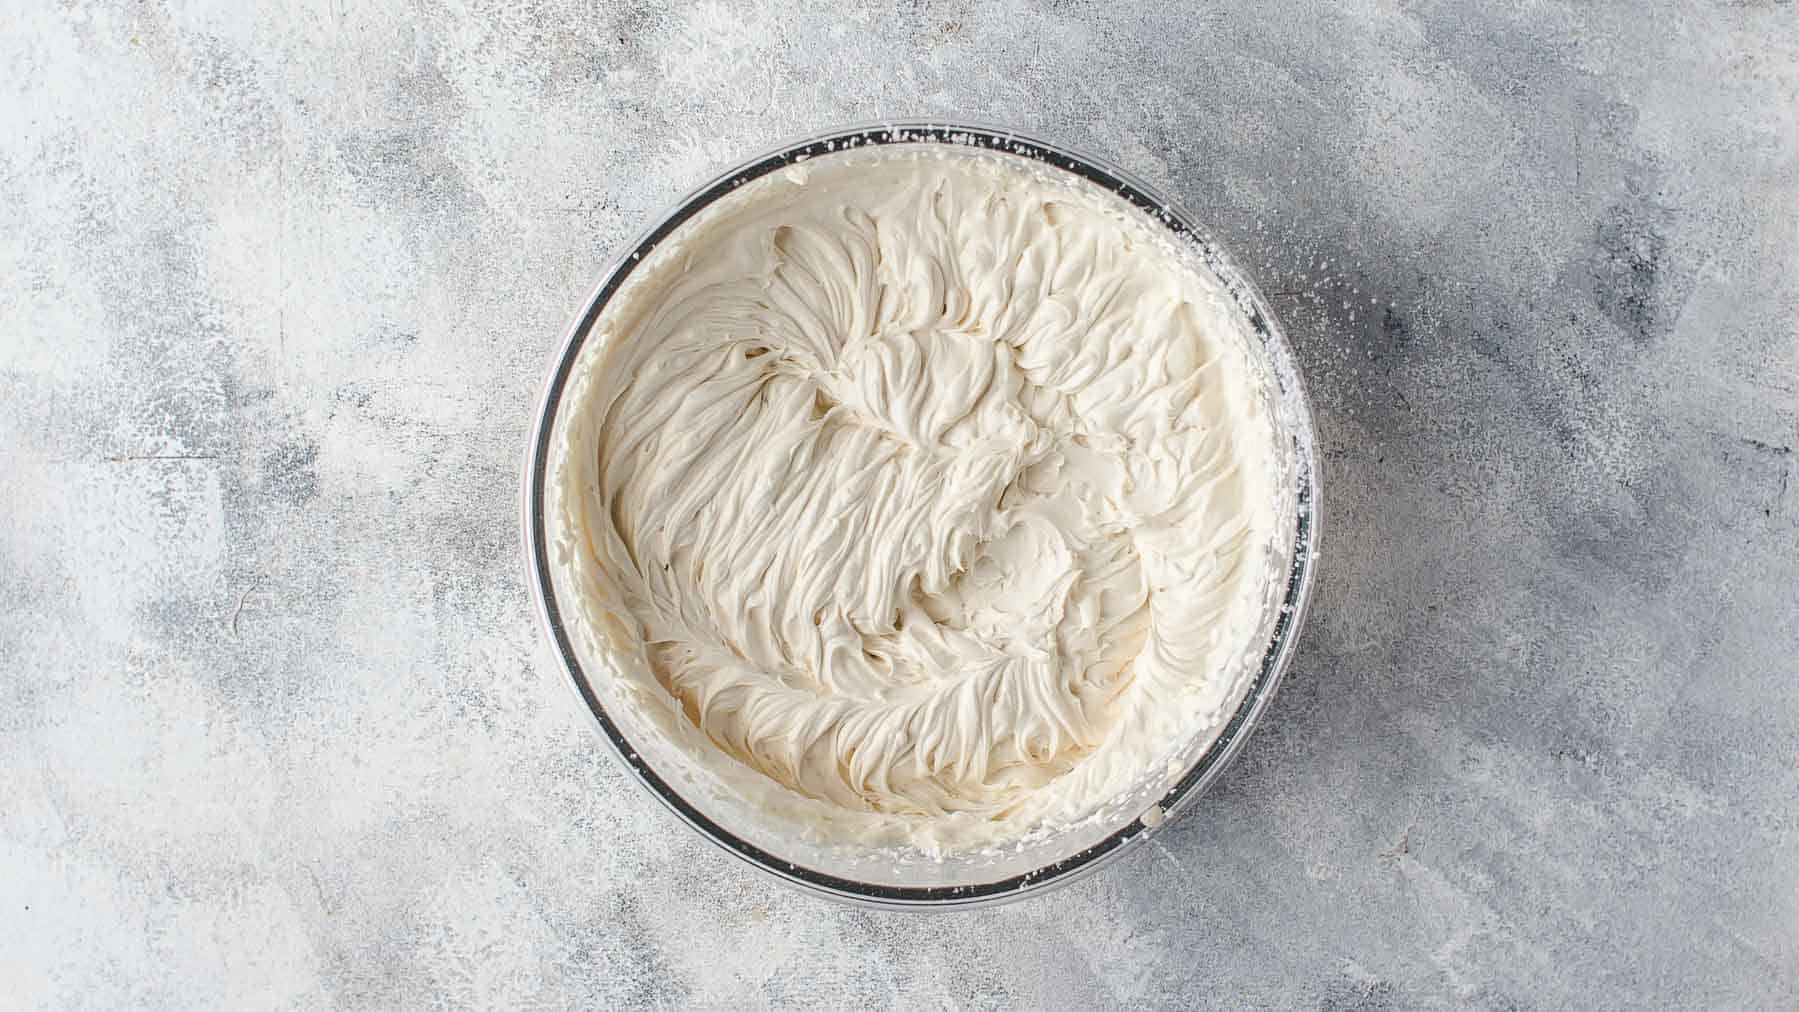
Then add the heavy cream (straight out of the fridge). Watch the following three process photos how the consistency changes. In the beginning, when you add the heavy cream, it seems to be very liquid, but this is normal. You add a lot of liquid to the frosting. Just keep mixing on medium speed until it is creamy and stiff peaks form for about 2-3 minutes.
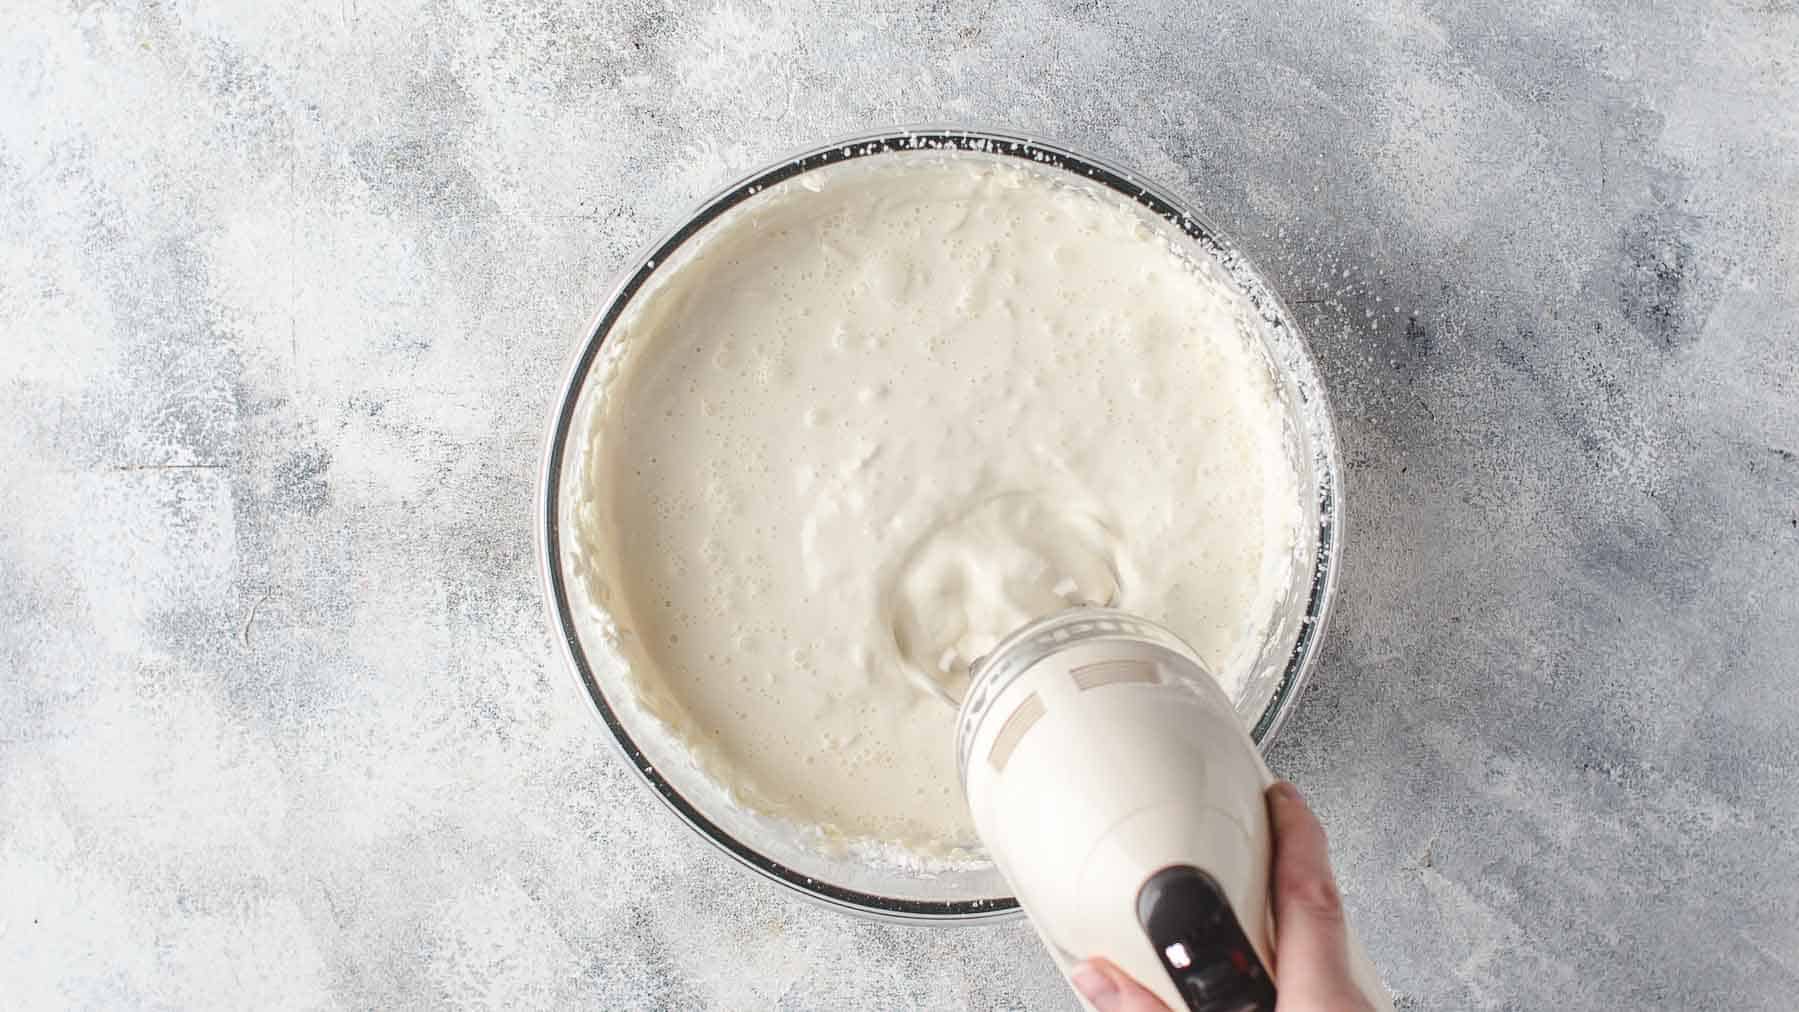
After 1 minute it starts to get creamy.
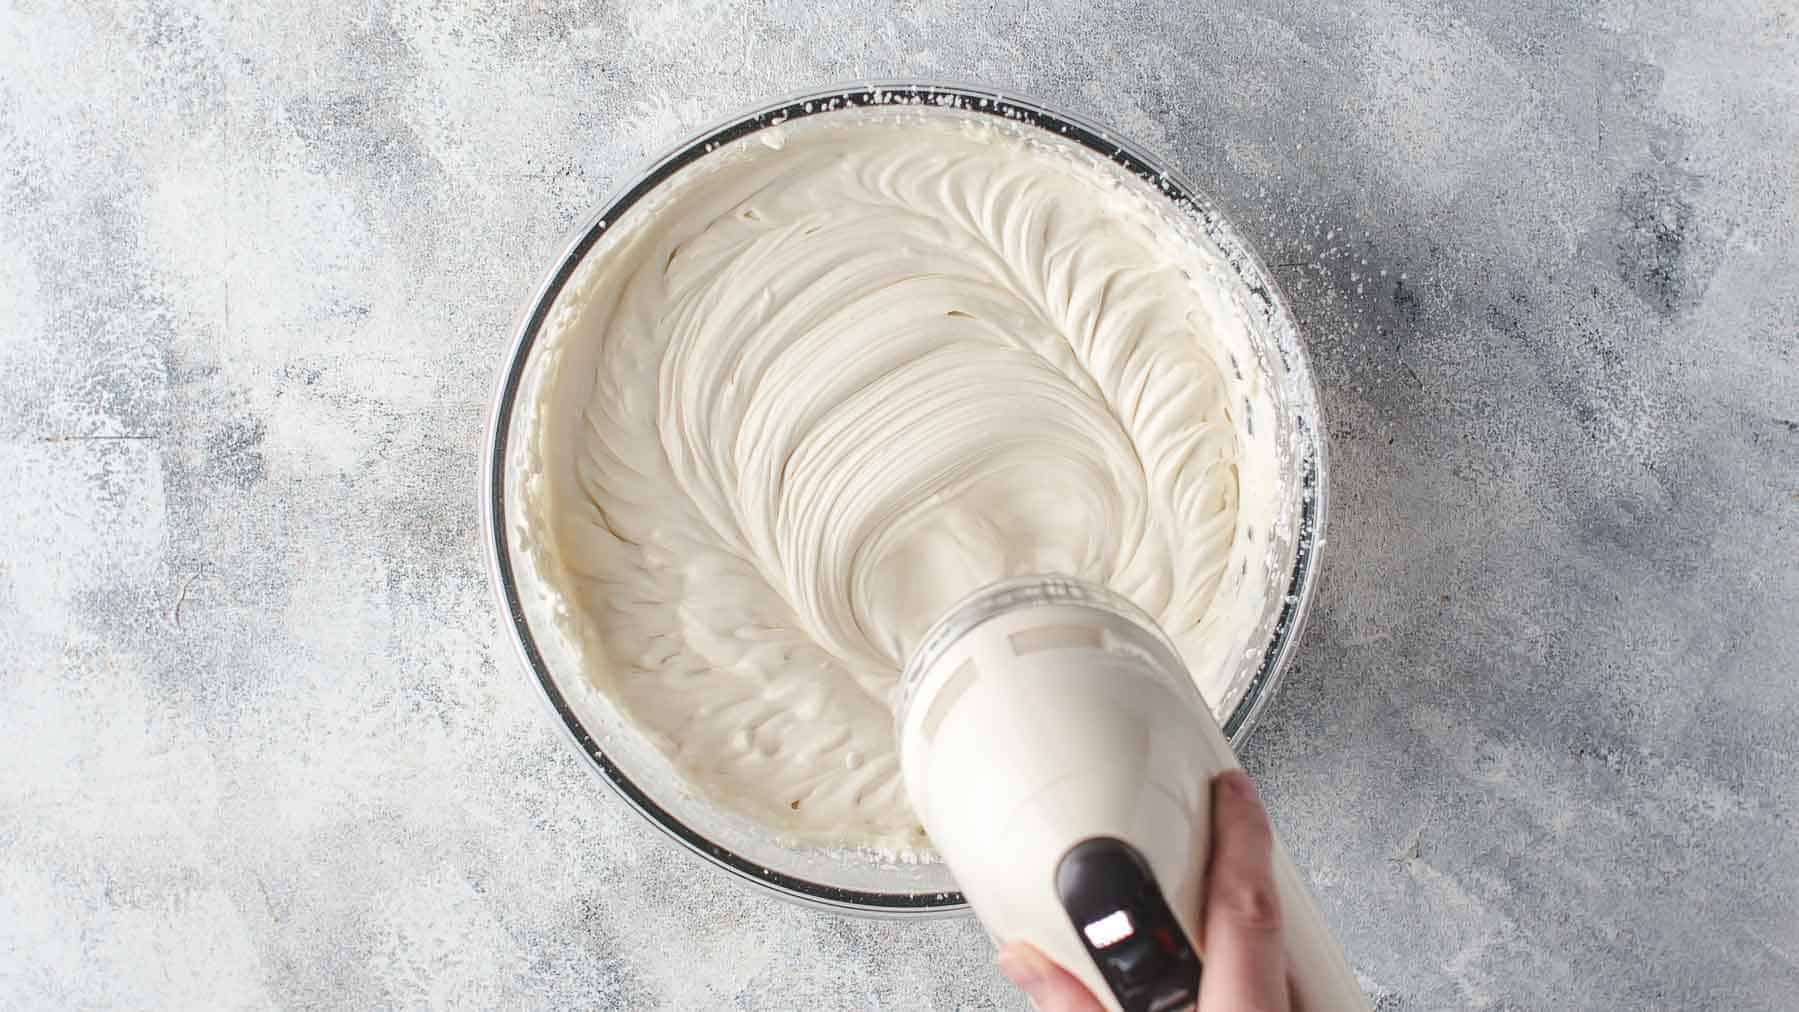
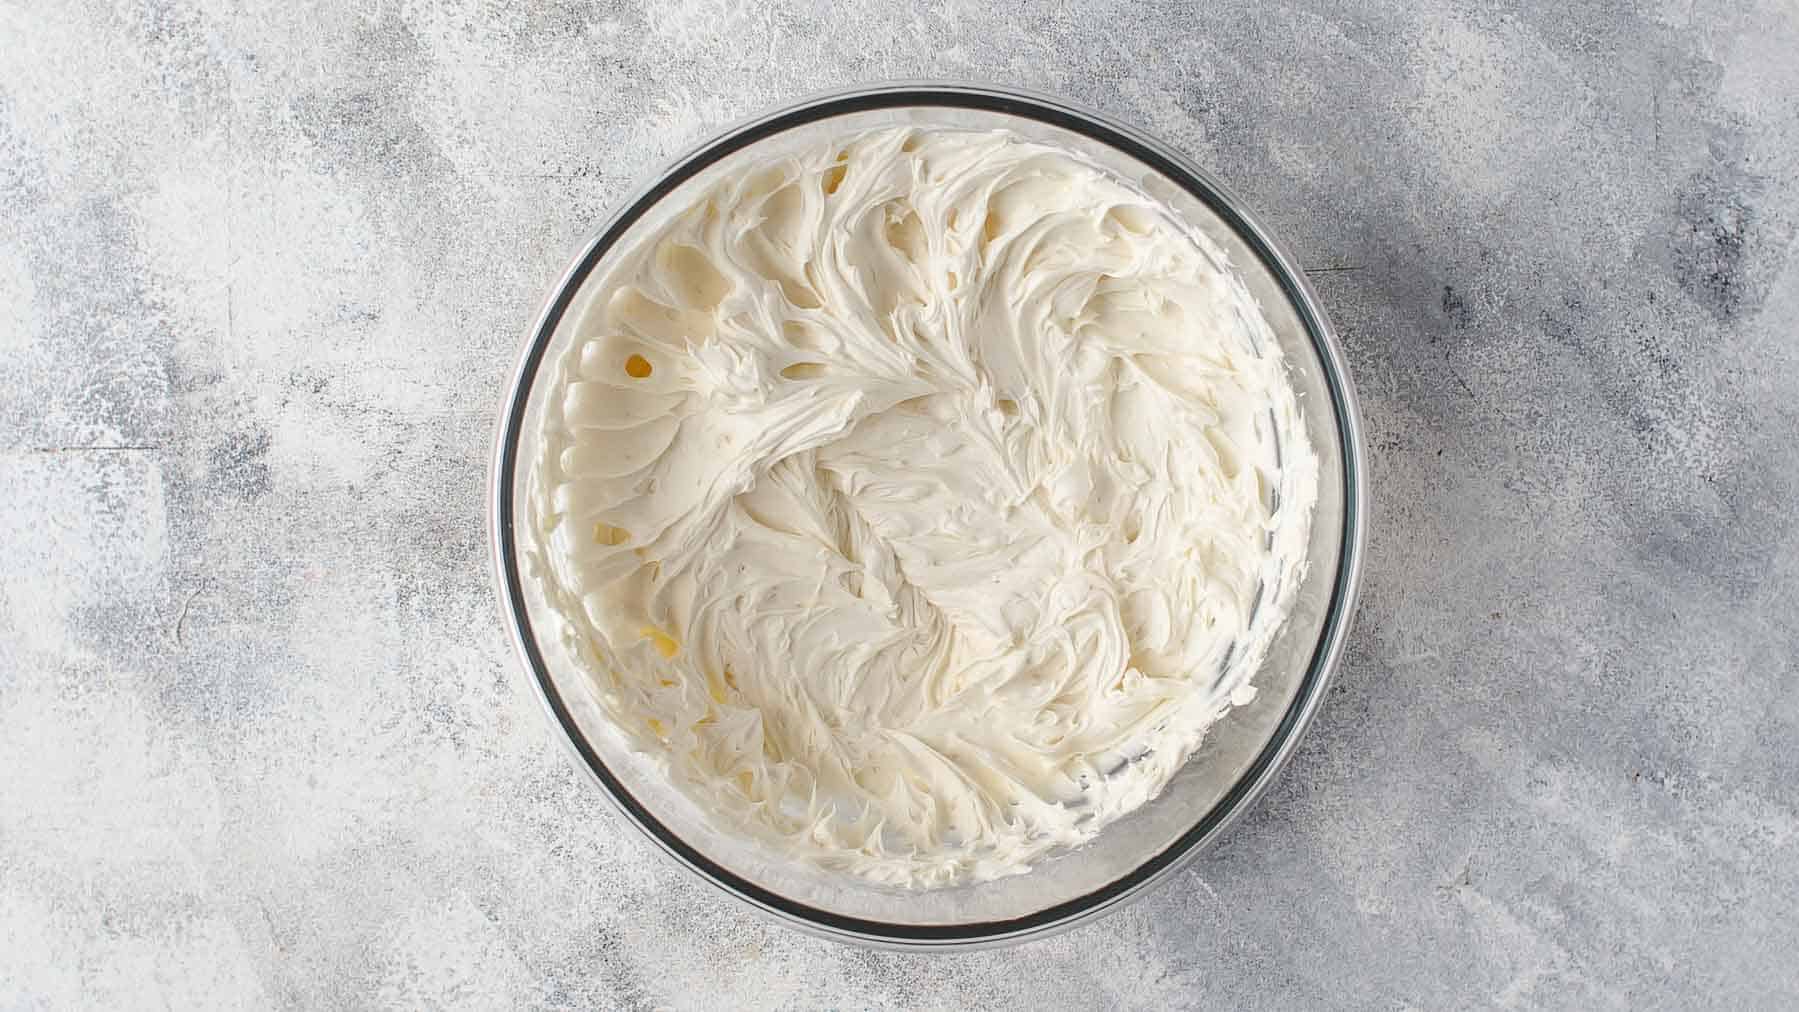
That's how the mixed frosting looks like.
Assemble
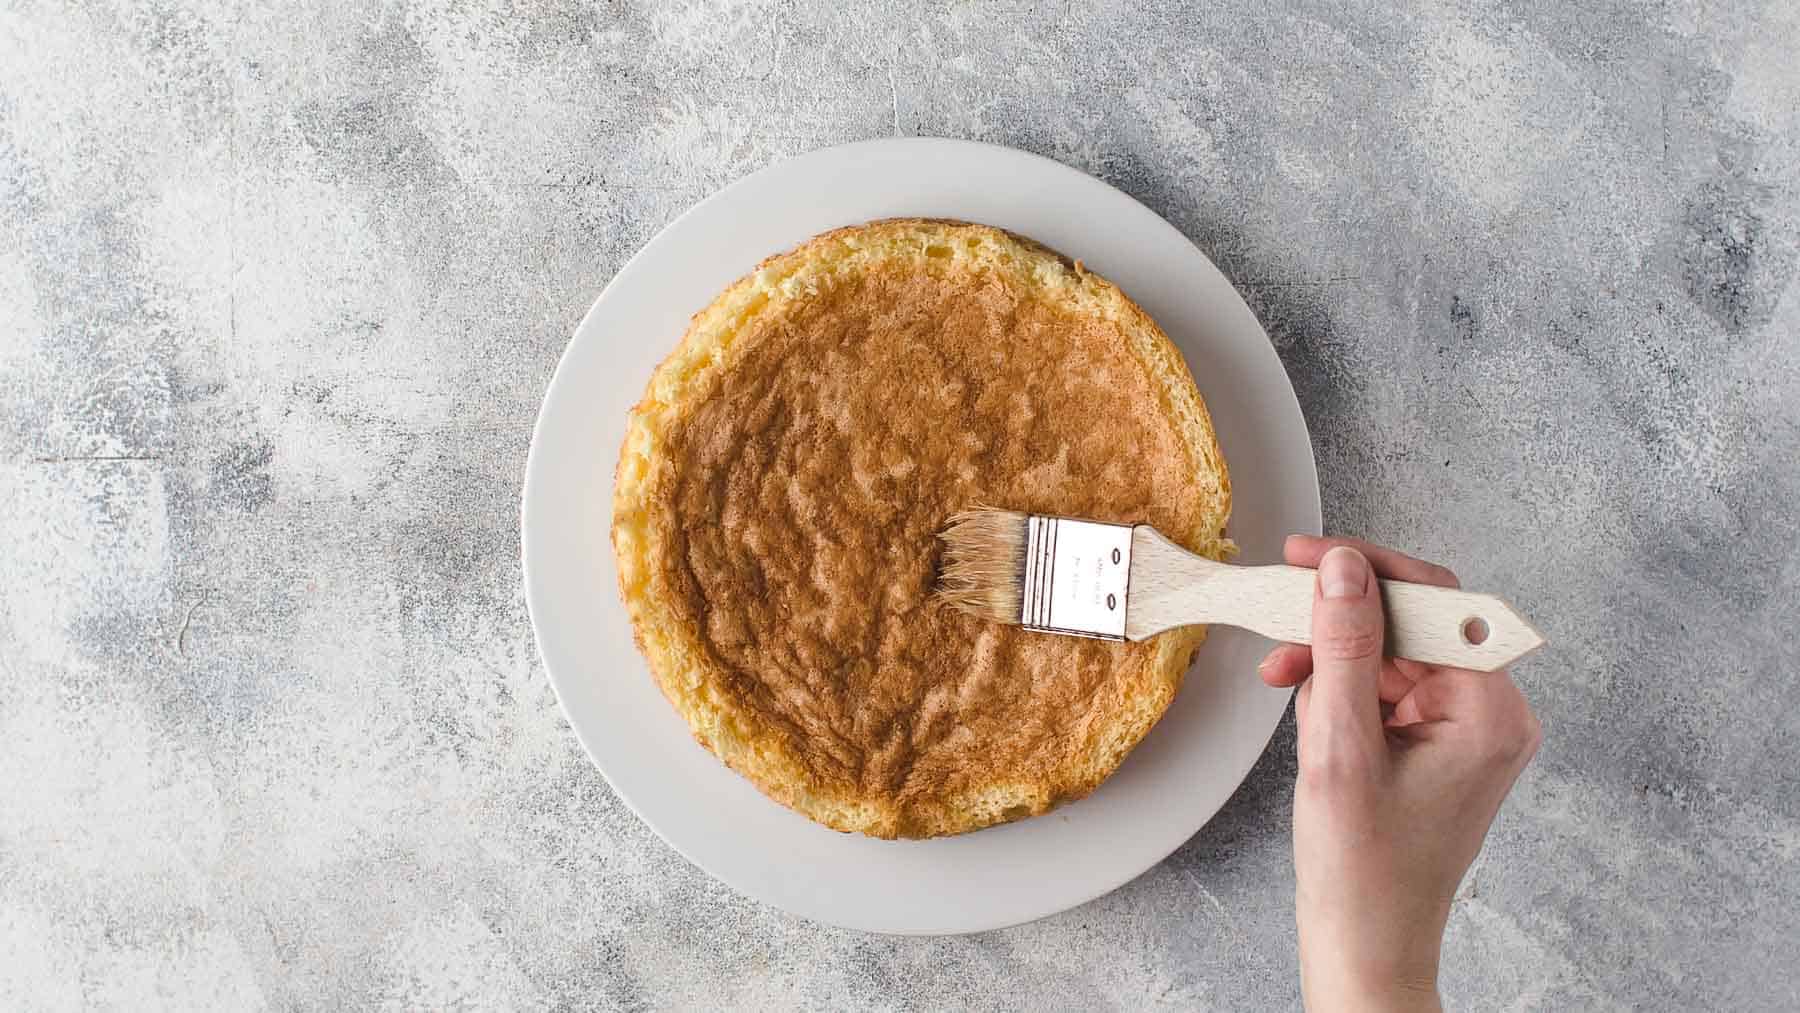
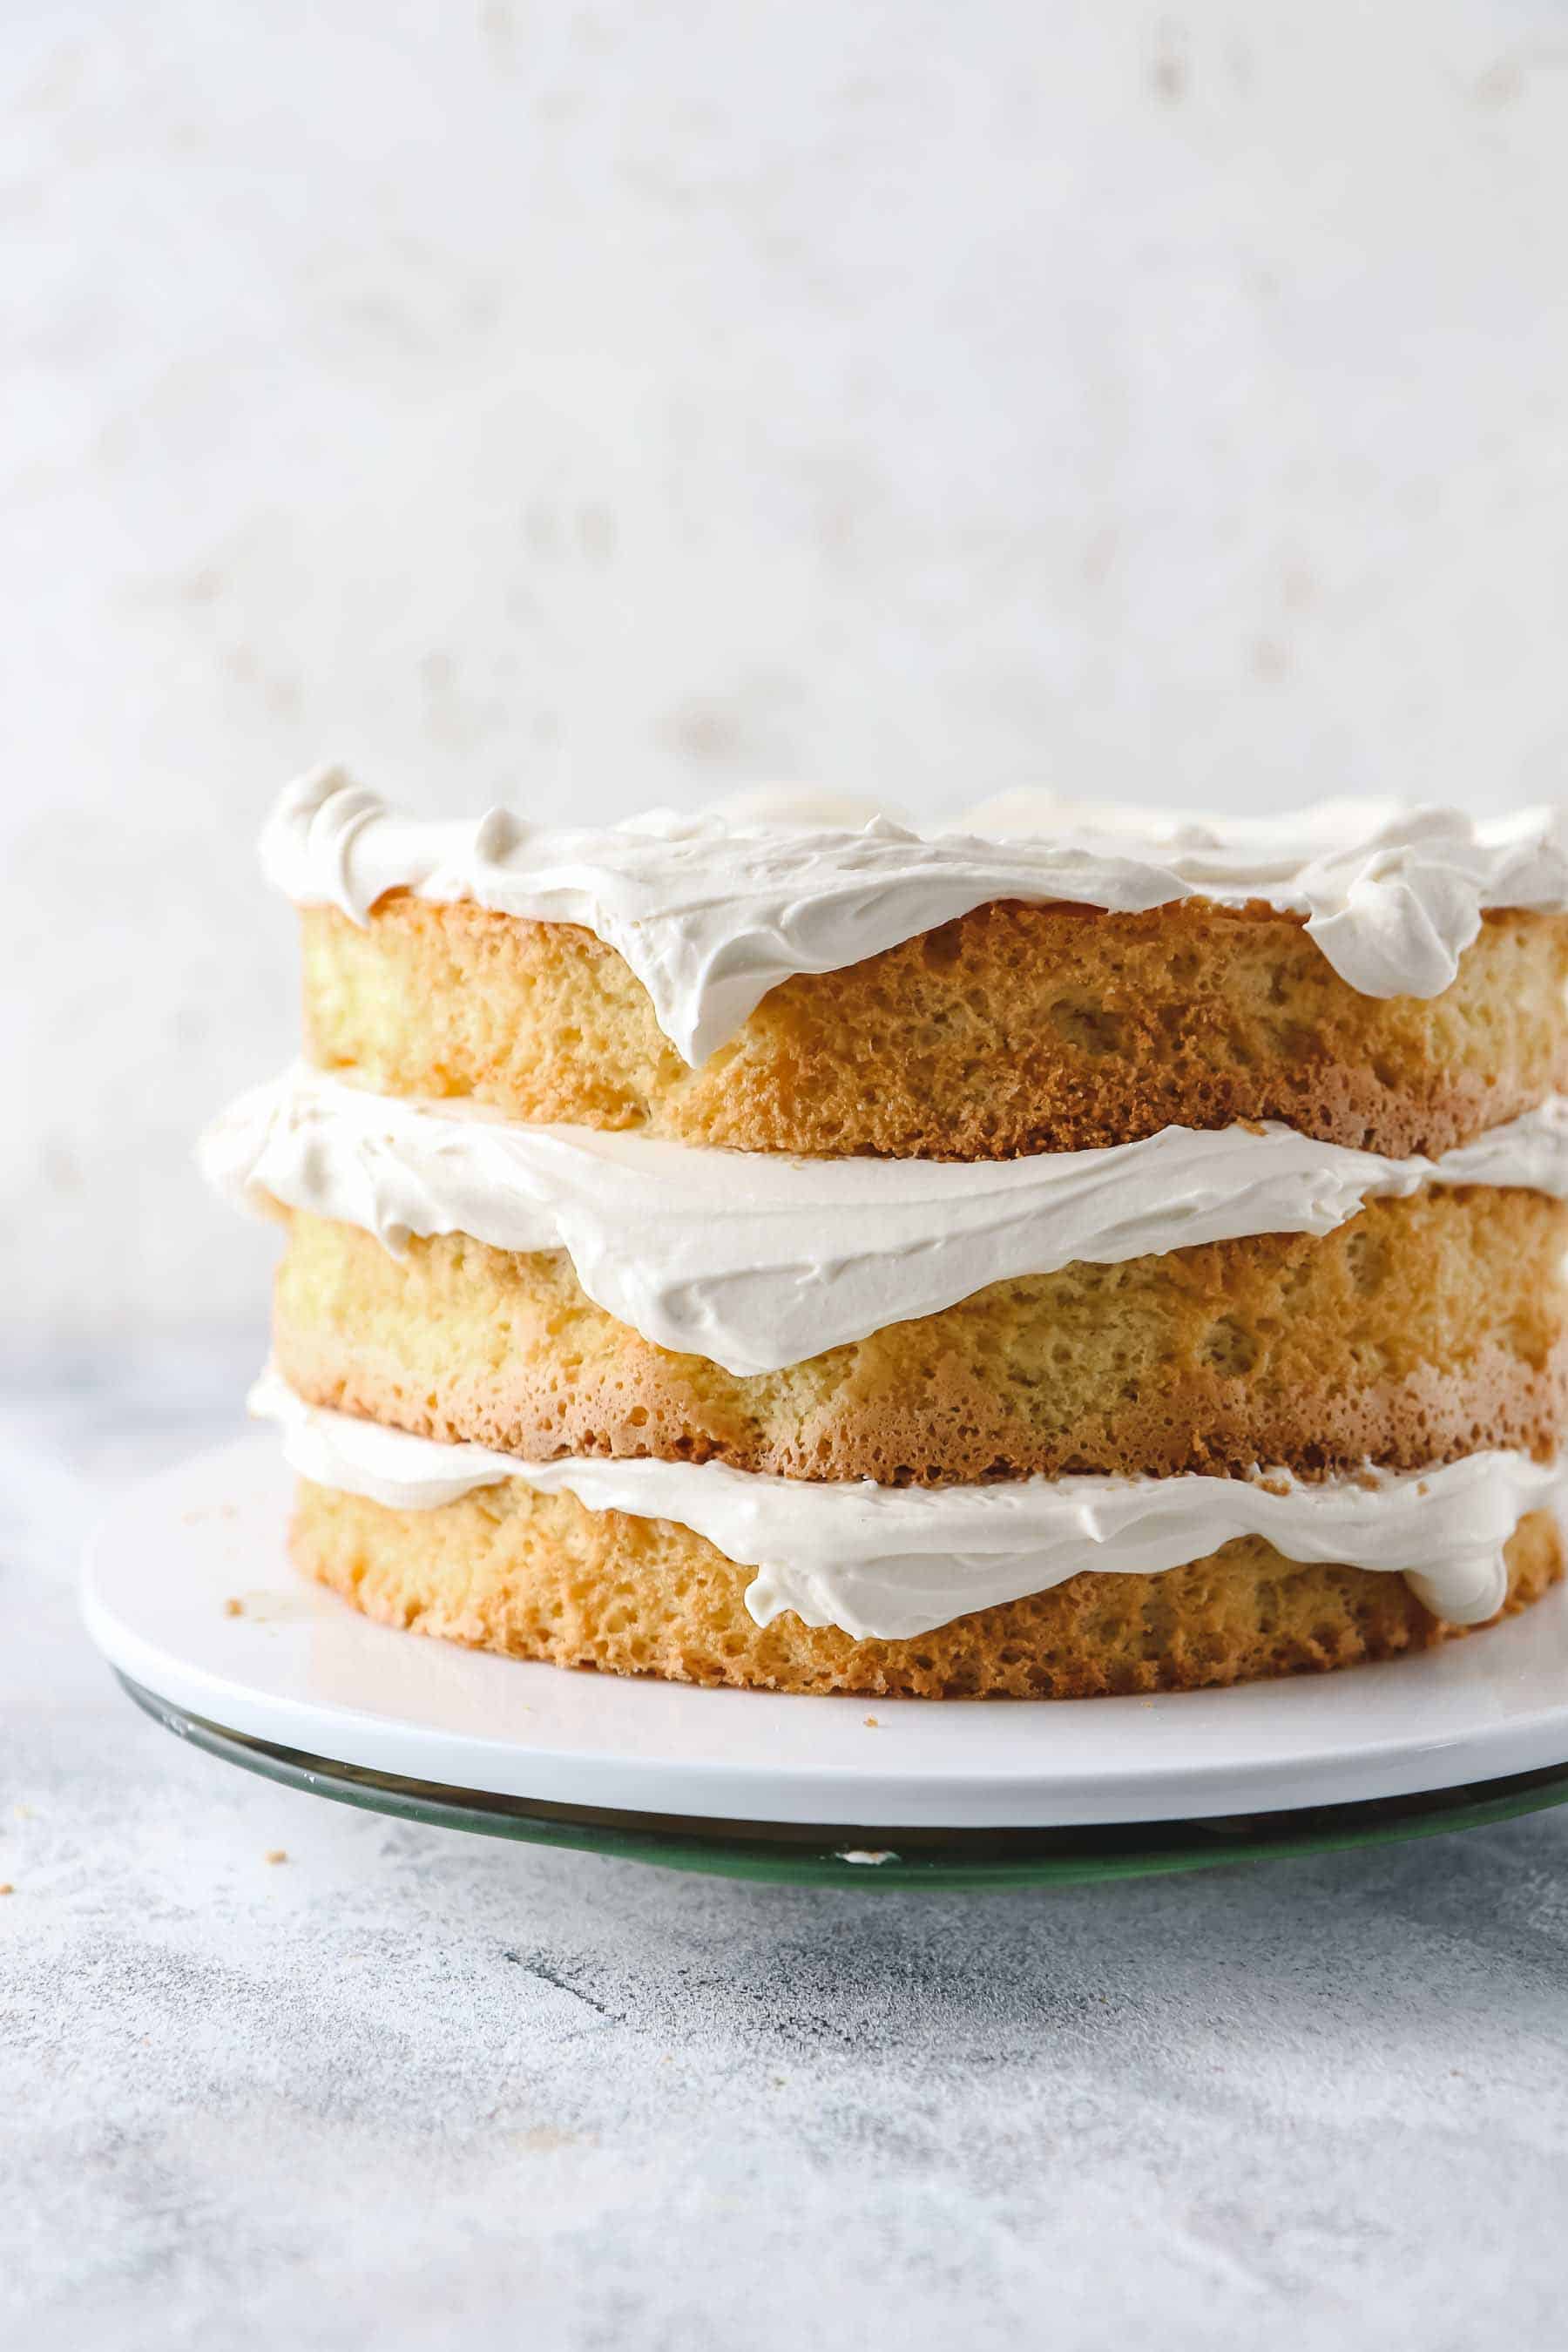
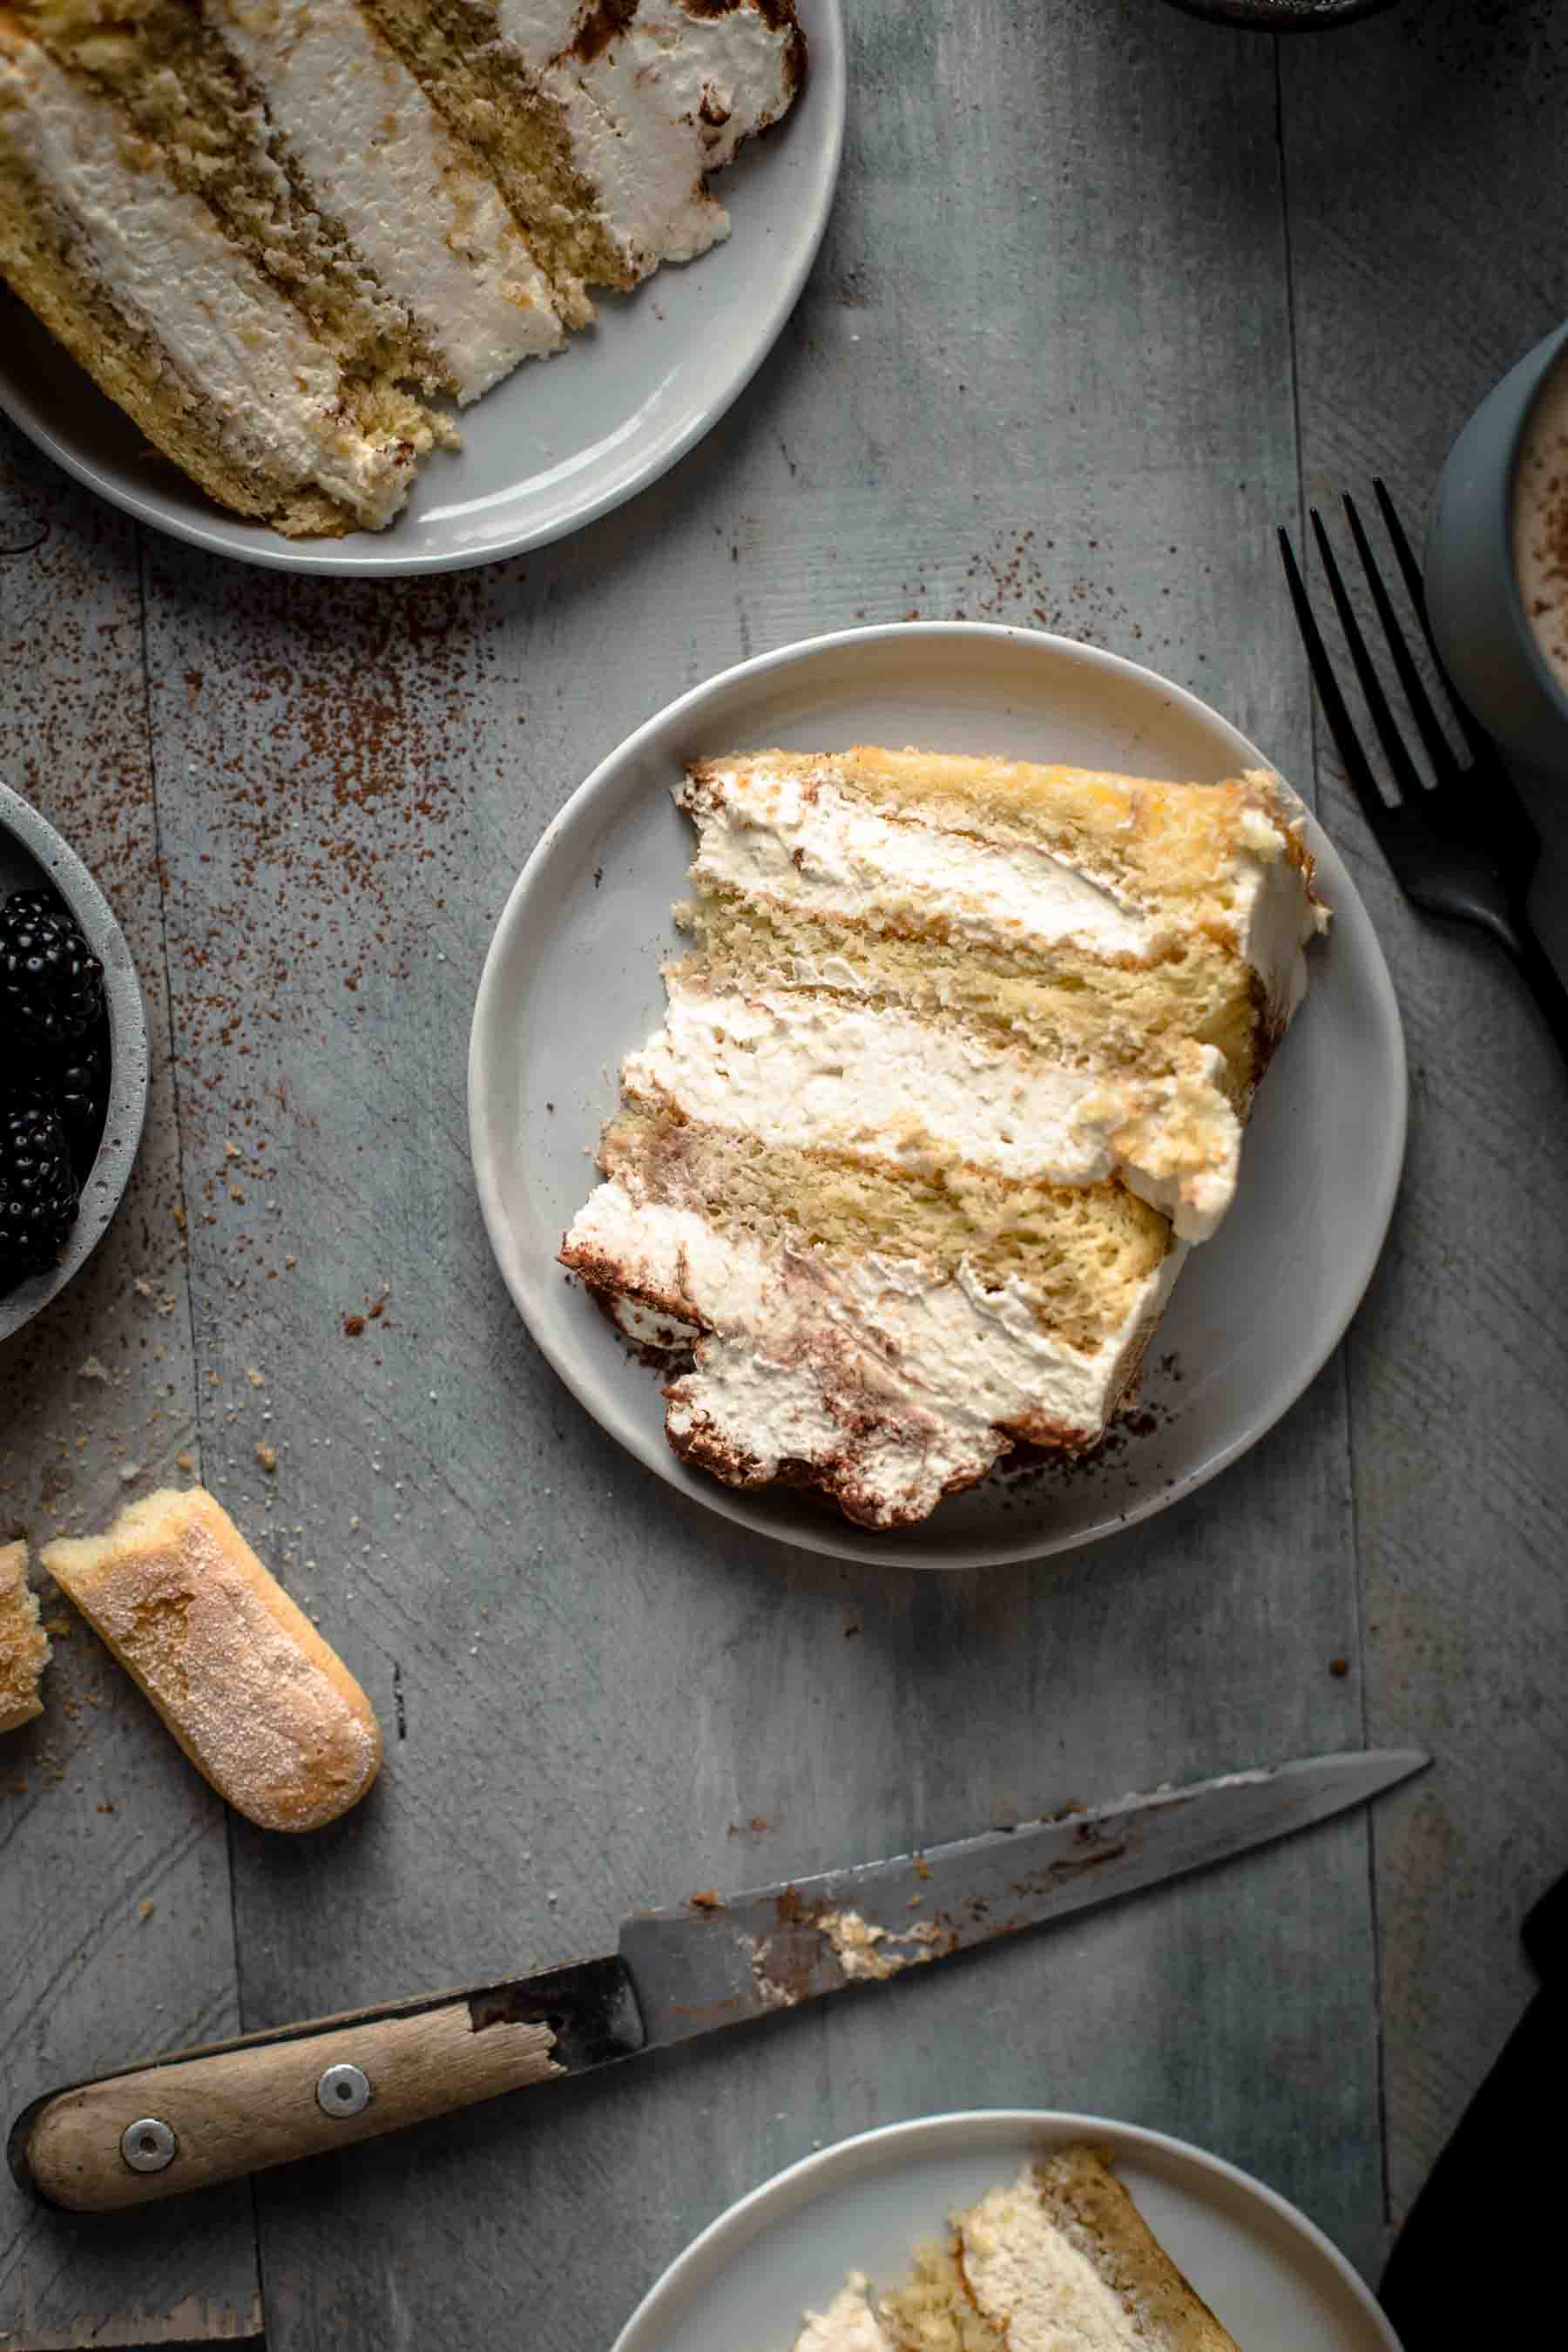
Now we assemble the cake. Cut off the edges of the cake layers to create a flat surface if needed. Then place the first layer on a cake turner or plate. If you have a cake turner, use it. It's easier to frost cakes with a cake turner. Lightly brush the cake with strong coffee.
The more coffee you use, the more intense the taste will be, but it will also be wetter. Less coffee leads to lighter coffee taste and dryer cake layers. I used ½ cup of coffee because for me it was the best balance of coffee taste and consistency.
If you want to adjust the amount of coffee to your taste, I recommend staying in the range between ¼ - ¾ cup coffee. With ¼ cup the taste will be very light. With ¾ cup of coffee, the cake will be wetter, and the coffee might leak around the cake, the longer it stands in the fridge.
Top with about ⅓ of the mascarpone cream and spread evenly.
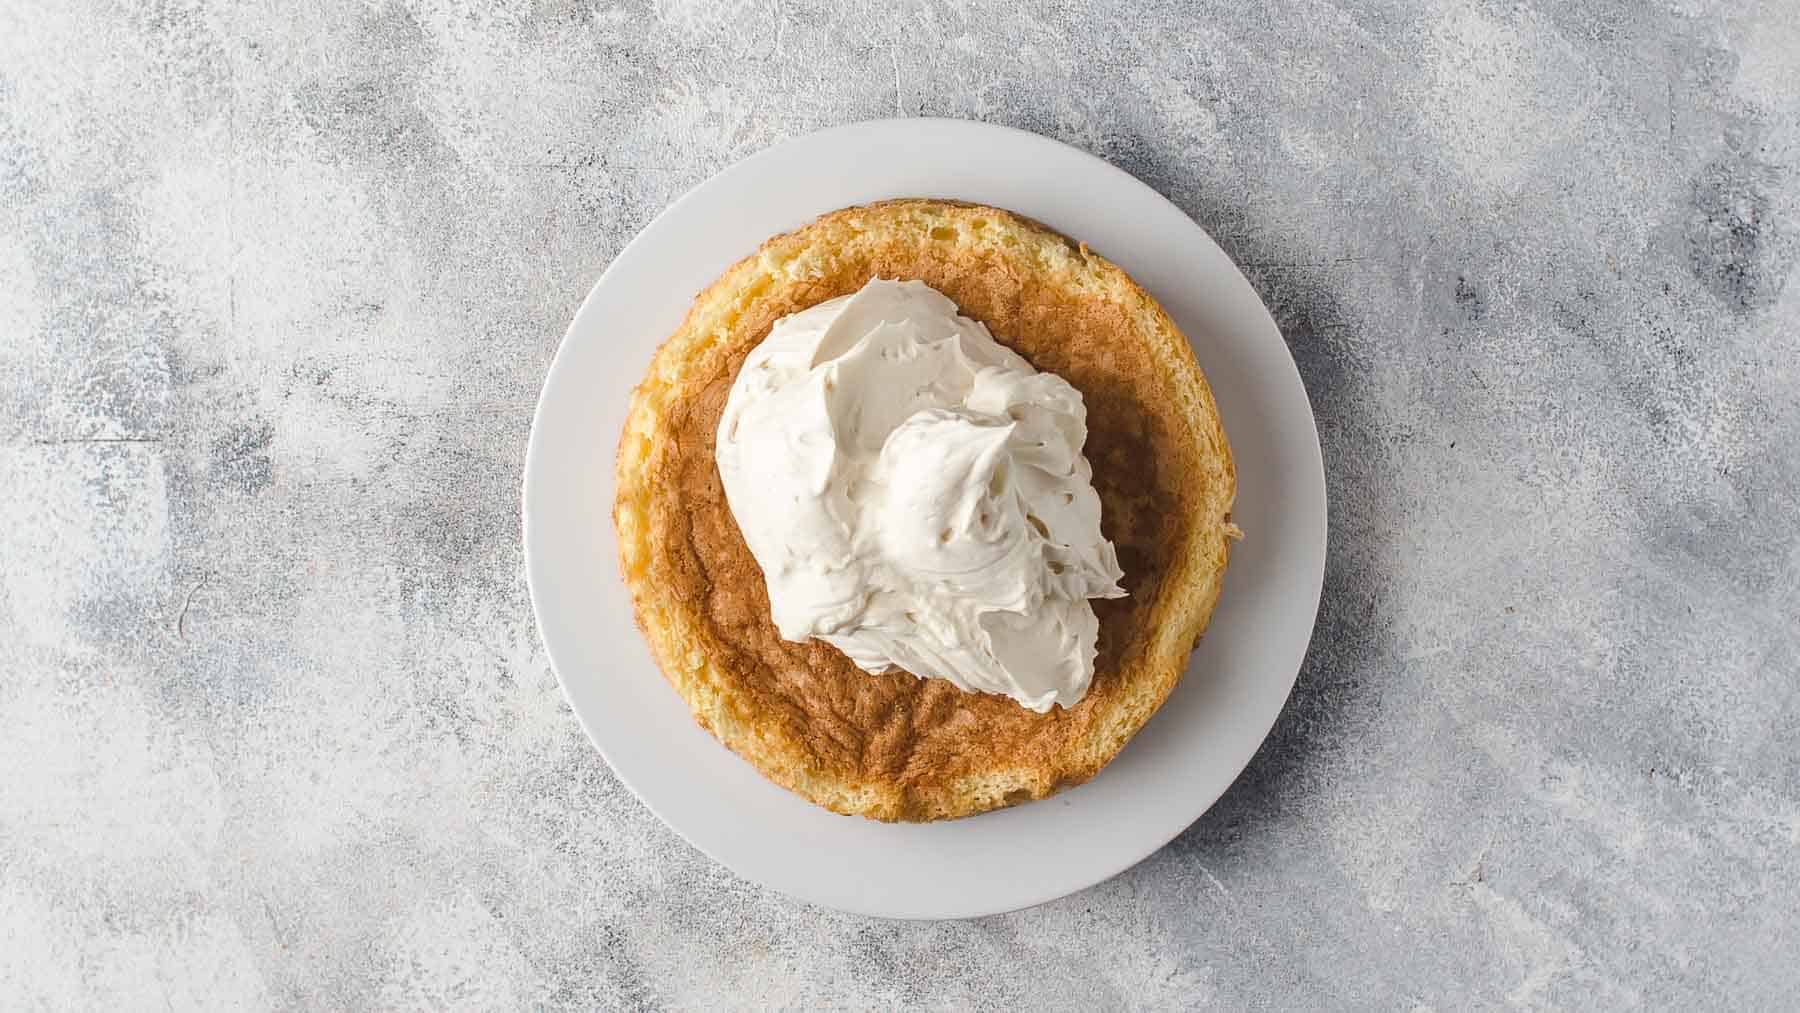
Make sure that you spread every layer of the mascarpone frosting evenly that the cake is straight. Use the last third of mascarpone frosting to level the cake and frost the outside. I use most of the remaining frosting for the top to level the cake. I just lightly frost the sides of the cake because I love naked cakes. If you don't want to make a naked cake, you might want to reserve more frosting for the sides.
The mascarpone frosting should stick out between the cake layers. It makes it easier to frost the sides of the cake more evenly.
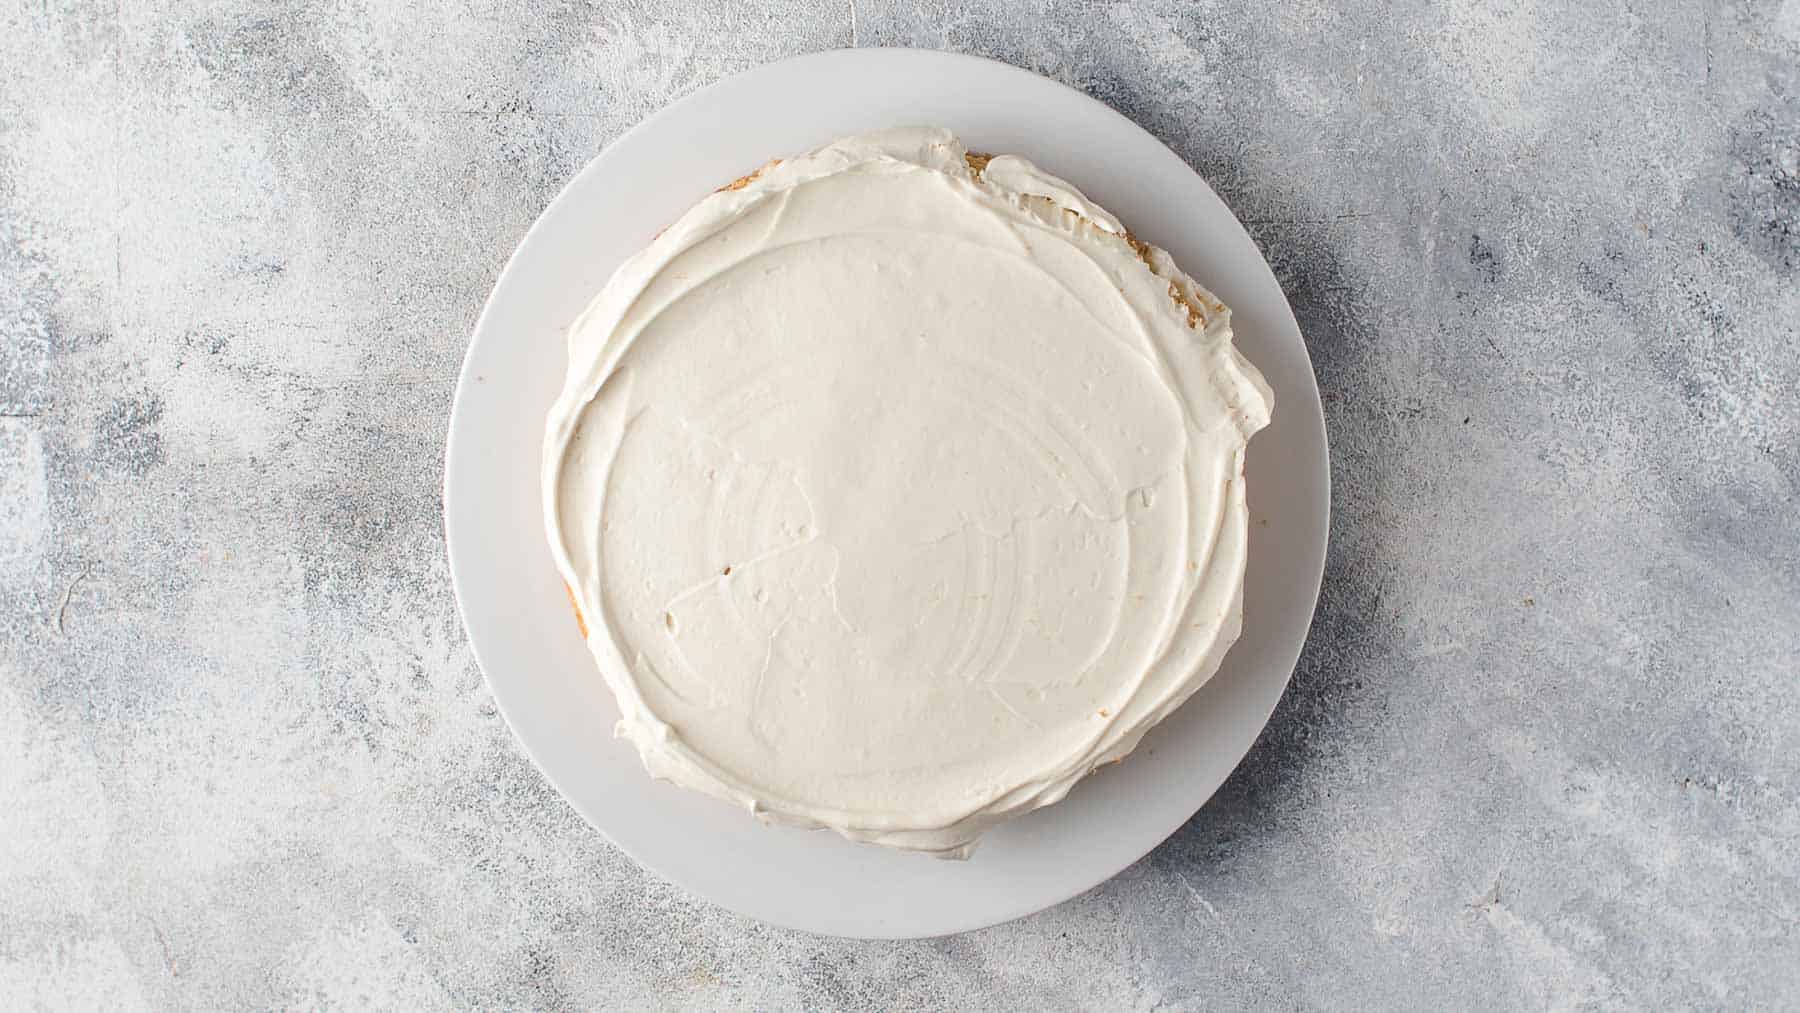
Then level the frosting on the top and sides of the cake with an offset spatula.
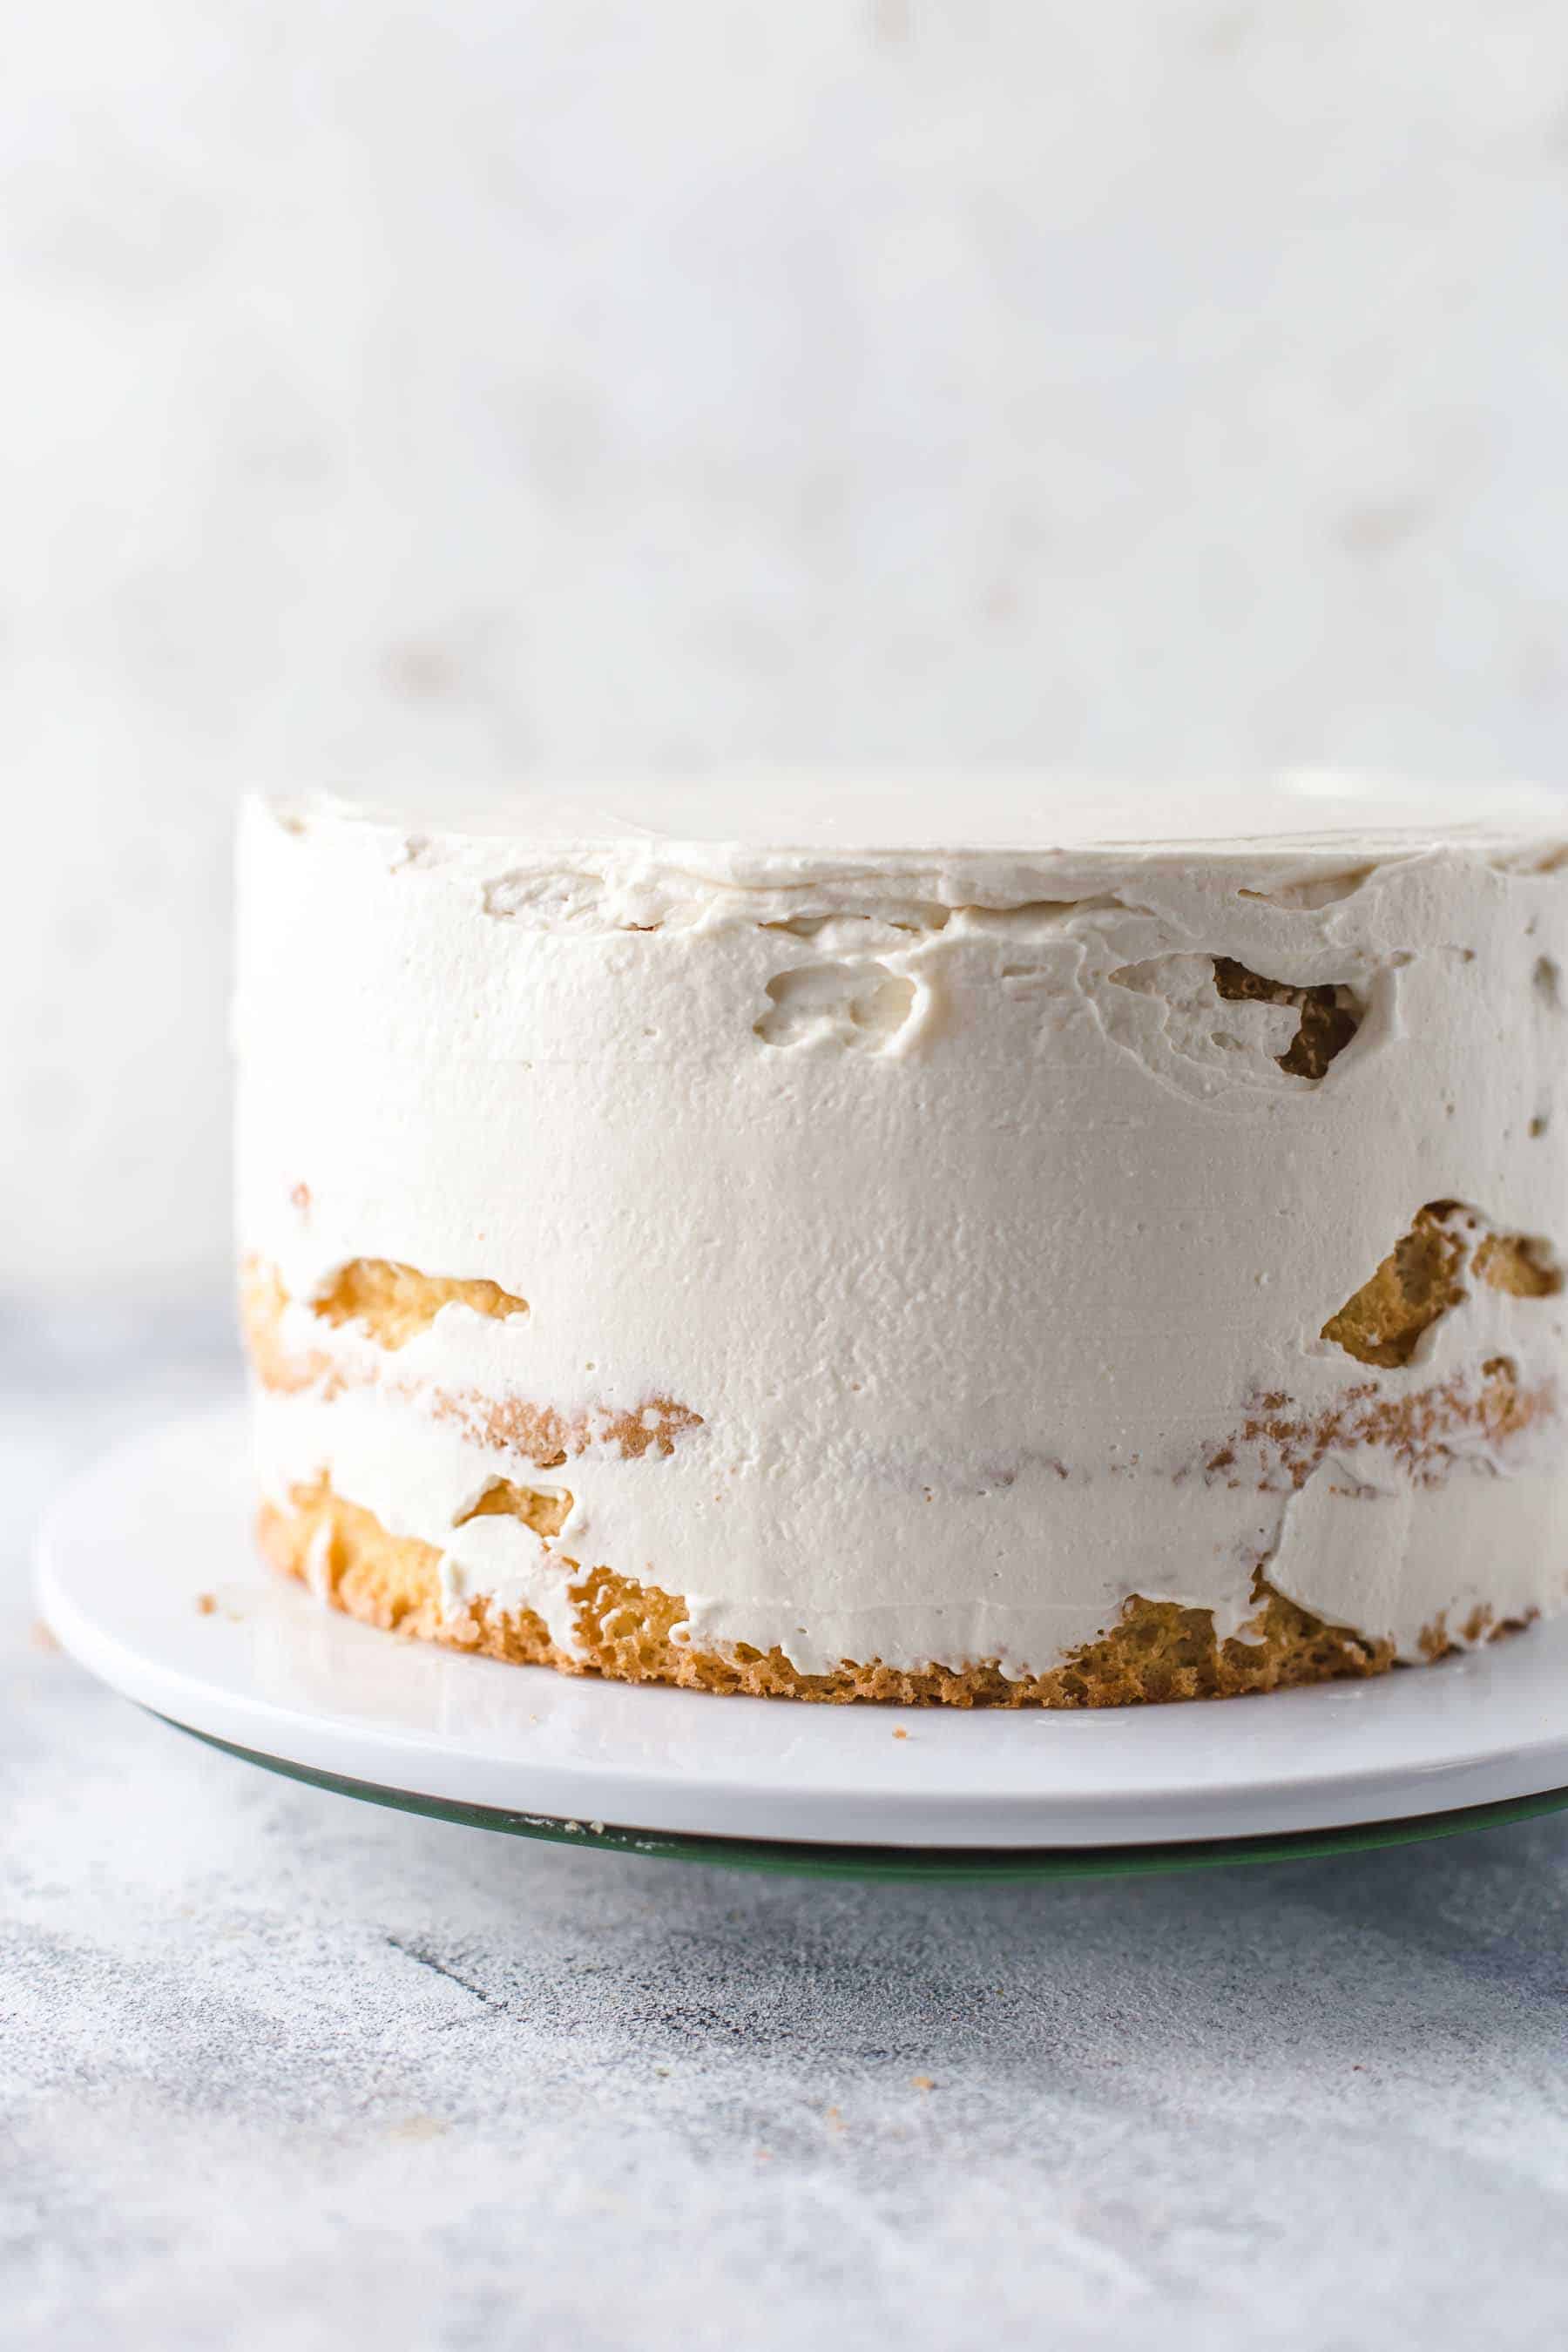
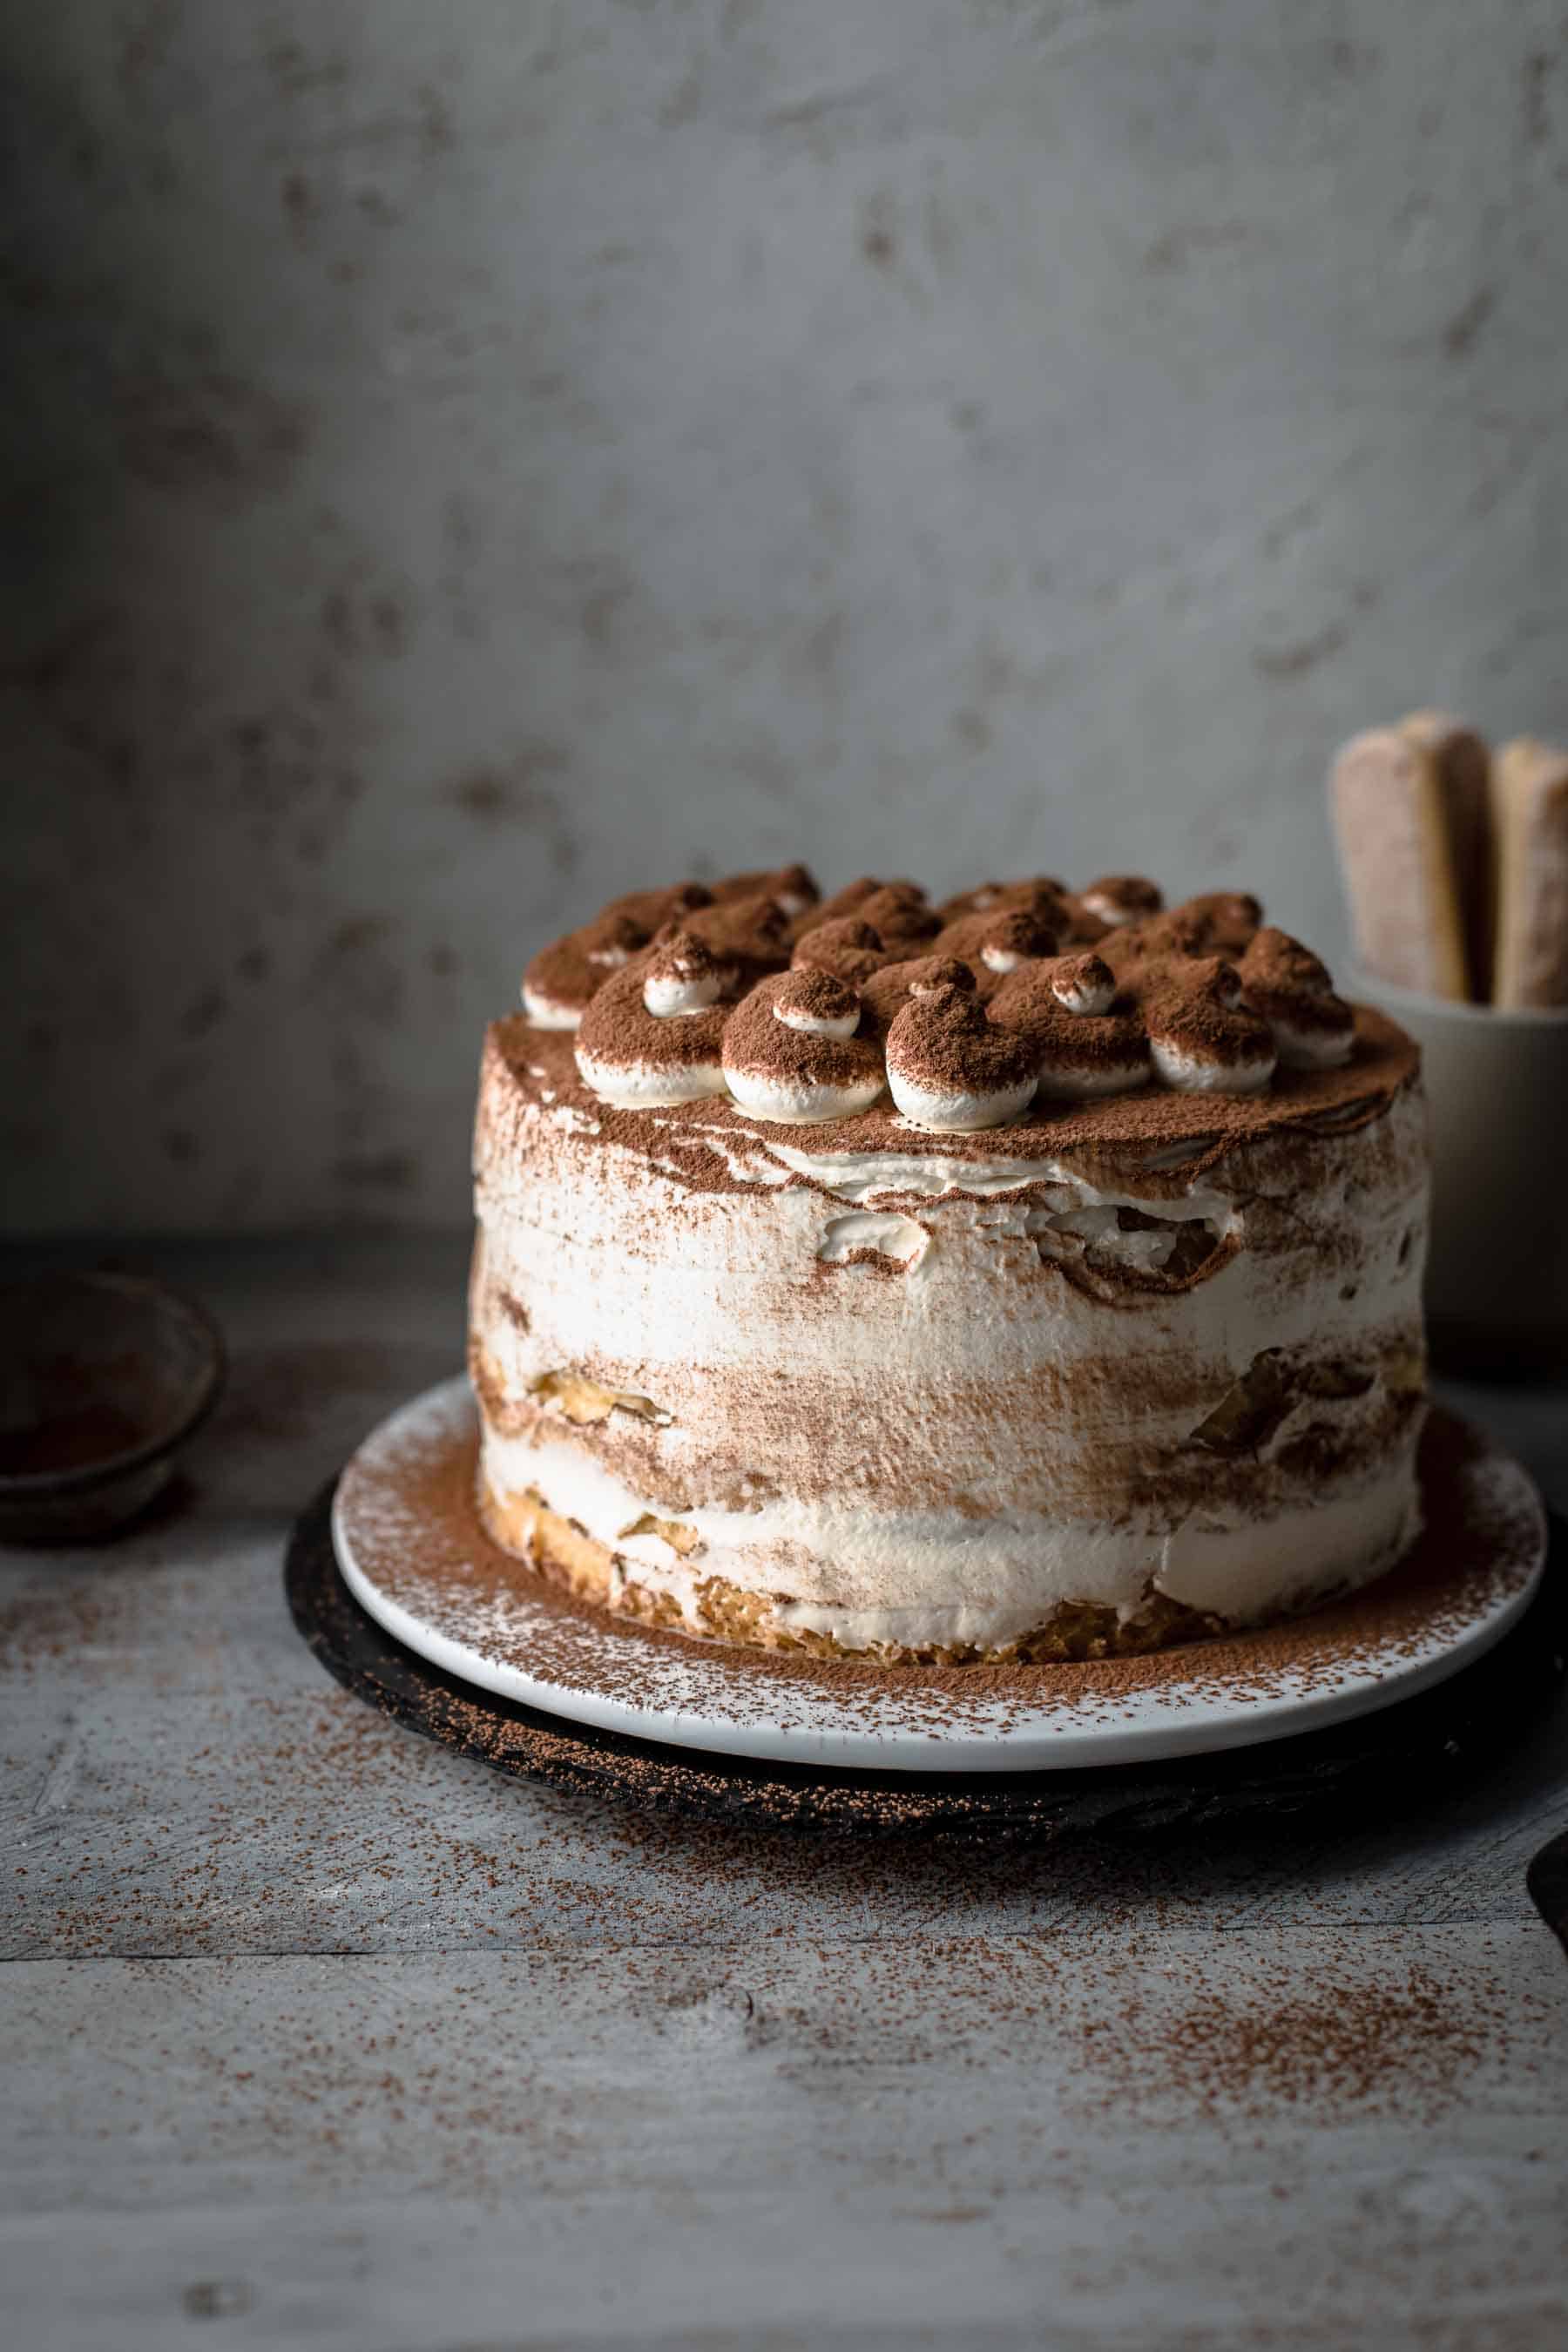
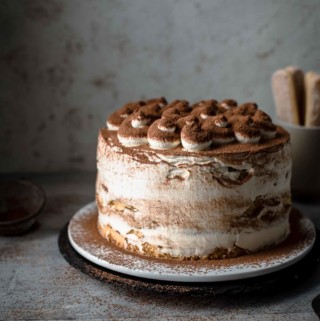
Chill the cake at least 4 hours in the fridge or overnight. Decorate the cake with whipped cream, cocoa powder, or whatever you desire.
Ingredients notes
Espresso
- I usually pick up espresso at my favorite coffee shop as I can't replicate the taste of a professional coffee machine at home.
- However, if you have an awesome coffee machine at home, you can absolutely use your favorite strong-brewed coffee instead.
- If you want to serve this dessert to kids or people that are sensitive to caffeine, you can use either de-caffeinated coffee or use hot cocoa instead.
Mascarpone
- Please make sure that you use full-fat mascarpone and no low-light or substitute product. Also, don't interchange it with ricotta. Ricotta does not work with this recipe.
- The mascarpone must be thick and firm. I buy mascarpone imported from Italy (Galbani), and it is smooth, thick and firm. 100g of this mascarpone cheese contains 42g fat, and it is made of cream and citric acid. However, BelGioioso mascarpone works just as well.
Expert tips for mixing mascarpone successfully
Mascarpone may curdle and looks like cottage cheese within a couple of seconds after starting mixing. It can be very quickly overmixed because of its high-fat content. So, if this ever happened to you, you are not alone. This can happen to everybody and is not related to this recipe, particularly.
- Mascarpone should be used cold and straight out of the fridge.
- Use a large mixing bowl that you have enough place to mix the mascarpone.
- Mix the frosting on medium speed and just long enough until smooth and combined.
- Make sure all frosting ingredients are cold.
- Follow the directions carefully and watch the video and photo tutorial to learn how long to mix at each step and what the frosting should look like.
What does Tiramisu Cake taste like?
It tastes like the Italian coffee-infused mascarpone dessert we all love so much just in cake form. It's a rich and decadent cake with coffee, mascarpone, and cocoa taste.
Storing
Tiramisu Cake needs to be refrigerated. It's not possible to store it at room temperature because of the mascarpone frosting. The cake wouldn't last long, and it would lose its shape when you store it at room temperature. The best is to store it in an airtight container in the fridge. Don't store it open in the refrigerator because the mascarpone frosting would taste like everything you store in your fridge.
Tiramisu cake is best eaten within 2 days but stays fresh up to 3 days. On day three, the cake layers start to get wetter and wetter because they soak the moisture of the frosting. Because there are no raw eggs in the frosting, it's safe to store it up to 3 days.
Freezing
- Assembled cake: After chilling for 4 hours, place the Tiramisu Cake or single slices in the freezer until firm, for about 1-2 hours. Remove the cake from the freezer and tightly wrap in plastic foil twice. Make sure that everything is covered. Then wrap two layers of tin foil around until completely covered. It freezes well up to 2 months. Unwrap the cake and thaw in the fridge overnight. Then decorate with whipping cream and cocoa before serving. Eat within 2 days.
- Cake layers: After baking the cake layers, remove the paper and let cool completely. Then tightly wrap each cake layer in plastic foil twice. Place in freezer bags and remove as much air as possible. Freeze up to 1 month. For thawing, unwrap the cake layers and let sit on the counter for about 1-2 hours. Once it is room temperature, make the frosting and assemble the cake.
More birthday cakes to try
If you love show-stopping birthday cakes like this one, you will love the following recipes as well:
- Mirror Glaze Galaxy Cake
- Sacher Torte
- Black Forest Cake
- Lemon Blueberry Cake
- Chocolate Coffee Cake
- Esterházy Torte
- Strawberry Vanilla Cake
Recipe
Tiramisu Cake
Ingredients
Genoise Cake
- 6 large eggs
- 1 cup granulated white sugar
- 1 cup all-purpose flour, spooned and leveled, then sifted
- 1 tablespoon cornstarch
- ½ teaspoon baking powder
- ½ cup strong brewed coffee, espresso preferred - for brushing
Mascarpone Frosting
- 4 ½ cups full-fat mascarpone, cold
- 2 ½ cups unpacked powdered sugar, sifted
- ½ cup strong brewed coffee - espresso preferred, chilled
- 1 ½ cups heavy whipping cream, cold
Decoration to your preference
Instructions
- Preheat oven to 350°F / 175°C. Line the bottom and the sides of three 8" (20cm) baking pans with parchment paper. Set aside.
- Make the genoise cake: In a large mixing bowl, using a handheld or stand mixer fitted with a whisk attachment, whisk eggs on medium speed just until combined. Add sugar and whisk on medium-high speed for about 10-12 minutes until white pale, foamy and tripled in size. (It takes 3-5 minutes longer with a handheld mixer compared to a stand mixer). To know if you have the right consistency, let a bit of batter drip off the whisk attachment on top of the mixed batter. The dripped batter should be visible for 10 seconds before it sinks into the batter. If it sinks earlier, you need to whisk longer.
- With a wooden spoon, fold in flour, cornstarch baking powder carefully. Don't overwork the batter and don't work too fast otherwise, it will lose too much air. Divide in prepared baking pans and bake for 20-22 minutes until a toothpick centered in the middle comes out clean. Let cool in the pans for 5 minutes. Then remove from pans and remove the paper immediately. Transfer to a wire rack and let cool completely.
- Make the mascarpone frosting: Whisk mascarpone on medium speed until creamy for about 2 minutes. Add powdered sugar and whisk until creamy and combined another 1-2 minutes. Add coffee and whisk until well combined and creamy for about 2-3 minutes. Stir in heavy cream and whisk until fully combined and creamy for another 2-3 minutes.
- Assemble the cake: Place the first cake layer on a cake board or cake stand. Brush with a third of the ½ cup coffee.* Then spread ⅓ of the mascarpone cream with an offset spatula on top. Repeat one more time. Place last cake layer on top and lightly frost the outside and the sides of the cake with the remaining frosting. Level the top and sides with the offset spatula. Chill at least 4 hours in the fridge.
- Pipe whipped cream on top if desired. Then dust with cocoa just before serving. Store leftovers in an airtight container in the fridge up to 3 days.
Notes
Video
You can find the video in the post above. If you don't see a video, please check your browser settings.
Angela
What a fabulous idea! I love how simple the ingredients for the cake! I can’t wait to try this!
Sabine
I hope you like it! Thank you so much!
Randi
I want to try this recipe. Can you please tell me how to make the coffee? I'm not a coffee person and don't know measures for making strong coffee. Please tell which coffee that I need to buy and how much I have to add to make the coffee. From New Zealand.
Sabine
I'm not a coffee drinker myself. I always buy a good espresso at a coffee shop. I tried to make my own coffee with powdered coffee and water and can't recommend it. The investment in good coffee makes all the difference.
Nancy
Since the whipped cream isn’t stabilized will it’s shape last on the cake?
Sabine
The frosting needs to be spreadable and stabilized when frosting the cake. It will hold its shape.
Nancy
Thx. I meant the whipped cream piped on top. I ended up adding a little marscapone to it and it’s holding its shape. The frosting came out perfect no problems. Only my layers were thin. Didn’t look as thick as yours. Nice recipe.
Cheryl
To be honest, I was scared to try this recipe because some reported problems with the icing not thickening up etc. But this tiramisu cake looks by far the best so I was tempted to try it anyways. I’m so happy I did! I do not understand the problems with the icing because it was easy to make and came together within a couple of minutes. Thank you very much for the very detailed recipe! It’s very delicious!
Sabine
Cheryl, Thank you so much for your feedback! I’m so happy that you succeeded and liked it!
Michelle
Hi Sabine,
I just baked the cakes and they look great. The icing...not so much. I followed directions to the T and used Italian marscapone (BelGioioso). I used a hand mixer like you did in the photos & video however, it curdled and I couldn’t get it to mix. I strained it and transferred it to my stand mixer to try it again but it curdled. I kept at it thinking it would finally come together but no luck. I tossed it. My husband is getting more marscapone so I can try it again. Do you think I should use my stand mixer instead of the hand mixer and if so, should I use the paddle or the whisk attachment? Thanks so much!
Sabine
Hi Michelle, Because of the high-fat amount Mascarpone can curdle quickly when beaten too long and with high speed. So please make sure that you just mix on medium speed and just 1-2 minutes. Please use a large mixing bowl. The mascarpone must be cold. If it’s a stand or hand mixer with a whisk or paddle attachment doesn’t matter. However, curdled mascarpone can be saved. Please google “mascarpone curdled” and you will find suggestions from heating it up to mix in whipping cream to using an immersion blender to fix it. Hope that helps!
Michelle
Hi Sabine,
Thanks for getting back to me so quickly the day before Easter (and I apologize it's taken me so long to reply). I wound up tossing the first batch, buying more cheese and trying again. The same thing happened but I was able to uncurdle it with a little cream. The problem is that it never thickened up again. I don't know what I did wrong-I followed everything to a T (I weighed instead of measuring, everything that need to be cold was used straight from the fridge...). I know whatever it was that it wasn't the recipe since other people have been successful. Oh well. Thank you so much for your feedback (and for posting delicious looking recipes). I really appreciate it.
Anna
Hi,
I’m making the cakes now for tomorrow. My question is, can I brush the coffee on the cakes, wrap them in saran wrap and keep them in the fridge over night or should I just wrap them and brush them tomorrow morning. I have other things to cook in the morning and wanted to save some time.
Thank you.
Sabine
Hi Anna,
I would brush them just before you assemble and frost the cake. Store the baked cake layers in an airtight container at room temperature until you assemble and frost the cake.
Happy Easter!
Anna
Thank you it was deeeeelish!!
Vanessa
Is it possible to make these cupcakes?
Sabine
The cake won't be possible to bake as cupcakes. But you could do a vanilla cupcake and this mascarpone frosting.
maria vasquez
Hello, I would like to know for how long can the tiramisu cake be out of the fridge? I am trying to make it as a wedding cake for my daughter, she loves tiramisu
Sabine
Hi Maria, to be honest, I don’t recommend to let it out of the fridge for a couple of hours. The frosting would get soft and the whole cake would loose stability. It definitely should be stored in the fridge. Like Tiramisu. Hope that helps!
Linda
I made the cake for a birthday party and everyone loved it. Thank you so much for the detailed instructions.
Sabine
I'm happy that everyone liked it! Thank you so much for the feedback!
Sabine
Hello, I would like to try the tiramisu cake recipe and have one question: How big is the cup ? 200 ml or more ?
Sabine
1 cup equals 240ml. Grams and ml are in brackets.