

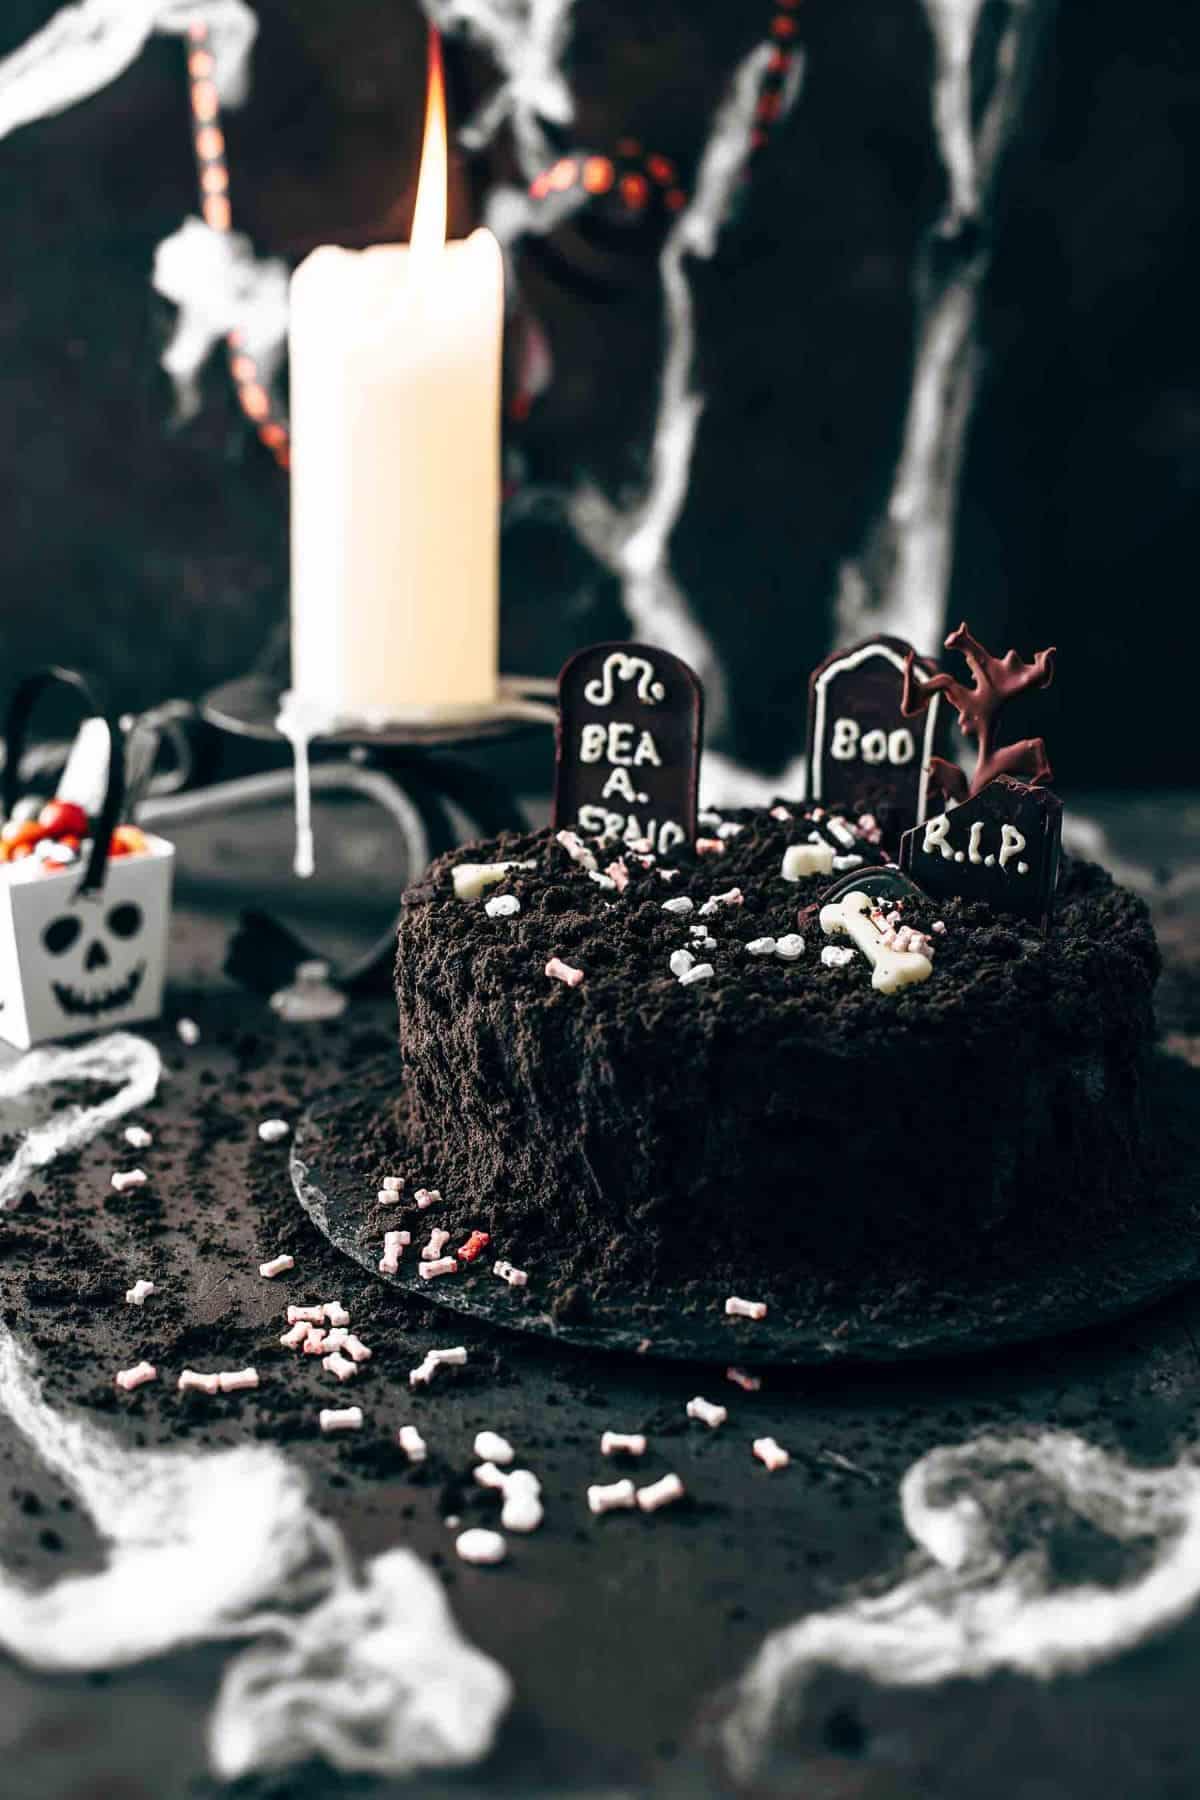
This Death-By-Chocolate Halloween Cake is a perfect Halloween night, and chocolate indulgence is guaranteed!
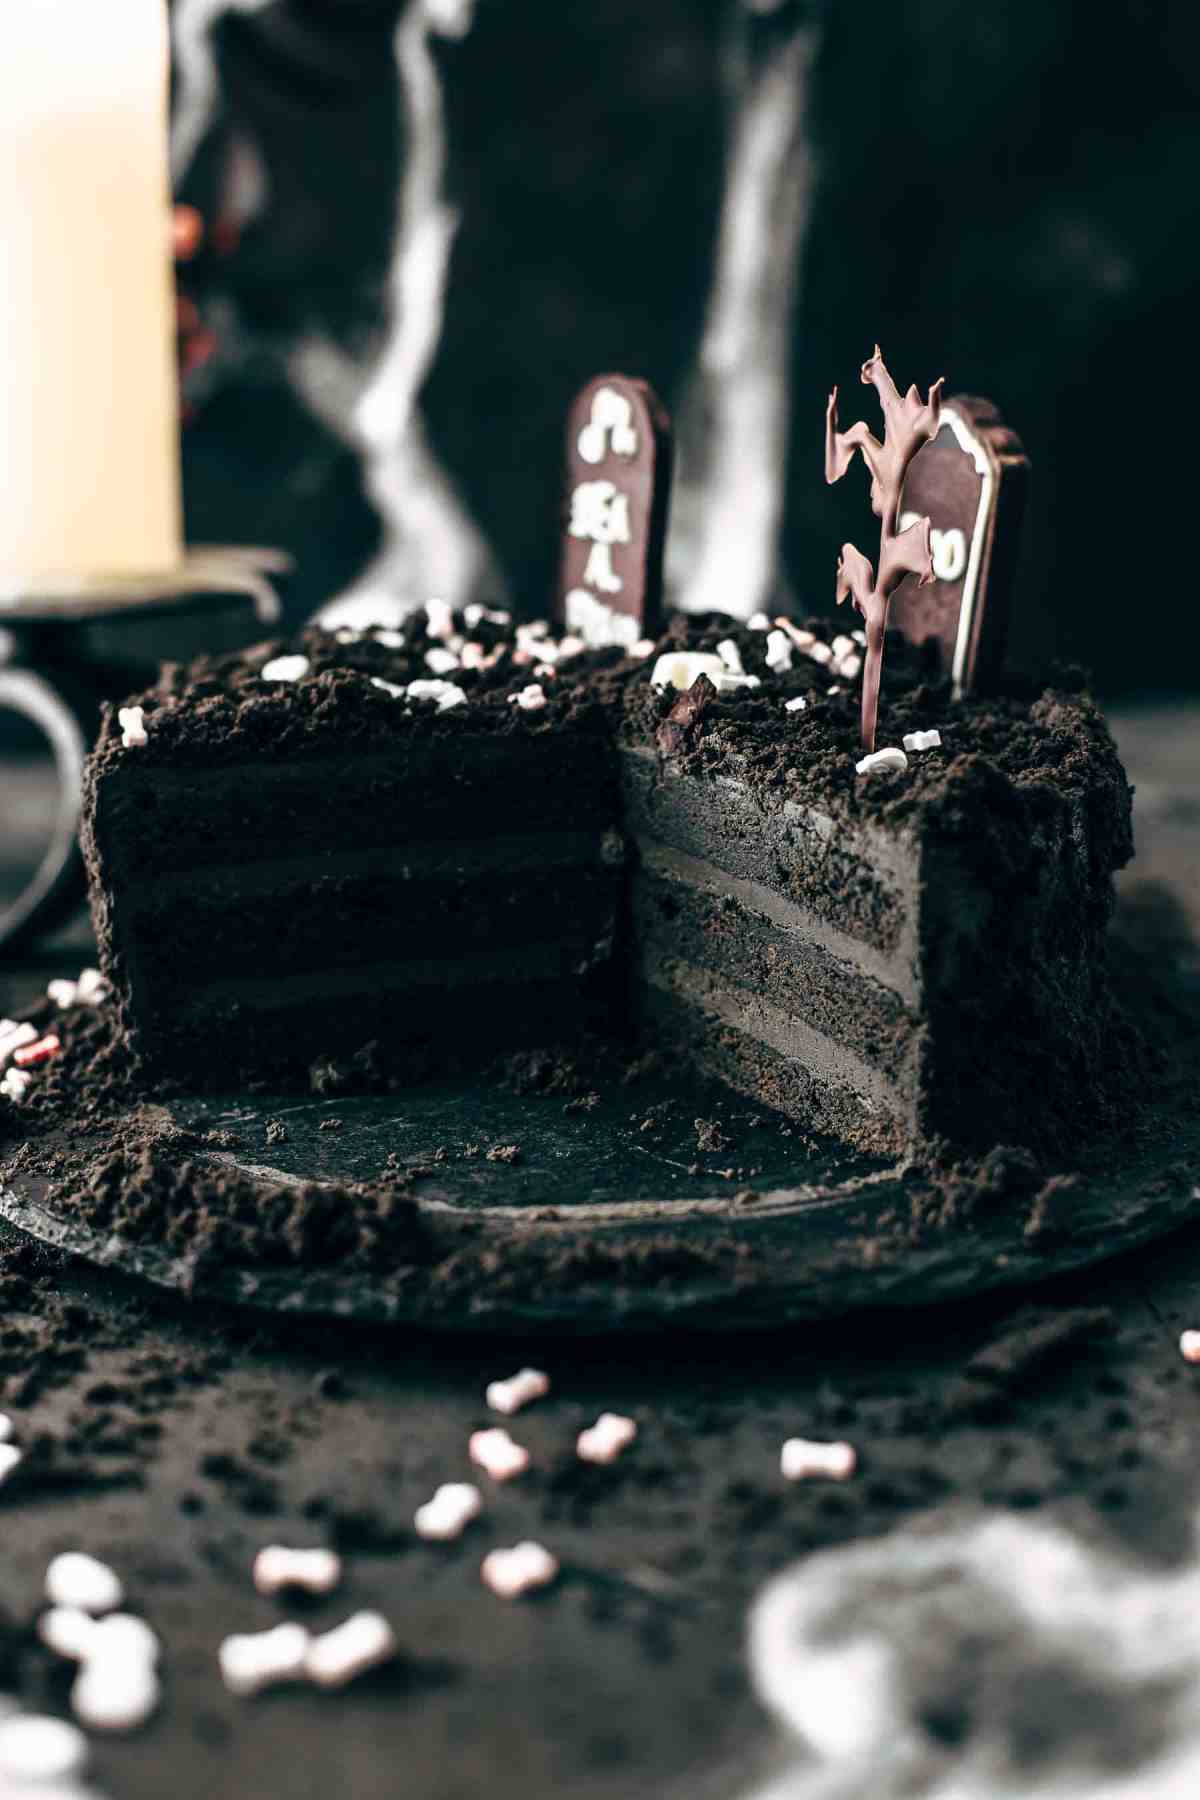
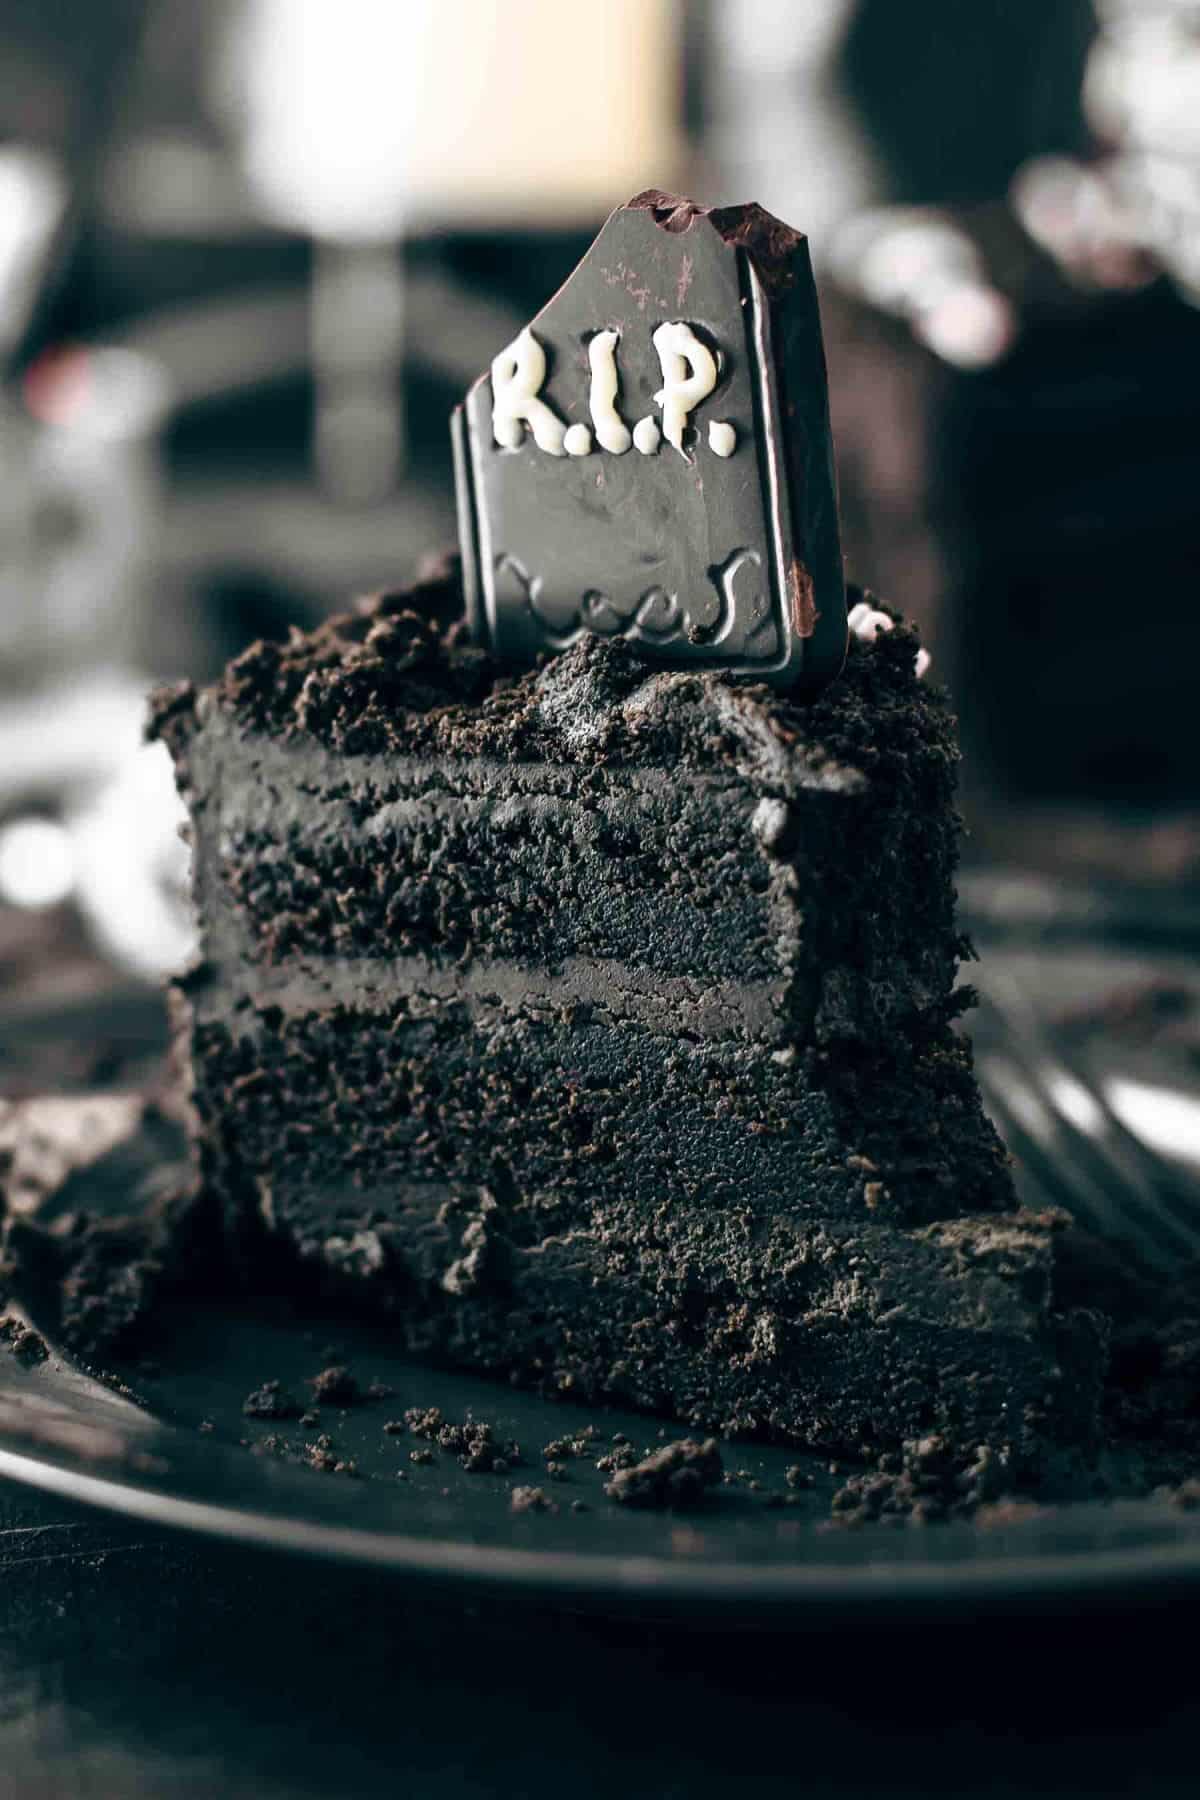
It's a three-layered dark chocolate cake frosted with dark chocolate buttercream and decorated with chocolate cake crumbs. By the way, have you tried my Halloween Cake Pops?
Jump to:
- Video Tutorial
- Why You’ll Fall in Love With This Cake
- Ingredients
- Steps on How to Make the Death-By-Chocolate Halloween Cake
- Let’s Assemble the Cake
- Let’s Decorate the Cake
- Storage Instructions
- Expert Tips for Better Chocolate Cake Layers
- Expert Tips for Better Chocolate Buttercream
- Death-By-Chocolate Cake FAQs
- More Cake Recipes to Try
- Recipe
Video Tutorial
Why You’ll Fall in Love With This Cake
- It’s delicious - This cake offers a delightful combination of multiple flavors and textures with every bite. Imagine biting into a layer of cake crumbs that melt in your mouth, followed by a rich and moist cake, and ends with a flavorful explosion of smooth and velvety buttery cream.
- It’s spooky - This cake has never failed to impress guests with its deep, black appearance. It’s the perfect Halloween cake.
- It’s indulgent and chocolatey - This recipe isn’t called Death-By-Chocolate for no reason! It’s a chocolate cake with a dark chocolate frosting covered in chocolate cake crumbs, after all. This isn’t an overly sweet cake. Instead, it comes with a strong, dark chocolate taste.
Ingredients
For the Death-by-Chocolate Cake Layers
- 2+¼ cups all-purpose flour (270g)
- ¼ cup Dutch-processed cocoa powder (21g)
- 1 tablespoon baking powder
- ½ teaspoon salt
- ½ cup butter, room temperature (113g)
- ½ cup canola or vegetable oil (120ml)
- 1 cup granulated white sugar (200g)
- 2 large eggs
- 1 vanilla bean* (or 1 teaspoon vanilla extract)
- 1 cup buttermilk (240ml)
- 1+½ cups semi-sweet chocolate, melted (255g)
- Black gel or paste food coloring
For the Death-by-Chocolate Cake Buttercream
- 1 cup butter (226g)
- 2 cups powdered sugar, sifted (240g)
- 1 cup semi-sweet chocolate, melted and cooled (170g)
- Black gel or paste food coloring
Steps on How to Make the Death-By-Chocolate Halloween Cake
Learn how to bake and assemble a Death-By-Chocolate Halloween Cake with these simple instructions!
Prepare Your Baking Tools and Ingredients
1. Prepare your baking tools and equipment.
Preheat oven to 350°F (or 175°C). Line the bottom and the sides of three 8" (20cm) baking pans with parchment paper. Lightly grease the sides of the pan with butter or oil so that the paper sticks to the pan. Set aside.
2. Prepare dry ingredients.
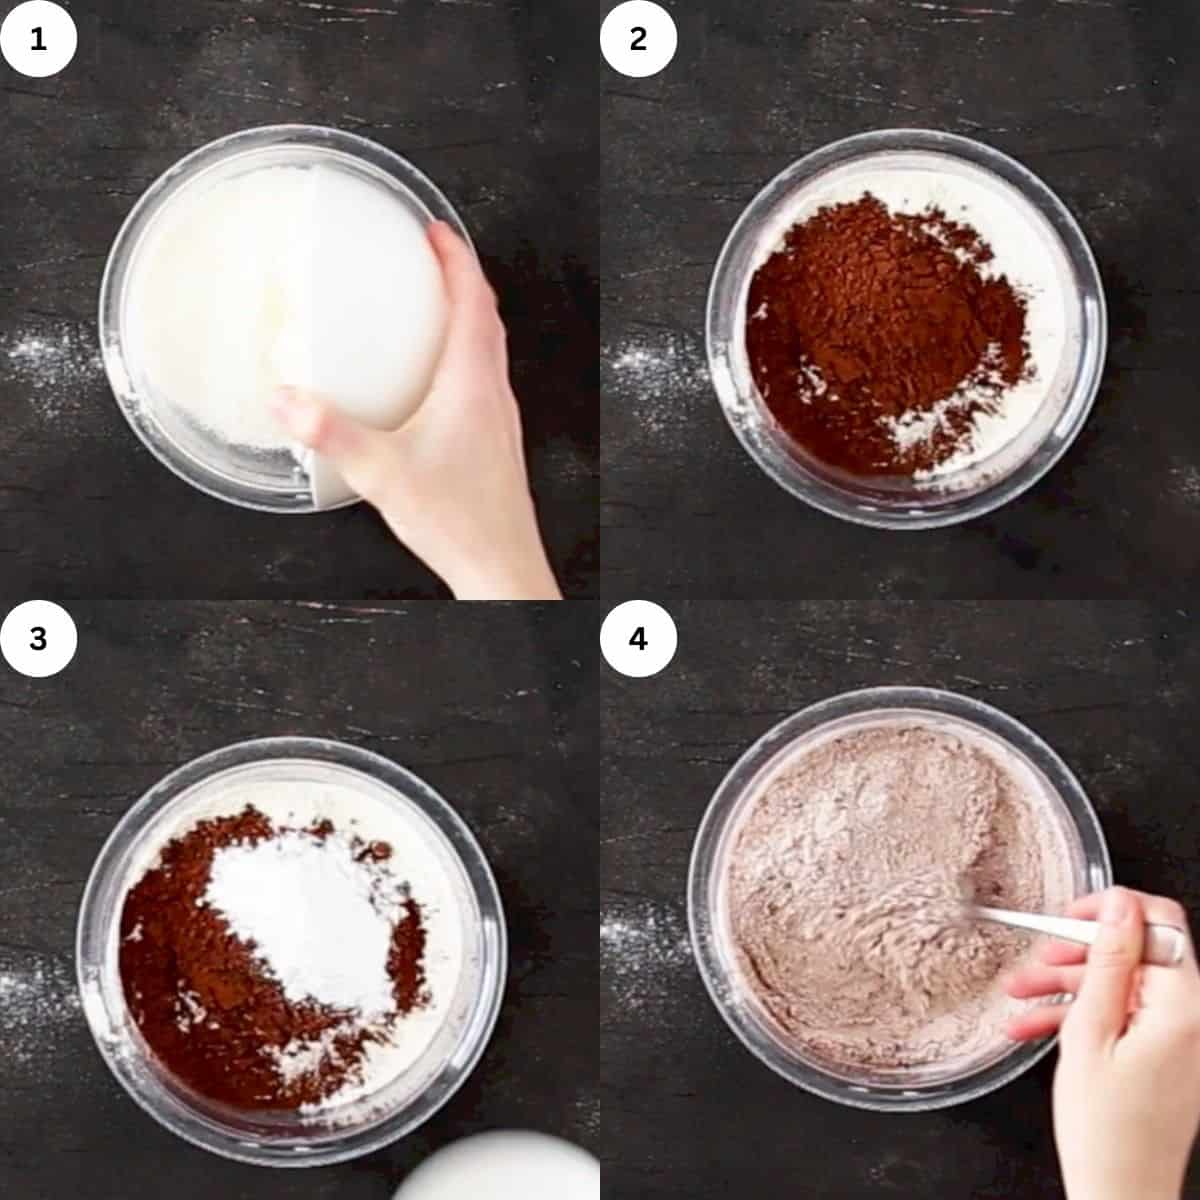
In a medium bowl, combine flour, cocoa, baking powder, and salt and stir to combine. Set aside.
Make the Death-By-Chocolate Cake Layers
1. Whisk butter, oil, and sugar together.
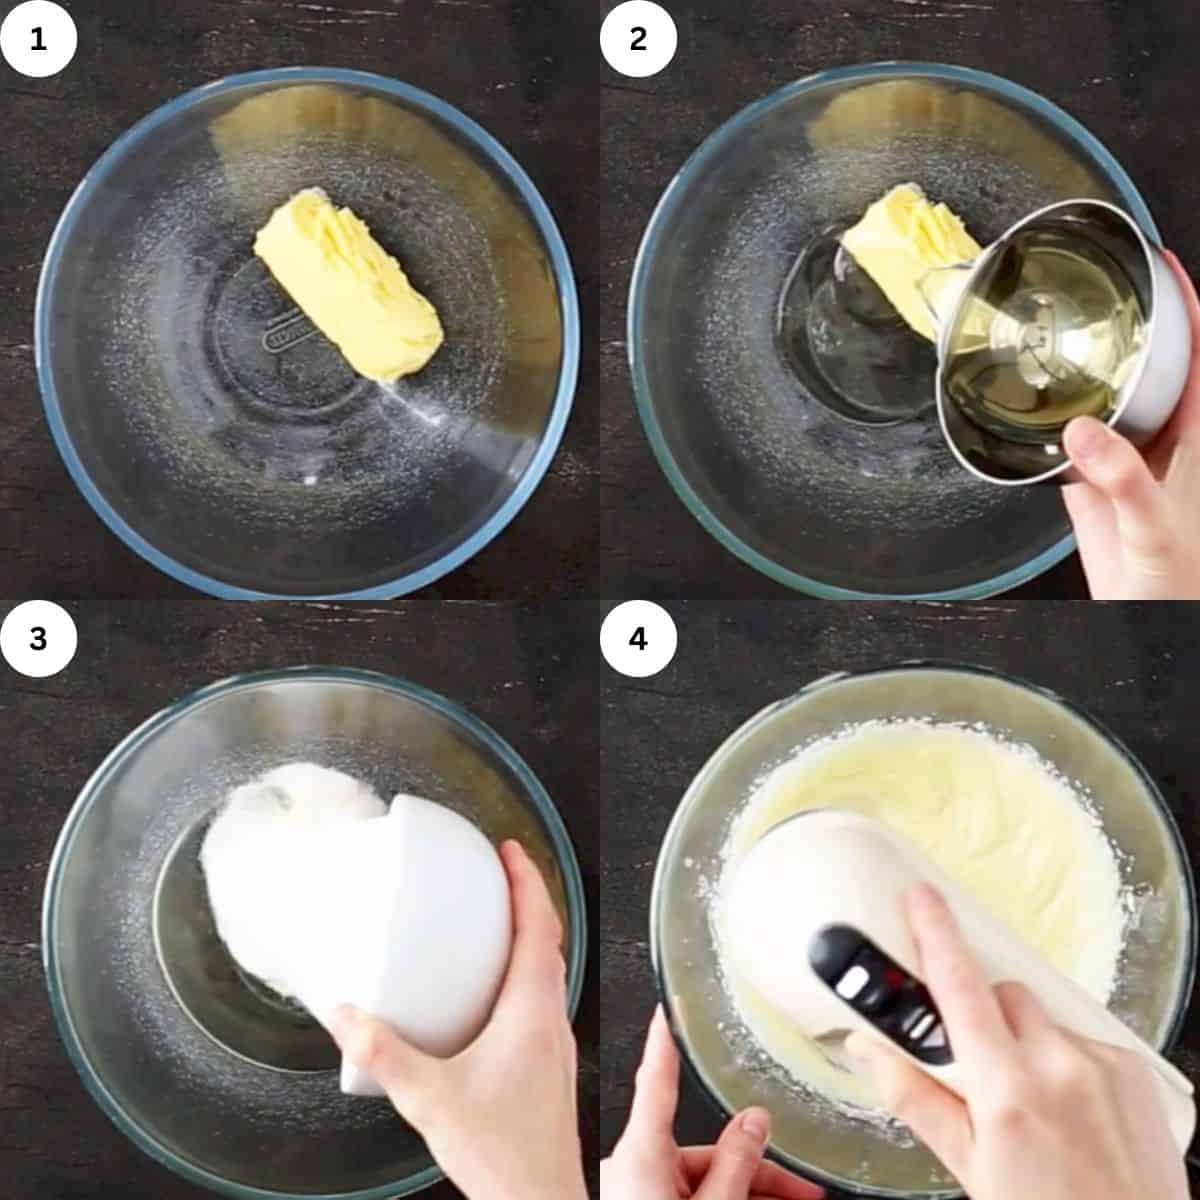
In a large mixing bowl with a stand or handheld mixer fitted with a whisk or paddle attachment, beat butter, oil, and sugar until creamy for about 2-3 minutes.
2. Prepare your vanilla.
Cut off the straight end of the vanilla bean. Then, place the tip of your knife below the curled end and cut the vanilla bean through the middle of the bean lengthwise with a sharp knife.
You don’t need to cut it all the way through, but it’s okay to do so.
Then, open the vanilla bean and scrape out the flavorful seeds with the back of your knife. We are only going to use the seeds.
3. Add more ingredients to your batter.

Add eggs and the vanilla seeds. Mix them into your batter until fully incorporated. Then alternately add dry ingredients and buttermilk, beginning and ending with dry ingredients. Stir just until combined.
4. Add more flavor and color to your batter.
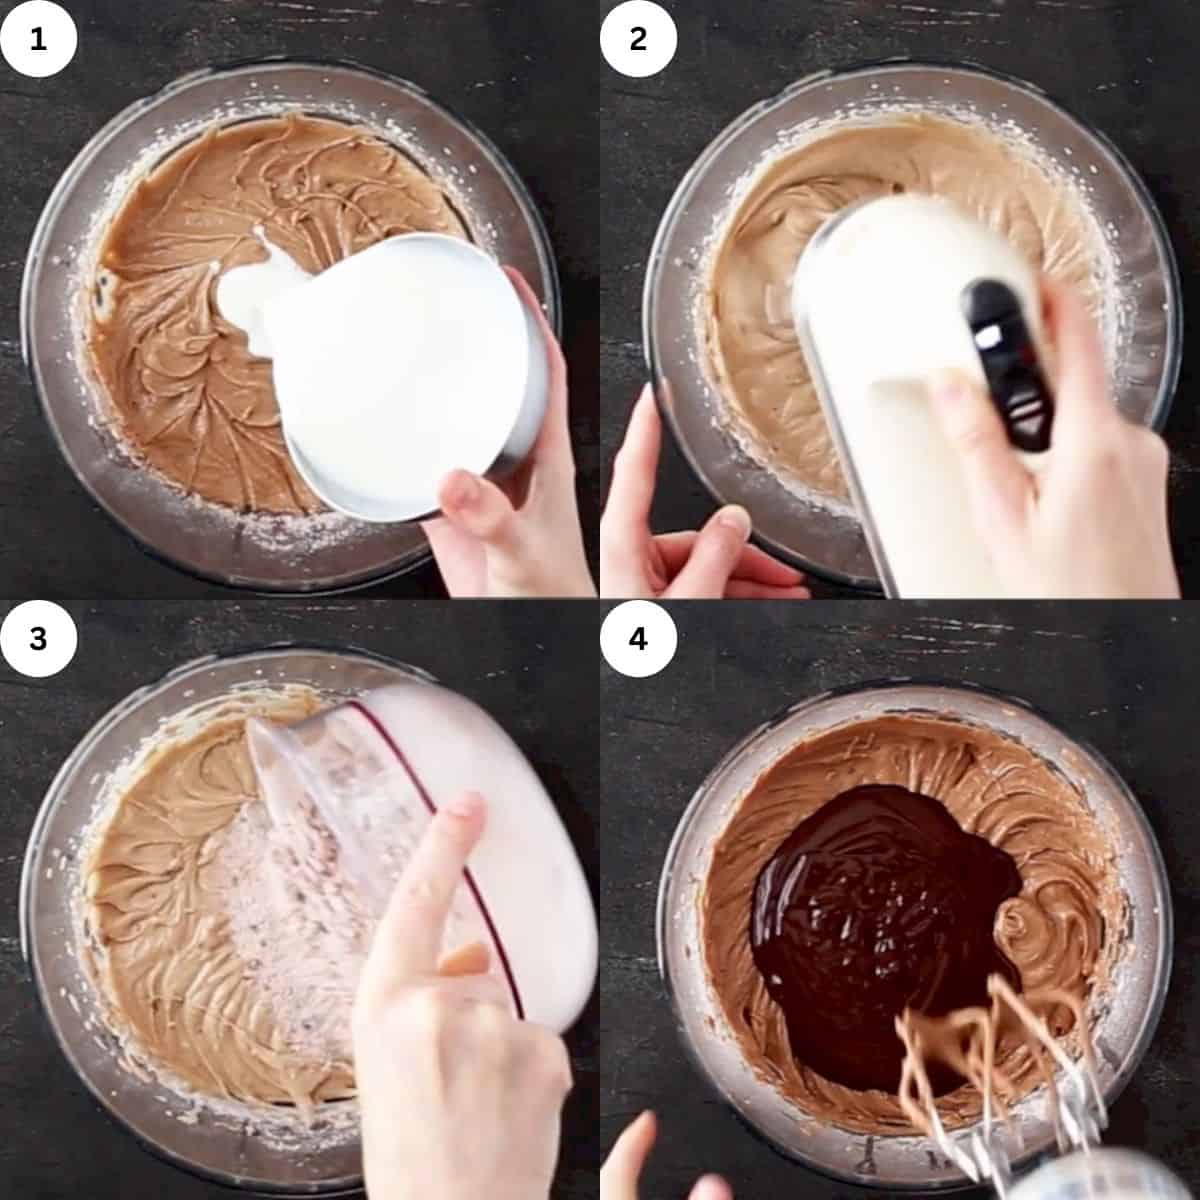
Add chocolate and stir to combine. Add food coloring (amount depends on which food coloring you take—read instructions on the label) and stir to combine.
Quick Note: The batter will be black and thick.
5. Bake your cake.
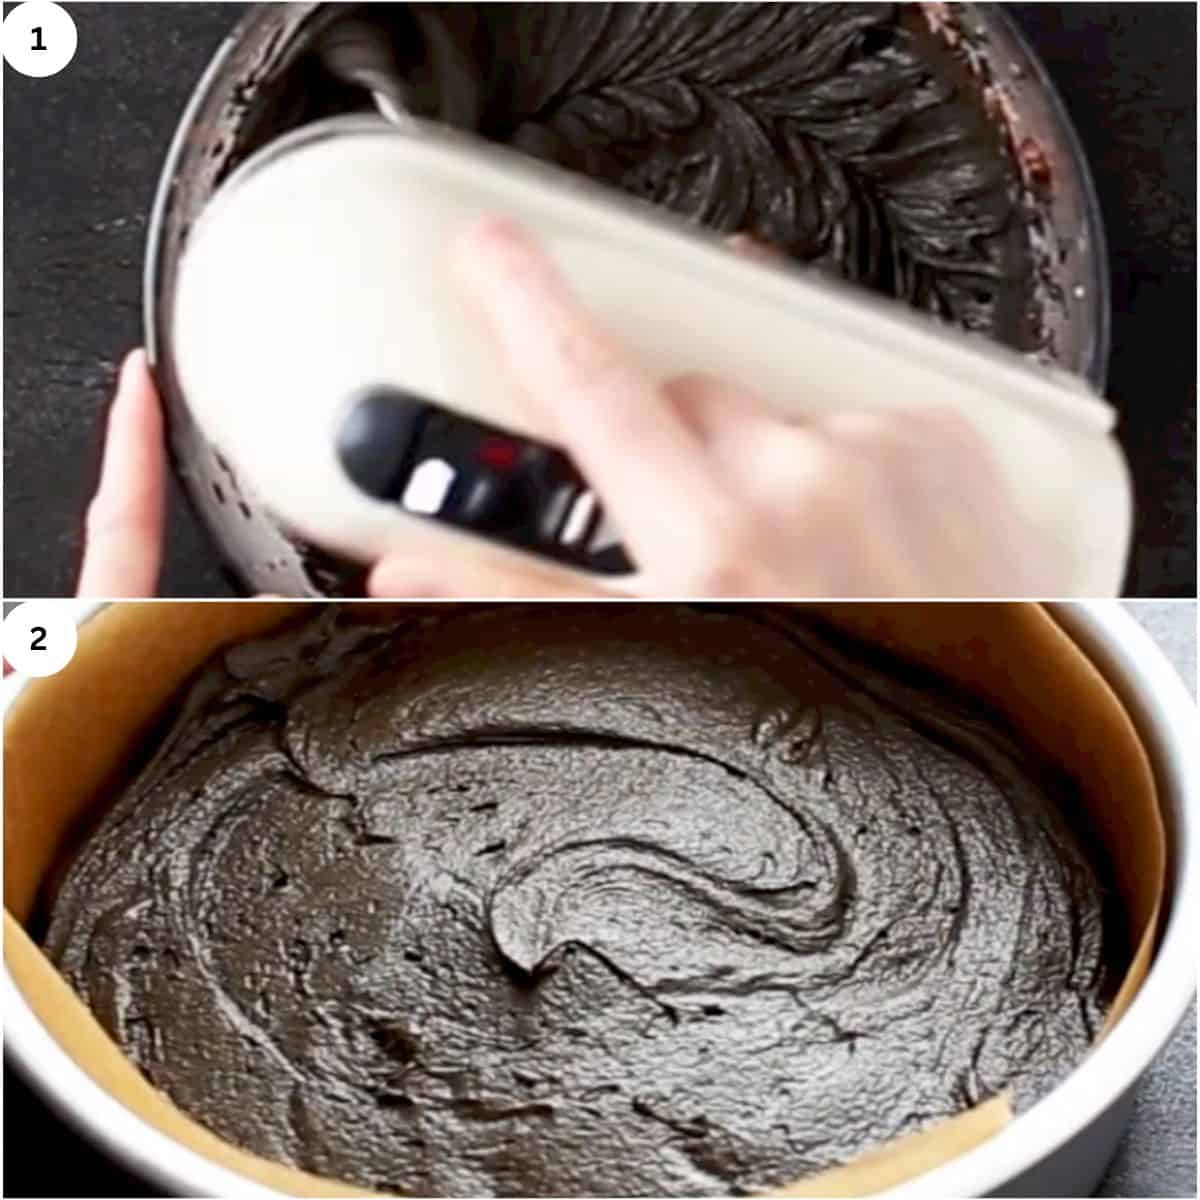
Transfer to the prepared baking pans equally and spread evenly. Bake for 18-22 minutes or until a toothpick in the center comes out clean.
Don't overbake, or the cake will be dry. Let cool to room temperature.
Make the Death-By-Chocolate Buttercream
1. Beat butter and sugar.
Beat butter on medium-high speed until soft and creamy, about 2-3 minutes. Add powdered sugar and beat on medium-low speed until thoroughly combined and smooth.
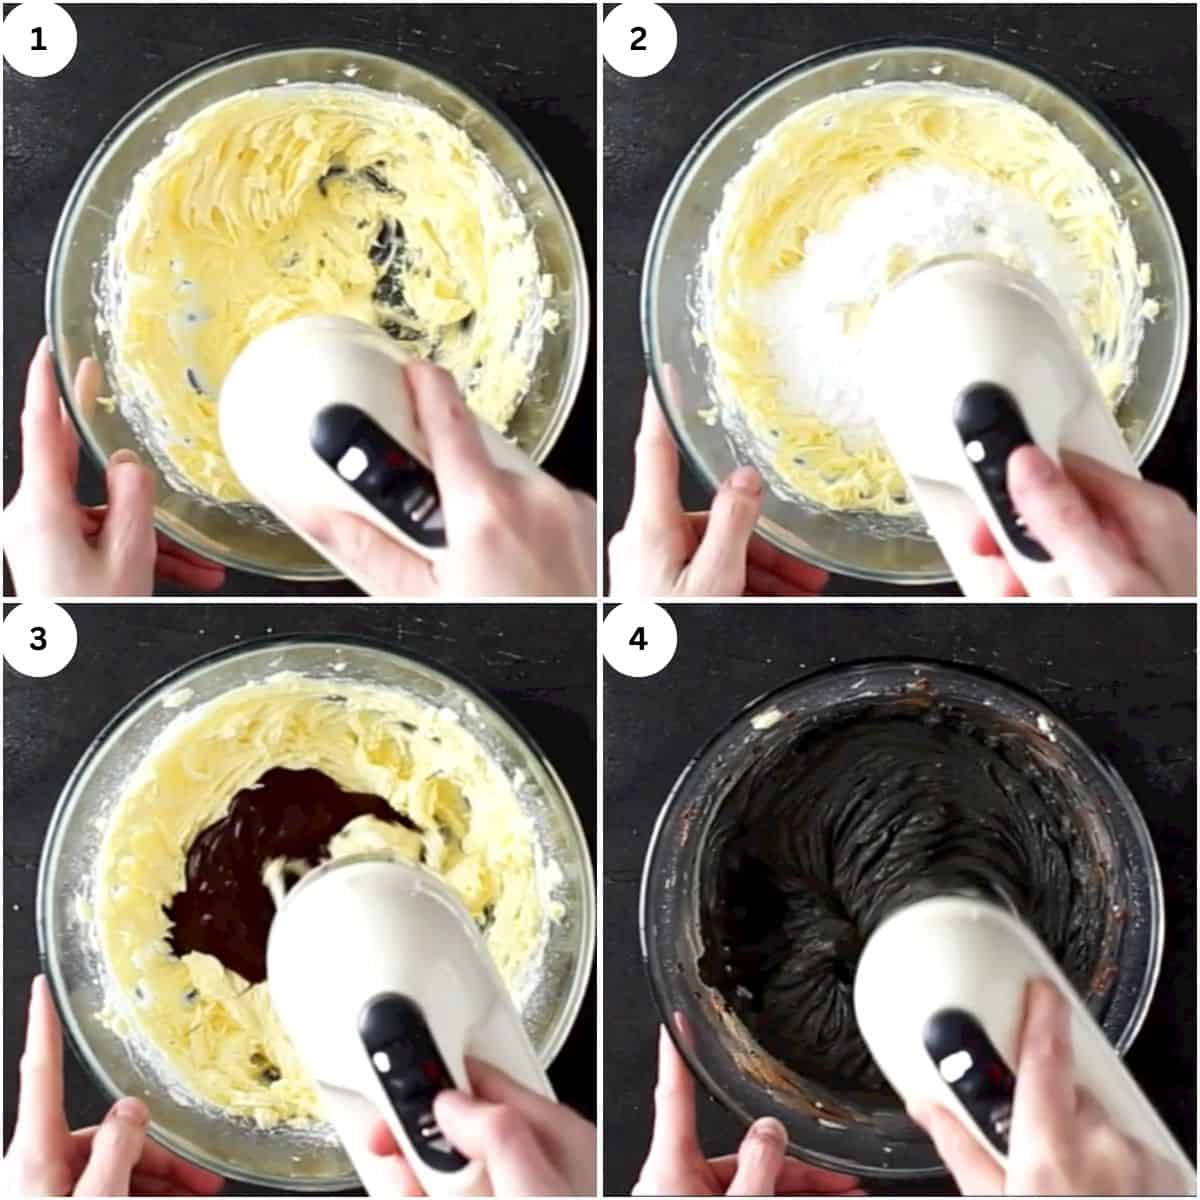
2. Add more flavor and color to your buttercream.
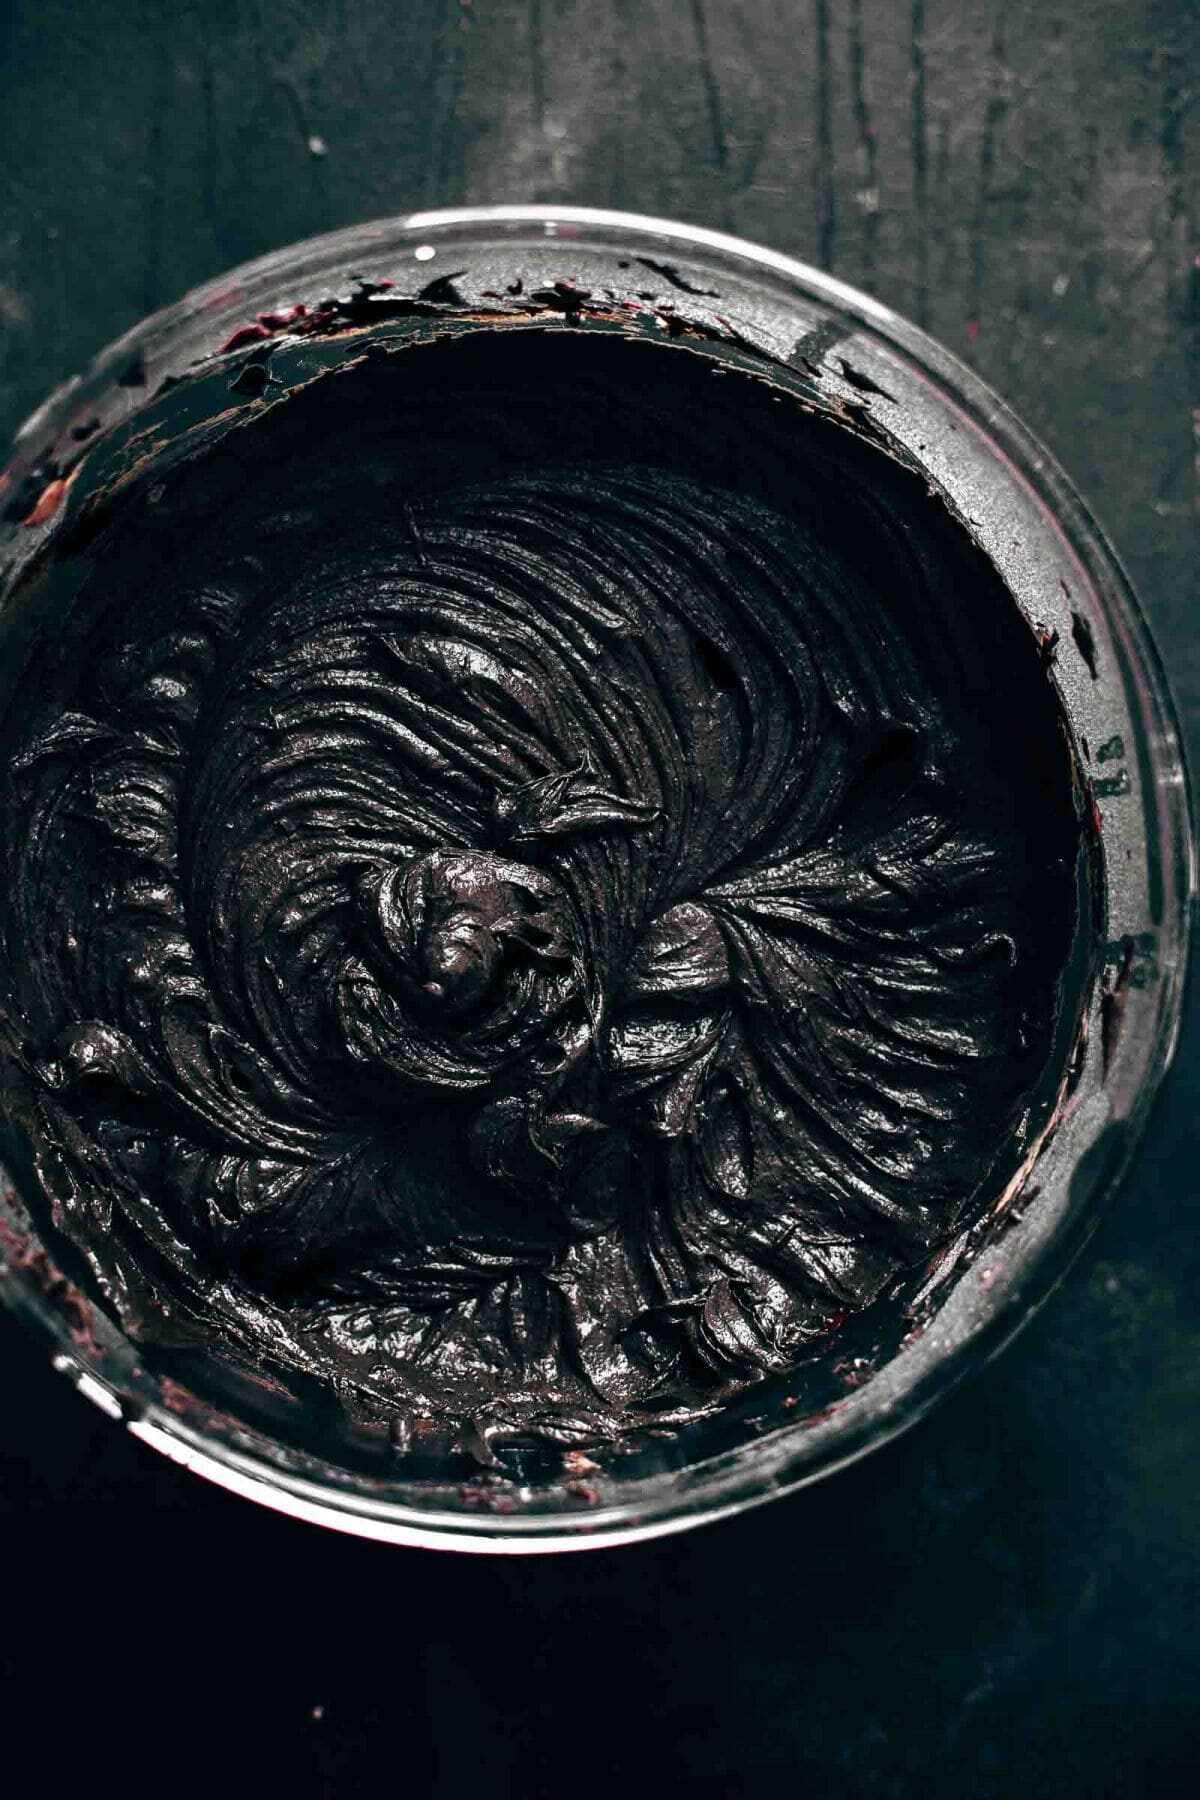
Add chocolate and stir until creamy. Add food coloring and stir to combine. The buttercream should be black.
Let’s Assemble the Cake
With the cake and buttercream frosting ready, let’s move on to cake assembling.
Prepare the Layers
1. Cut off the cake tops.
Cut a layer off the tops of your cakes to create a flat surface. Transfer cut tops to a plate. Place them uncovered on your kitchen counter. We’re going to use them in a bit.
2. Put the layers together.
Place the first chocolate cake layer on a cake stand, turner, or serving plate. Spread about ¼-⅓ of the chocolate buttercream evenly on top of the cake. Repeat with the other two chocolate layers.
3. Cover the cake in frosting.

Frost the outside and the sides of the cake with the remaining frosting. Level the top and the sides with an offset spatula. Chill your cake for 3 hours in the fridge.
Prepare the Crumbs
While the cake is chilling, let’s now prepare the crumbs.
To create a super authentic and spooky graveyard look, we need something that looks like earth, right? Crumbled chocolate cake does the job perfectly.
Remember the cut-off layers from before? Since you have placed them uncovered at room temperature, they should have lost a bit of moisture by now. You can wait for a little bit more if needed.
Quick Note: It’s easier to get fine crumbs when the cake is a bit drier.
Cover the Cake With Crumbs
Take the cake out from the fridge and let it stand at room temperature for about 30 minutes so that the buttercream lightly softens.
Then, crumble the cake tops with your fingers into fine crumbs. Sprinkle crumbs on top of the cake to cover it completely. Press the rest of the crumbs with your fingers against the sides carefully. The cake should be covered on the top and around the sides completely.
Quick Note: Don’t use up all your crumbs. You’d want to reserve some of them for added decoration.
Let’s Decorate the Cake
It’s now time for the fun part—cake decorating!
I used Wilton Tombstone Candy Molds and filled them with melted semi-sweet chocolate. After filling, place them for about 15 minutes in the freezer.
I recommend putting a drop of oil into the molds and wiping them out with kitchen paper. This makes it even easier to remove the chocolate tombstones from the molds after freezing.
Remove them by inverting the molds on wax paper and lightly knocking on them so that the chocolate tombstones fall out. Let chill for about 30 minutes.

Then write spooky words on your tombstones with white chocolate or icing (using a Candy Melts Piping Tip Set, for example.), or use a candy decorating pen.
I also made a chocolate tree by drawing melted chocolate on a sheet of wax paper with the tip of a spoon. I know there would be better methods of doing this, but I didn’t want to have very accurate trees. I wanted them to look a bit strange and weird to create an even spookier look. Let dry at room temperature.
You can prepare the tombstones and the trees the day before decorating. I also did it the day before so that the chocolate looks kind of aged.
When chocolate gets warm and then cold again, the oil comes out and creates a spotted and washed-out look. This made the tombstones look old and weathered.
The decoration is up to you! Do whatever you like the most. You could also color the tombstones with food coloring, which is suitable for chocolate. If you want to make them grey, for example, you may want to use white chocolate or candy melts and color them.

Storage Instructions
You can store your leftovers in an airtight container at room temperature for up to 3 days.
Expert Tips for Better Chocolate Cake Layers
- Don’t use too much food coloring. For this deep black color, you need to add some black food coloring. But because the cake is very dark on its own, you don’t need that much of it.
- Use Dutch-processed cocoa powder. Dutch-processed cocoa powder will make your cake even darker than natural cocoa powder. In addition, dutch-processed cocoa will also help your batter to rise during baking since no baking powder or baking soda was used in the recipe.
- Spread the batter evenly. The batter will be very thick. So make sure that you spread it evenly into the pan so that it has a flat surface.
Expert Tips for Better Chocolate Buttercream
- Choose the right food coloring. Make sure you use food coloring suitable for buttercream and icing. I recommend gel or paste food coloring mended.
- Use quality chocolate. Use only high-quality, semi-sweet chocolate bars from a brand you love. I prefer Ghirardelli, Guittard, or Lindt for this cake. 50-60% cocoa works best.

Death-By-Chocolate Cake FAQs
1. Can this recipe be in a sheet cake style?
Baking this recipe in a sheet cake style can make the surface larger and allow more space for decorating. Unfortunately, I have not tried doing it yet.
If you are going to attempt to do this, I recommend checking the doneness of the cake with a toothpick, as the sheet cake layer will be a little flatter than one of my cake layers.
As for the conversion, this recipe fits a half-sheet pan. You can double it for a full sheet pan.
2. Why is it called Death-by-Chocolate cake?
Death-by-chocolate is a metaphor that simply means you’ll be drowning in the indulgent, chocolatey goodness of this cake with every bite.
3. What is the difference between chocolate cake and death-by-chocolate cake?
What sets a death-by-chocolate cake apart from a standard chocolate cake is its deeper, darker flavor. This type of cake also tends to be denser and richer in both texture and taste.
More Cake Recipes to Try
Did you enjoy this delicious Death-by-Chocolate cake? Then, feel free to explore my other cake recipes. You may also like Mirror Glaze Galaxy Cake, Rainbow Cake, Valentine's Day Cake, S'mores Cake, Chocolate Easter Cake, or Tiramisu Cake.
Recipe

Death-By-Chocolate Halloween Cake Recipe
Ingredients
death-by-chocolate cake layers
- 2+¼ cups all-purpose flour (270g)
- ¼ cup dutch-processed cocoa powder (21g)
- 1 tablespoon baking powder
- ½ teaspoon salt
- ½ cup butter, room temperature (113g)
- ½ cup canola or vegetable oil (120ml)
- 1 cup granulated white sugar (200g)
- 2 large eggs
- 1 vanilla bean* (or 1 teaspoon vanilla extract)
- 1 cup buttermilk (240ml)
- 1+½ cups semi-sweet chocolate, melted (255g)
- black gel or paste food coloring
death-by-chocolate buttercream
- 1 cup butter (226g)
- 2 cups powdered sugar, sifted (240g)
- 1 cup semi-sweet chocolate, melted and cooled (170g)
- black gel or paste food coloring
DECORATION: chocolate tombstones, trees, skulls, and bones sprinkles to your preference
Instructions
- Preheat oven to 350°F / 175°C. Line the bottom and the sides of three 8" (20cm) baking pans with parchment paper. Lightly grease the sides of the pan with butter or oil that the paper sticks to the pan. Set aside.
- In a medium bowl combine flour, cocoa, baking powder, and salt and stir to combine. Set aside.
- Make the death-by-chocolate cake layers: In a large mixing bowl with a stand or handheld mixer fitted with a whisk or paddle attachment, beat butter, oil, and sugar until creamy for about 2-3 minutes. Add eggs and vanilla* and mix until fully incorporated. Alternately add dry ingredients and buttermilk, beginning and ending with dry ingredients. Stir just until combined. Add chocolate and stir just to combine. Add food coloring (amount depending on which food coloring you take – read instructions on the label) and stir to combine. The batter should be black. The batter will be very thick. Transfer to the prepared baking pans equally and spread evenly. Bake for 18-22 minutes or until a toothpick in the center comes out clean. Don't overbake or the cake will be dry. Let cool to room temperature.
- Make the death-by-chocolate buttercream: Beat butter on medium-high speed until soft and creamy, about 2-3 minutes. Add powdered sugar and beat on medium-low speed until fully combined and smooth. Add chocolate and stir until creamy. Add food coloring and stir to combine. The buttercream should be black.
- Assemble the cake: Cut a layer off the tops of your cakes to create a flat surface. Transfer cut tops to a plate. Place uncovered on your kitchen counter. Place the first chocolate cake layer on a cake stand, turner, or serving plate. Spread about ¼-1/3 of the chocolate buttercream evenly on top of the cake. Repeat with the other two chocolate layers. Frost the outside and the sides of the cake with the remaining frosting. Level the top and the sides with an offset spatula. Chill 3 hours in the fridge.
- While the cake is chilling, prepare the decoration. Read blog post above to read what I did and which tools and products I used to make the chocolate tombstones and the tree. The decoration is up to your preference. You can also prepare the decoration the day before.
- Decorate the cake: Remove the cake from the fridge and let stand at room temperature for about 30 minutes that the buttercream lightly softens. Then crumble the cake tops with your fingers into fine crumbs. Sprinkle crumbs on top of the cake to cover it completely. Press the rest of the crumbs with your fingers against the sides. The cake should be covered on the top and around the sides completely. Reserve a few crumbs. Place your decoration on top of the cake and sprinkle a few bones and skulls sprinkles in front of the tombstones. Sprinkle the remaining cake crumbs on top.
- Store leftovers in an airtight container at room temperature up to 3 days.
Notes
You can find the video in the post above. If you don't see a video, please check your browser settings.
Marian P
Have you tried this recipe in a sheet cake style? I would like to make the surface larger for more headstones/graveyard things, but do not know how to convert pan size, temperature or baking time.
Sabine
Unfortunately, I have not. It's best to check doneness with a toothpick, as the sheet cake layer will be a little flatter than one of my cake layers. The recipe fits a half sheet pan or simply double it for a full sheet pan. I hope that helps!