

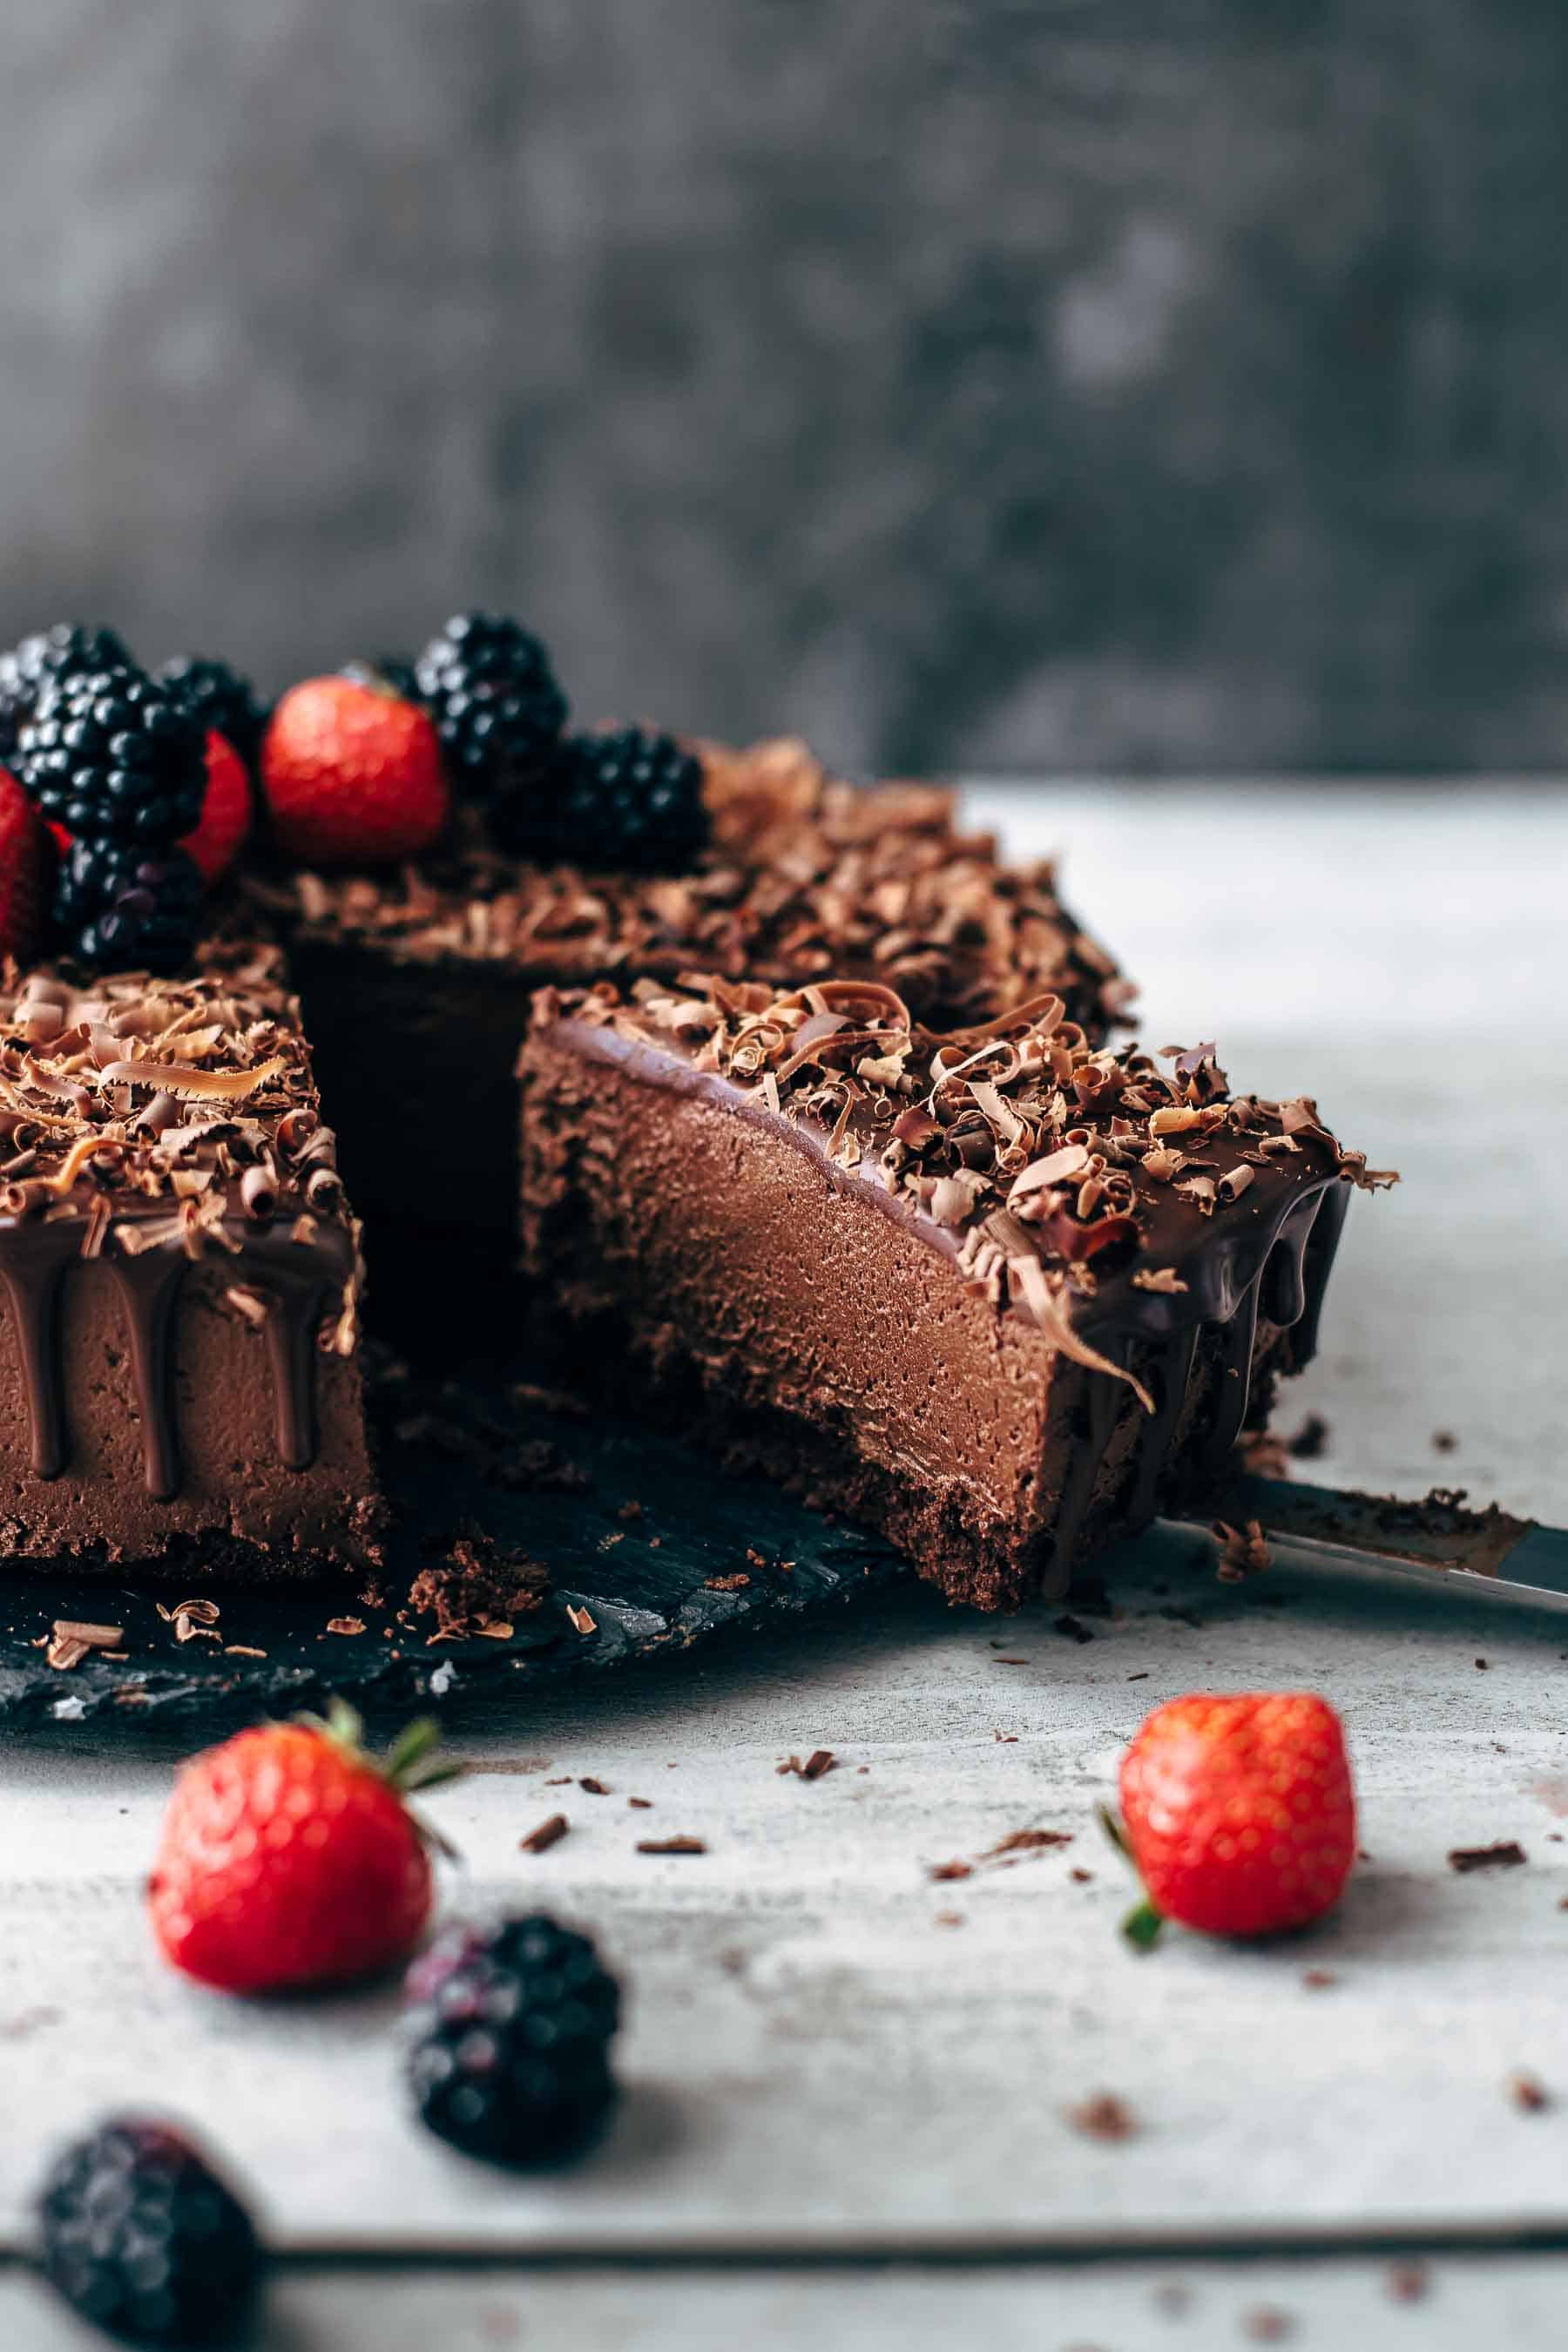
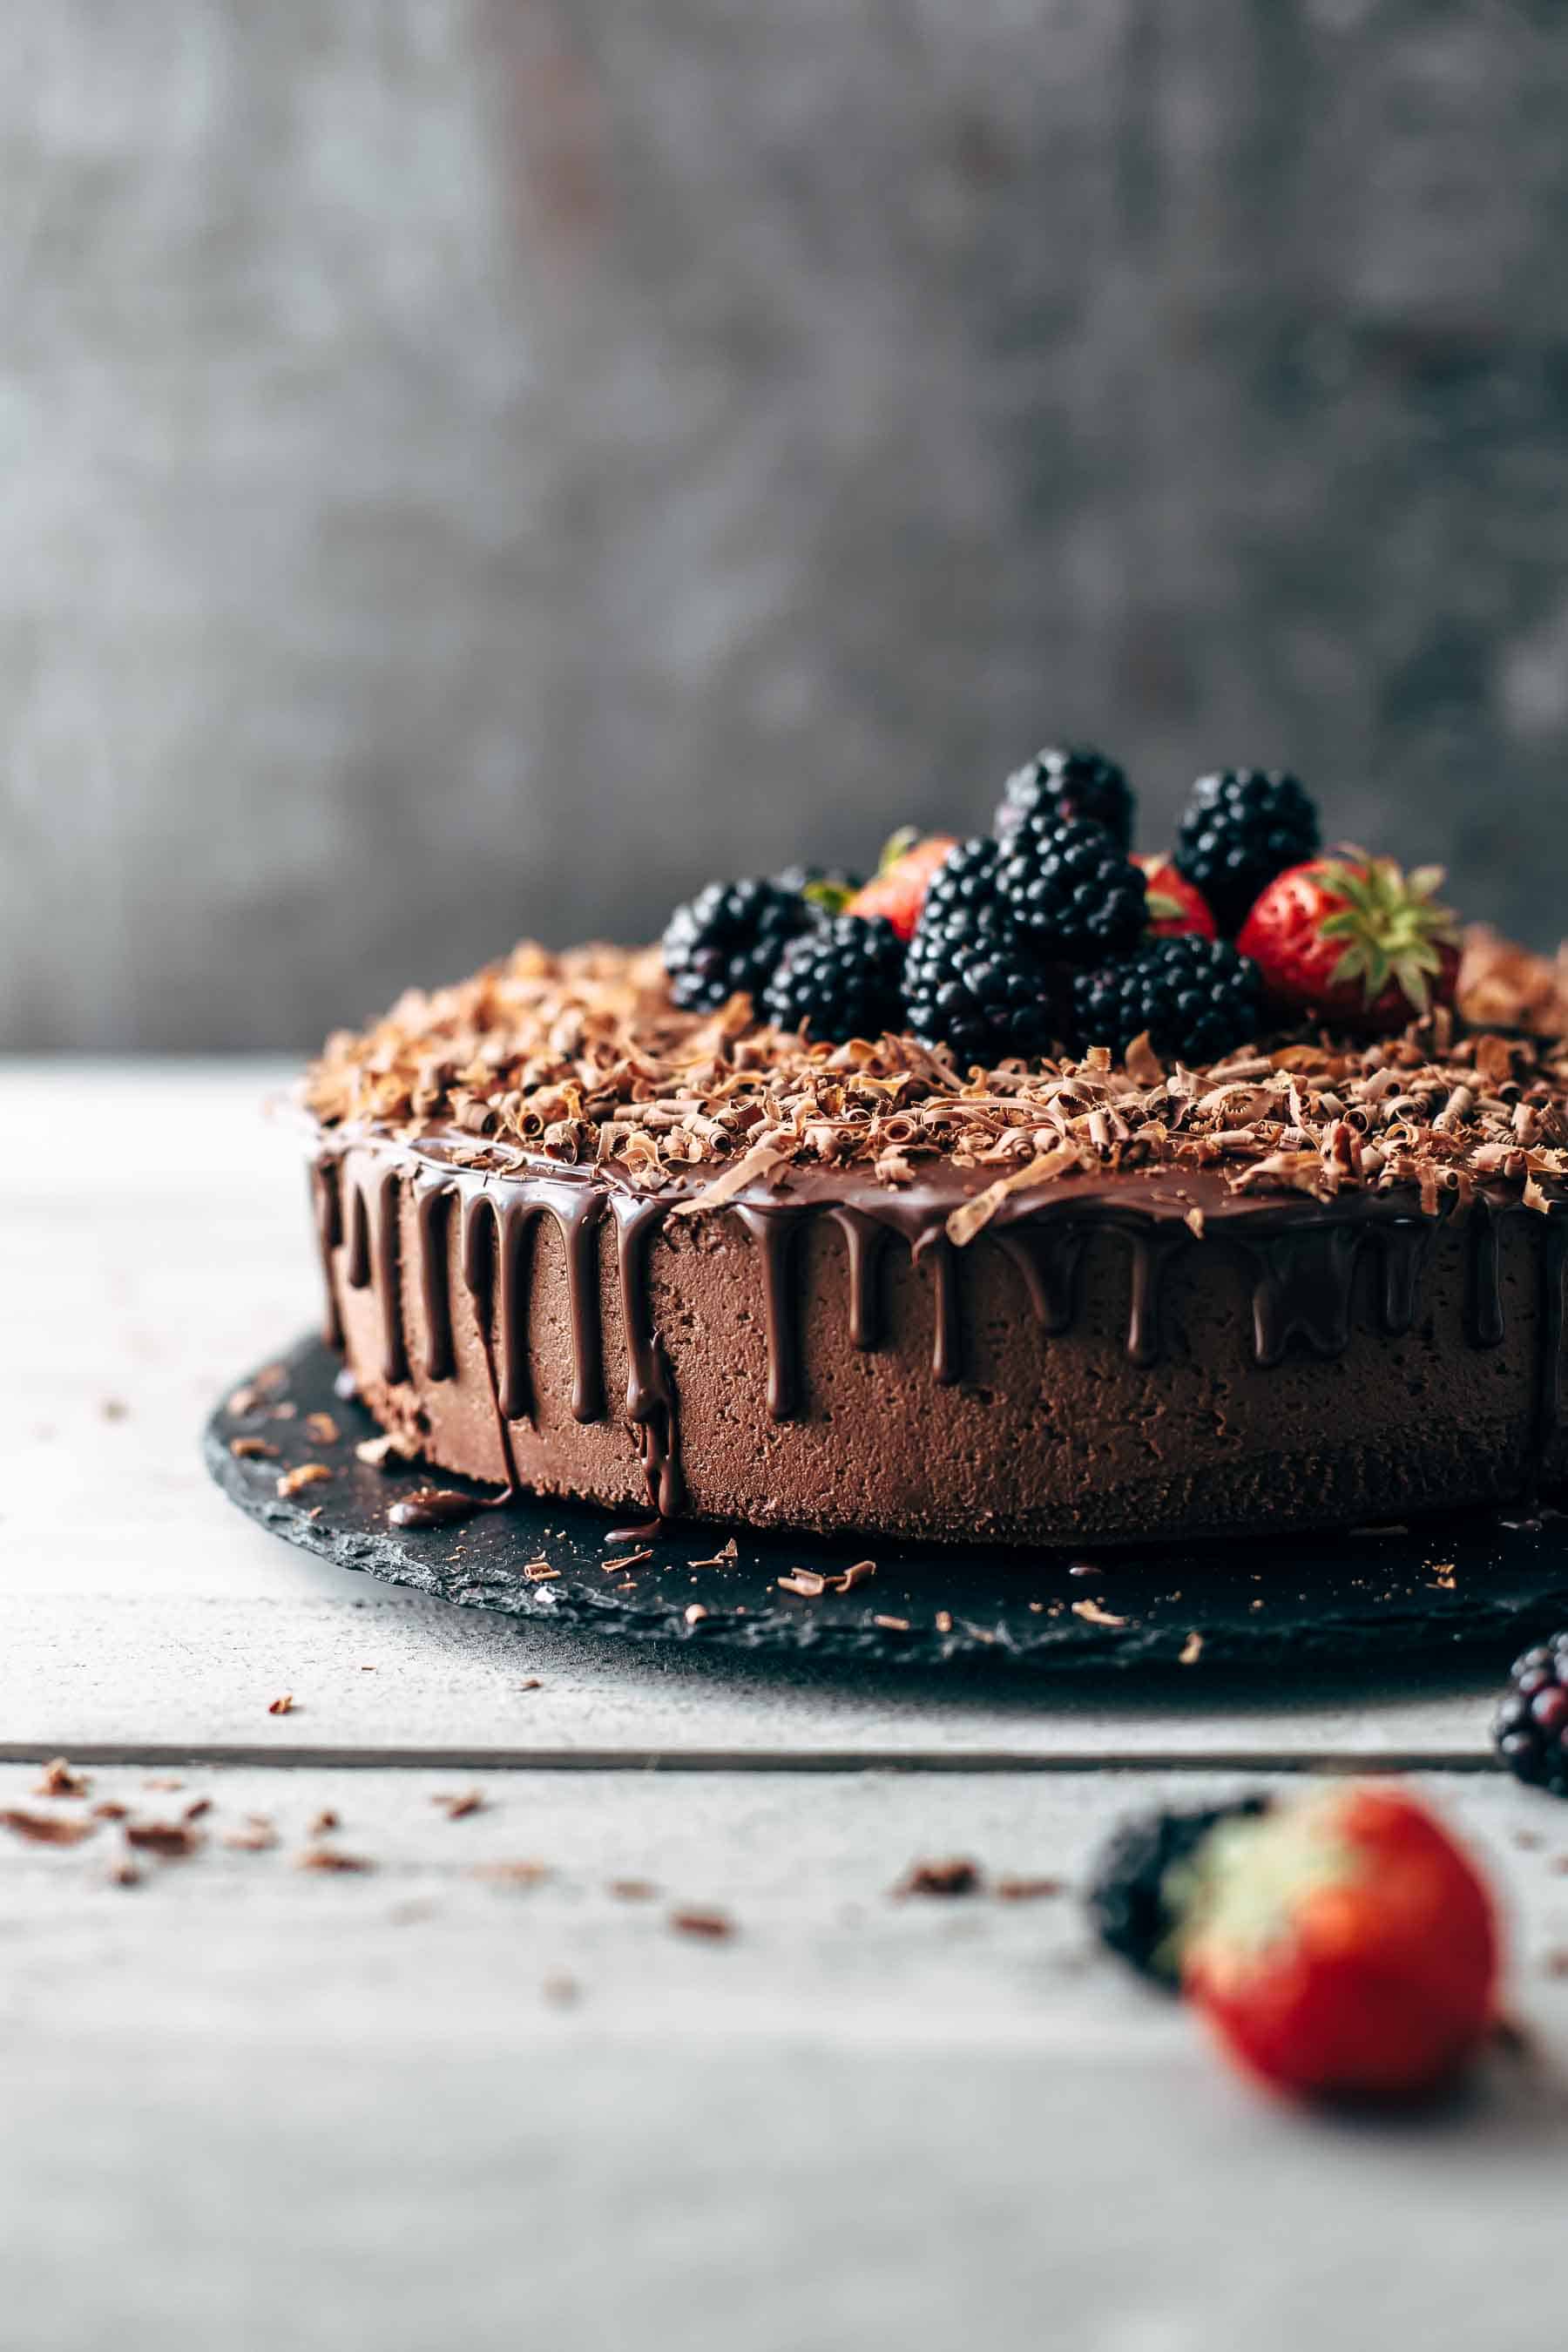
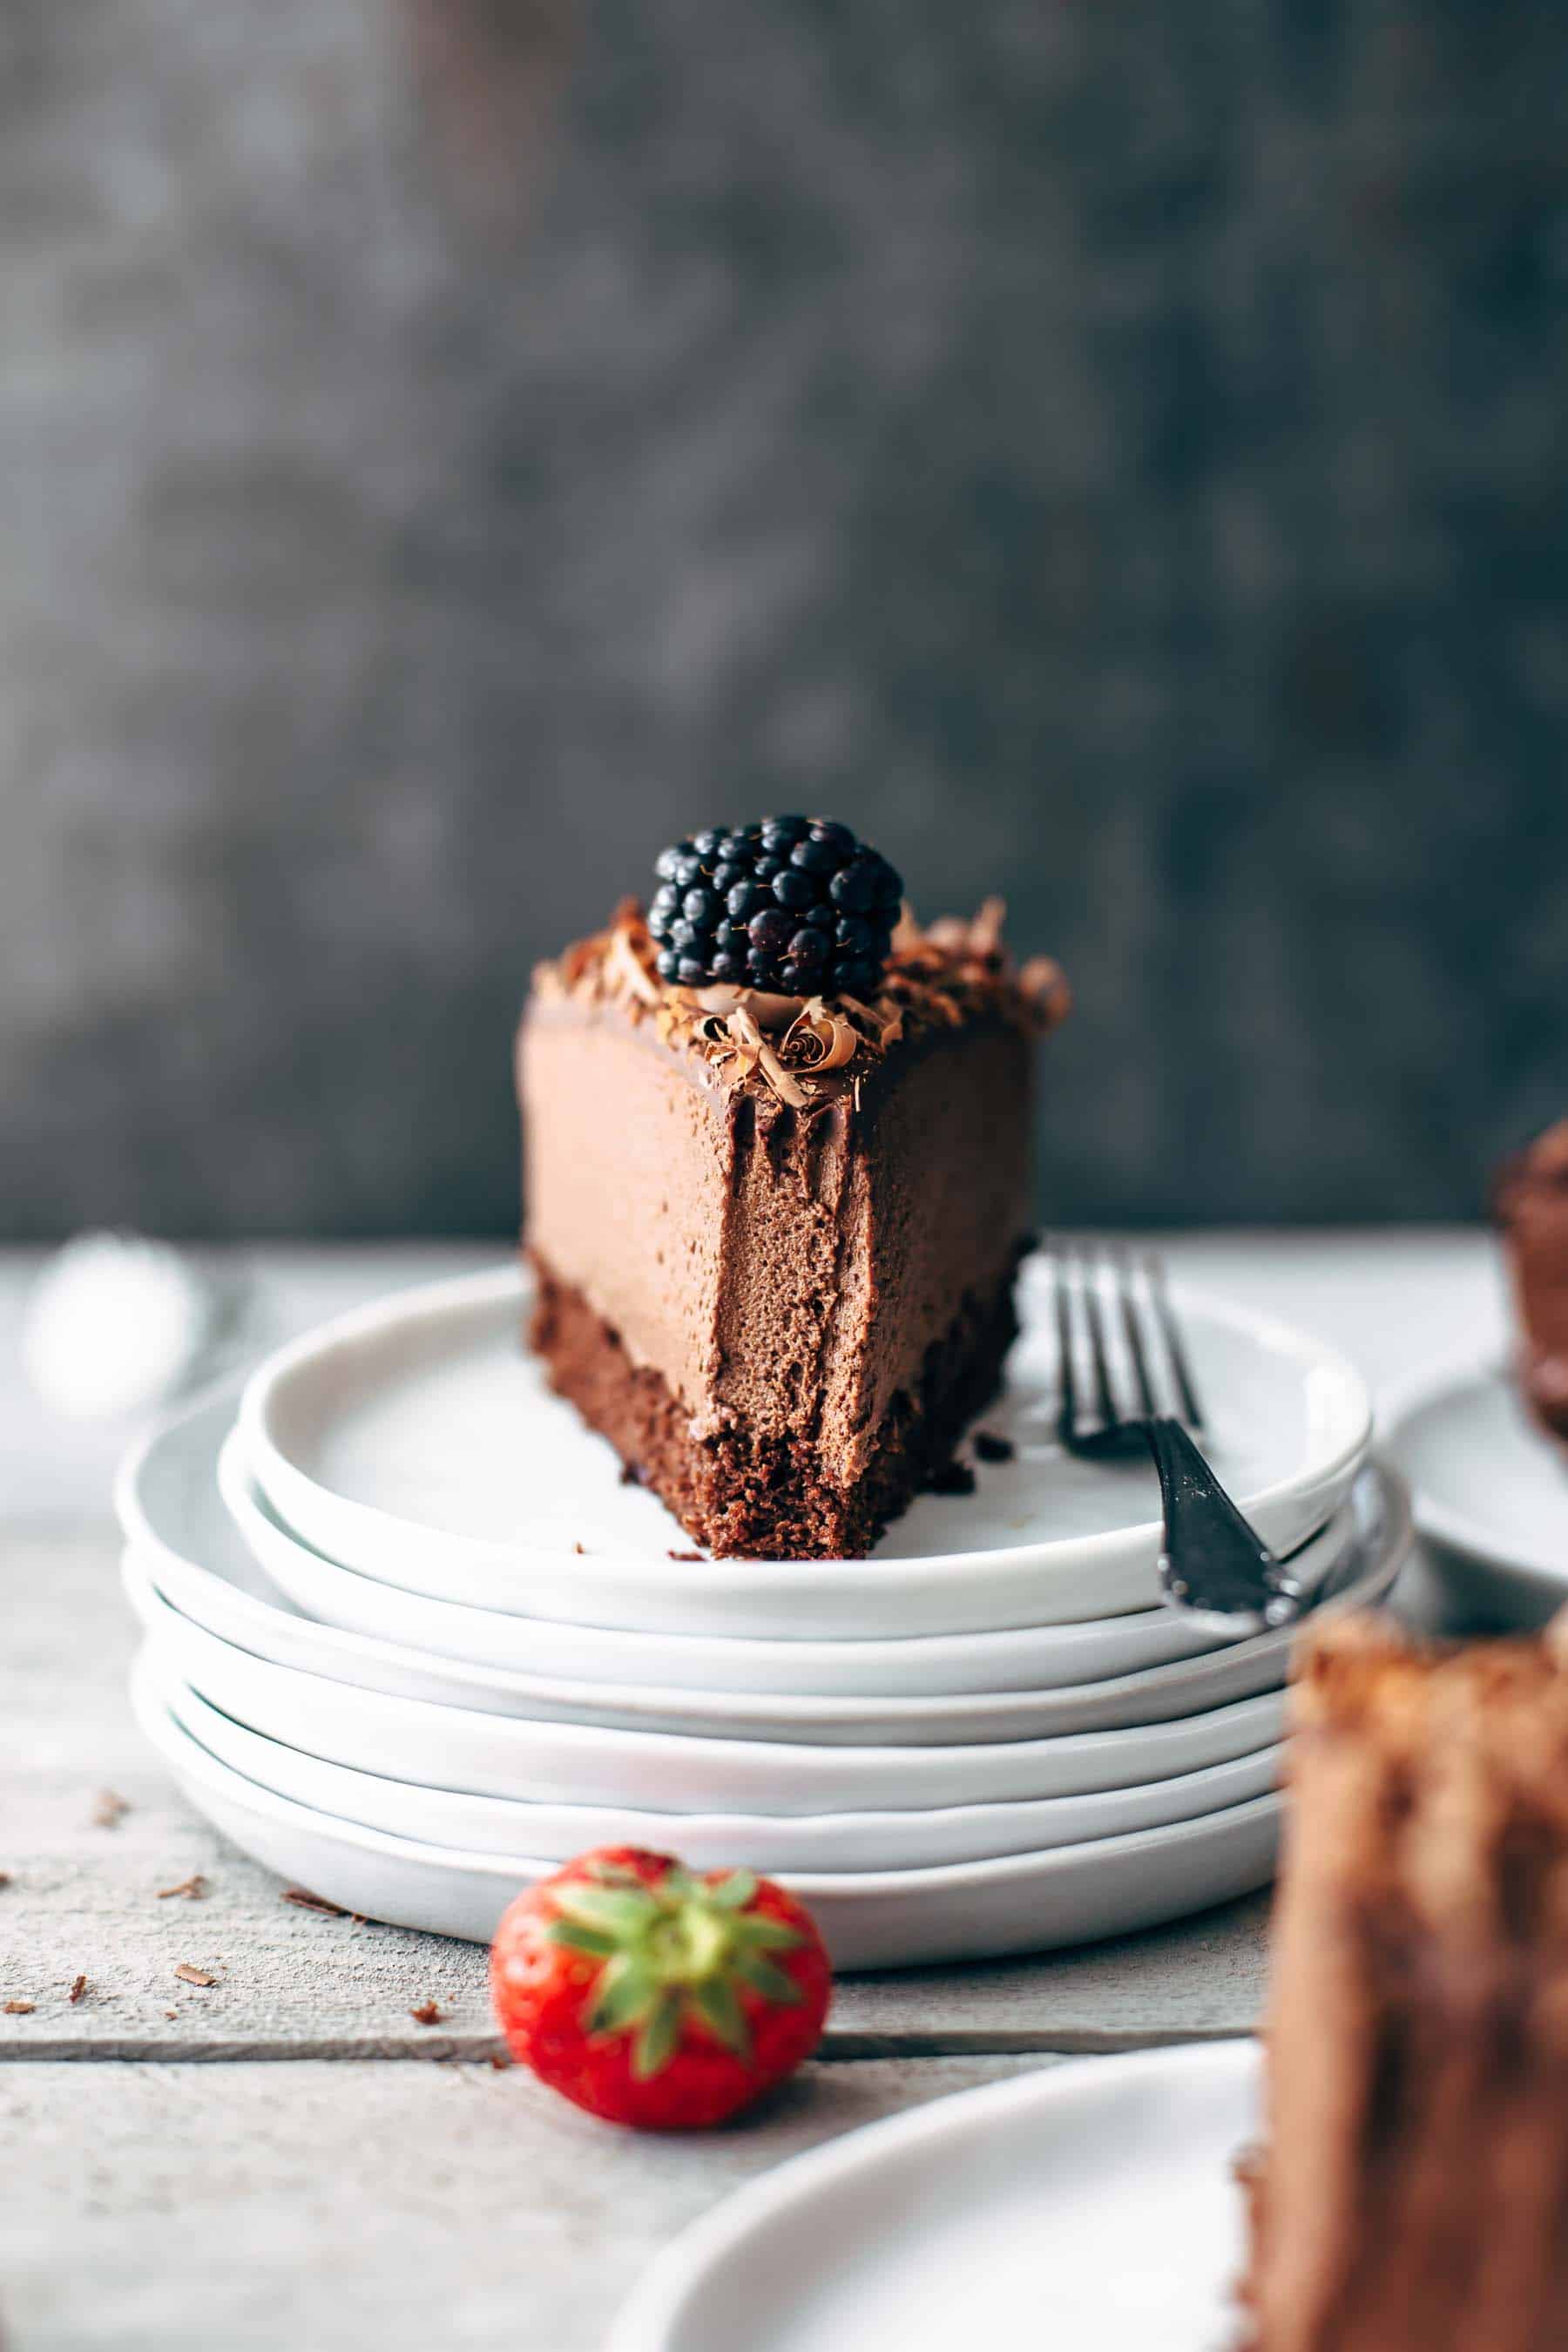
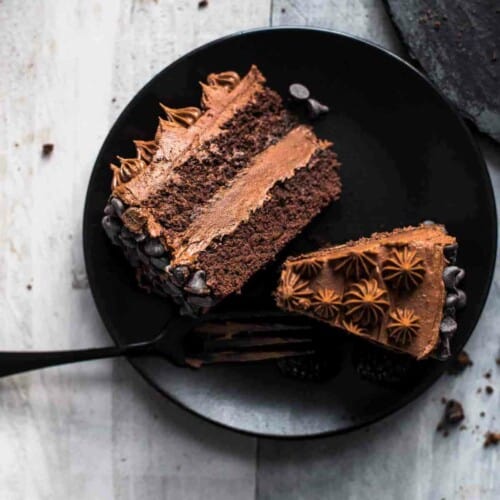
This Chocolate Mousse Cake recipe is the perfect cake for chocolate lovers. It's a delicious, rich, and creamy dessert cake that suits any occasion. It consists of a chocolate cake layer filled with chocolate mousse and topped with chocolate ganache. Doesn't that sound irresistible? By the way, have you tried my chocolate cream pie yet?
Jump to:
Why You Will Love This Chocolate Mousse Cake Recipe
- Decadent Dark Chocolate Cake: This cake has it all! A thin layer of rich dark chocolate cake, a fluffy chocolate mousse, and finally a rich, thick chocolate ganache.
- A Dark Chocolate Mousse Cake For All Occasions: From elegant birthday cakes to Valentine's Day celebrations, or dinner parties!
- Perfect for Chocolate Lovers: Anyone who adores the bittersweet goodness of chocolate is going to love this Belgian Chocolate Mousse Cake Recipe.
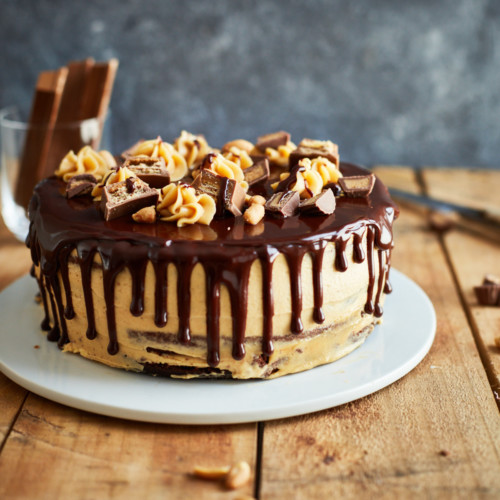
Love chocolate desserts? You've got to try this Flourless Chocolate Cake next!
Ingredients
Here's a look at the key ingredients for making this triple chocolate mousse cake. Be sure to see the recipe card further down the page for the full list and quantities of each.
- Heavy whipping cream: This is the key to a rich, creamy chocolate mousse for the cake. Do not try to swap it for half and half or whole milk as you will not get the same results.
- Egg yolks: The mousse uses egg yolks and you will also need a whole egg for the cake. Save the egg whites to use to make an Angel Food Cake later on.
- Sugar: You will be using both granulated white sugar and powdered sugar. The powdered sugar for the mousse should be sifted prior to adding so you don't end up with any lumps.
- Chocolate bars: Choose a high-quality semi-sweet chocolate bar to make the chocolate mousse and ganache.
- All-purpose flour: Be sure to spoon the flour into the measuring cup and level it off with the flat side of a knife.
- Cocoa powder: The cake uses Dutch-processed cocoa powder. Like the flour it should be spooned into the measuring cup and leveled off with a knife.
- Vegetable oil: Any neutral-flavored vegetable oil works great.
- Buttermilk: The acid in the buttermilk plays a key role in the cake. Do not try to replace it with regular milk. If you don't have buttermilk you can make buttermilk using milk and lemon juice or vinegar. Add a scant teaspoon of vinegar or lemon juice to a liquid measuring cup and then add milk up to the ¼ cup line. Let it sit for five minutes.
- Hot cocoa: Hot cocoa is just unsweetened cocoa powder and boiling hot water. You typically need 1 teaspoon of cocoa powder per ¼ cup (60 mL) of water, but you can check the package directions to see if there is any. Do not use hot chocolate or sweetened cocoa as this would change the texture and flavor of the cake layer.
Substitutions
- Using Natural Unsweetened Cocoa Powder: The cake layer is made with Dutch-processed cocoa powder and baking powder. If you want to use natural unsweetened cocoa powder use the same amount of Dutch processed in the recipe. However, instead of 1 ½ teaspoons of baking powder, use ¾ teaspoon baking powder and ¼ teaspoon of baking soda.
- Hot Cocoa: You can also use the same amount of hot water in place of the hot cocoa for the cake and add an extra teaspoon of cocoa powder to the batter.
Step-by-Step Video Tutorial
How to Make Chocolate Mousse Cake
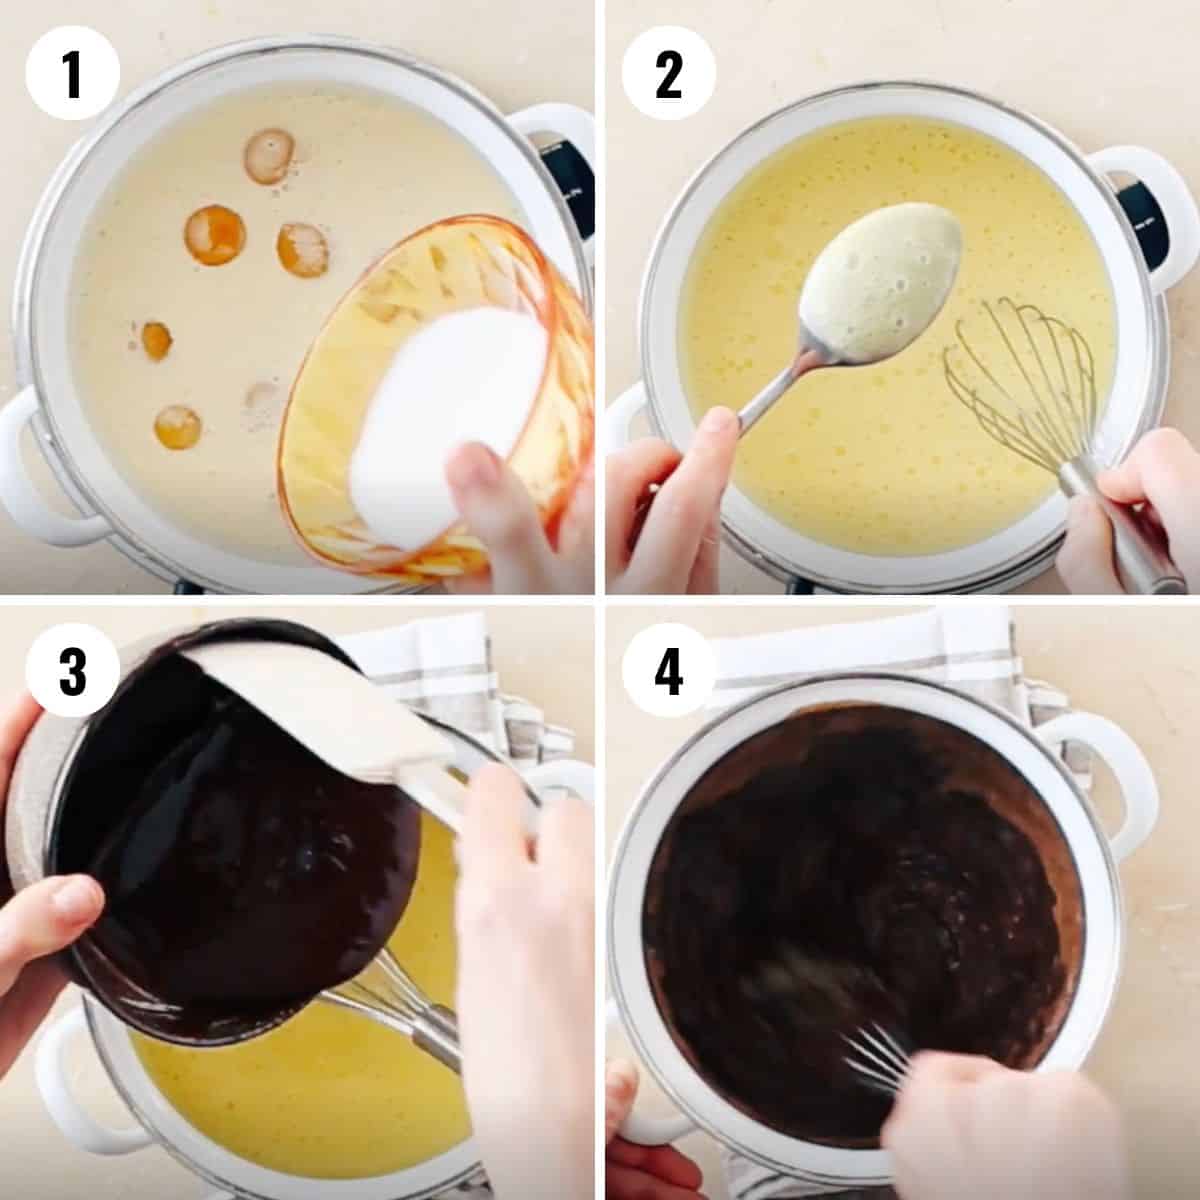
Step 1: Making the Chocolate Custard for the Mousse
- Step 1: Whisk together the heavy cream, egg yolks, and sugar in a medium saucepan.
- Step 2: Cook the mixture over medium-high heat whisking continuously until it thickens and coats the back of a spoon.
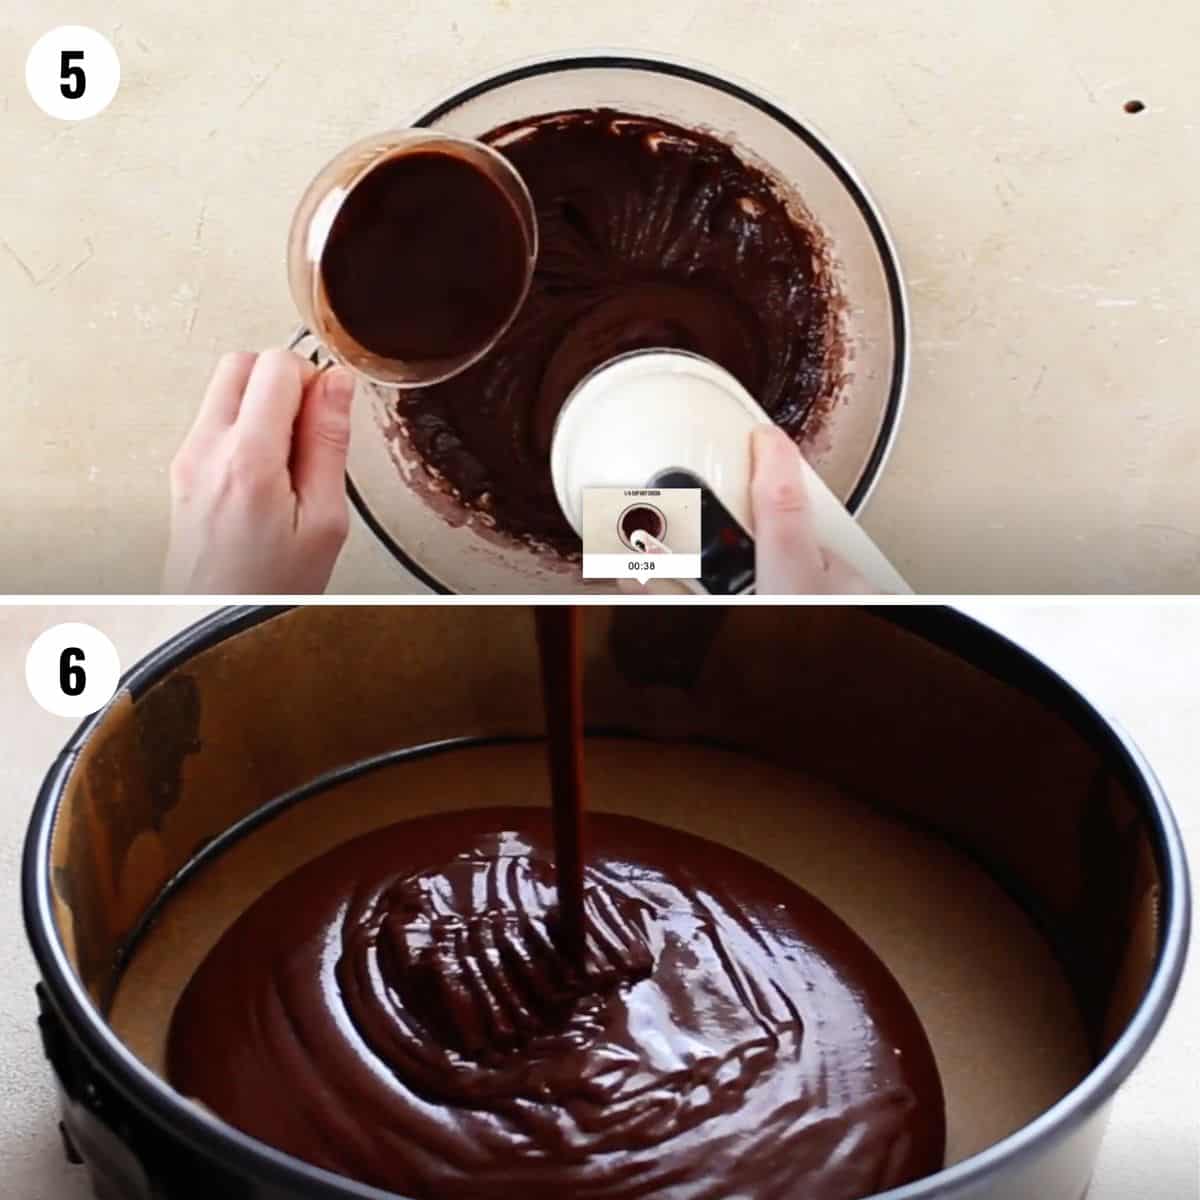
- Step 3: Remove from the heat and continue whisking for about 1-2 minutes. Add the melted chocolate to the pot.
- Step 4: Whisk until mixed together. Transfer the chocolate custard to a large mixing bowl and let it cool completely.
Step 2: Mixing the Chocolate Cake
- Step 1: Combine the flour, cocoa, sugar, baking powder, and salt in a medium bowl.
- Step 2: Whisk it together and set aside.
- Step 3: Add the oil, egg, buttermilk, and vanilla to a mixing bowl or stand mixer. Beat it together until combined.
- Step 4: Add the dry ingredients and stir them to combine.
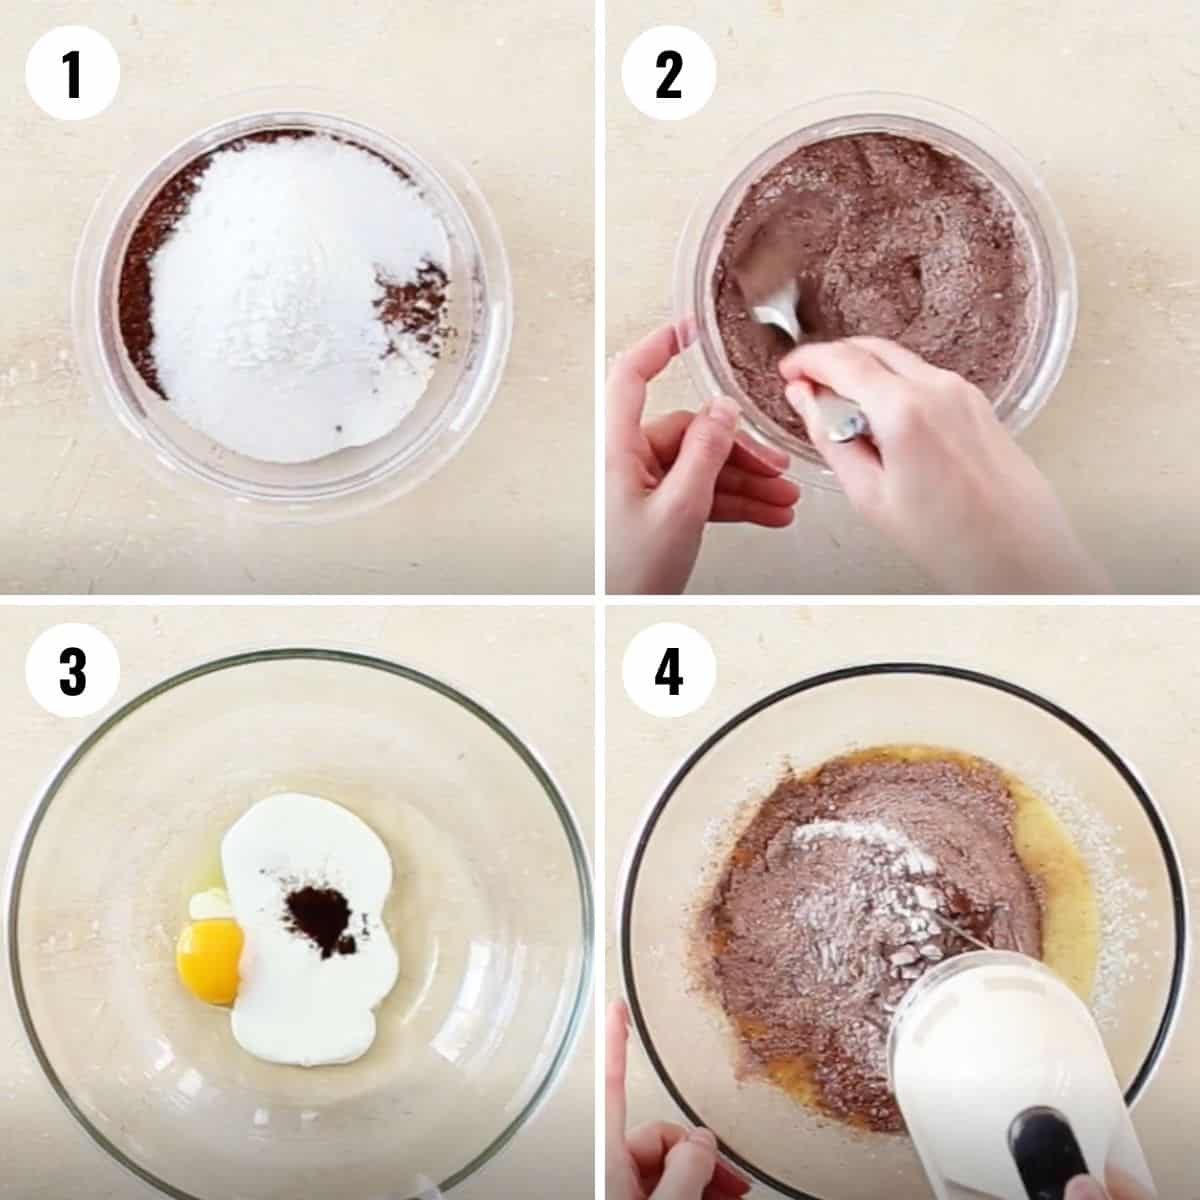
- Step 5: Slowly mix in the hot cocoa until well combined. The batter will be thin.
- Step 6: Pour the batter into your greased and lined baking pan and bake in a preheated oven until the cake is done.
Step 3: Adding the Whipped Cream to the Mousse
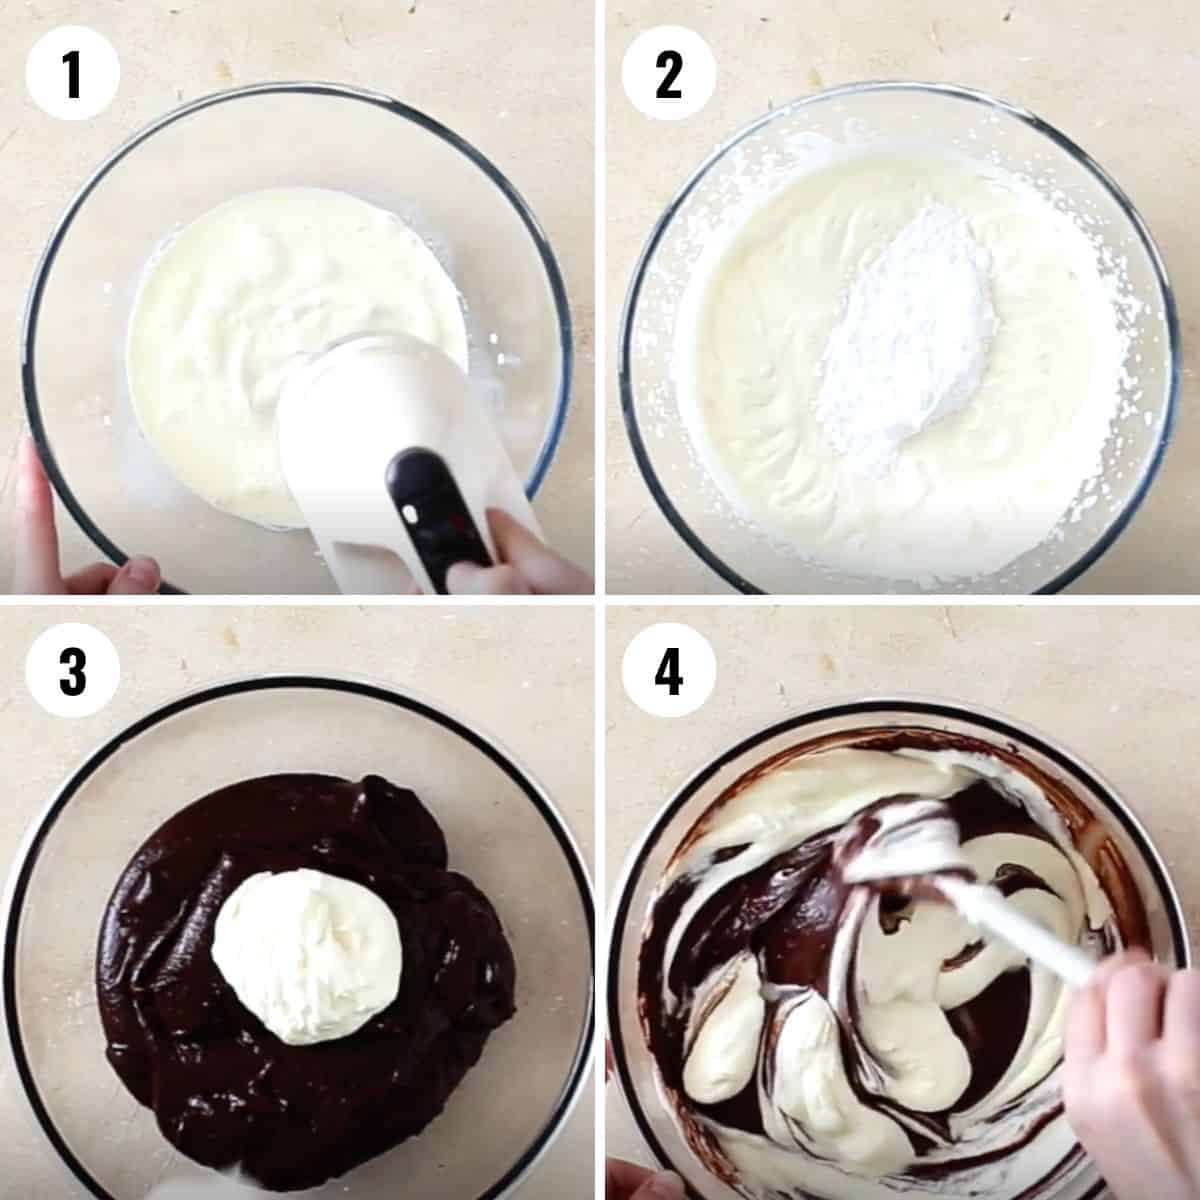
- Step 1: Beat the remaining heavy whipping cream in a large mixing bowl using a stand mixer or electric mixer until soft peaks form.
- Step 2: Add the powdered sugar and beat until stiff peaks form.
- Step 3: Stir about a quarter of the whipped cream into the cooled chocolate cream until the mixture is smooth and combined.
- Step 4: Fold the remaining whipped cream into the chocolate mixture with a spatula carefully until it’s combined. Don't overwork the mousse or it won't set properly.
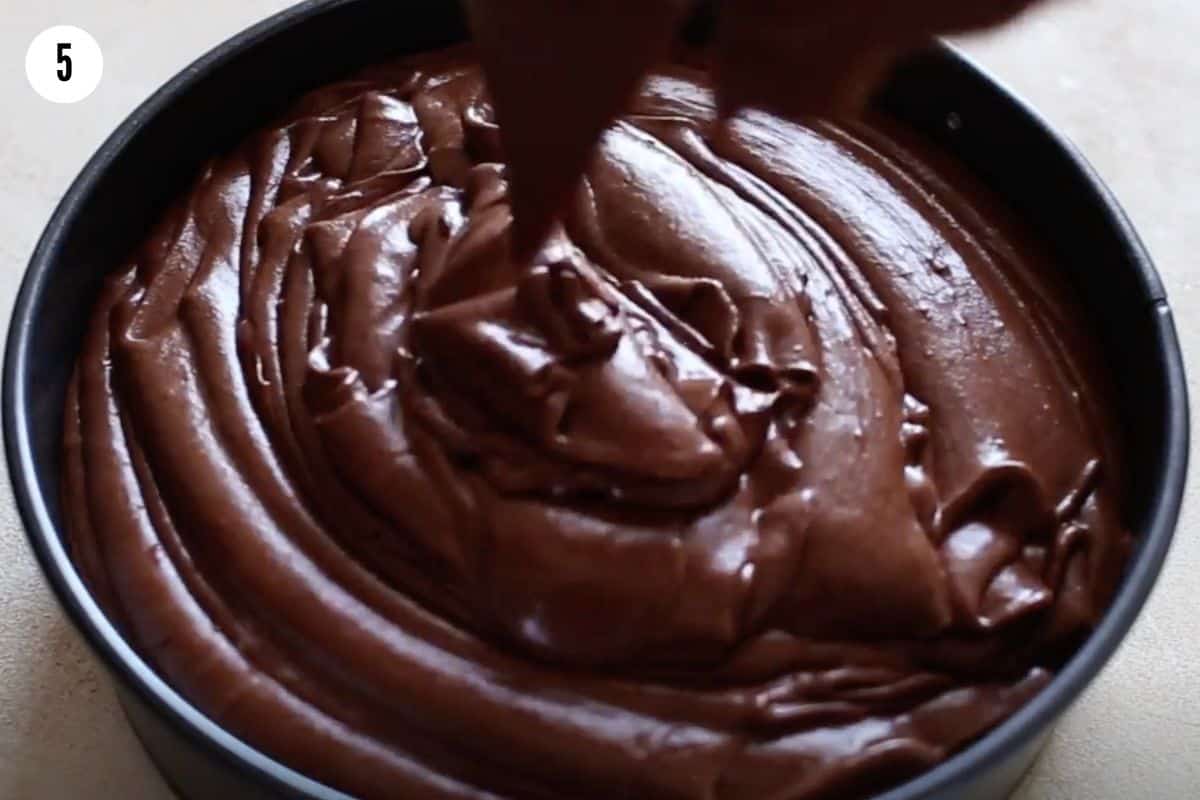
- Step 5: Pour the chocolate mousse into the pan over the top of the cake and spread evenly. Chill in an airtight container in the refrigerator overnight.
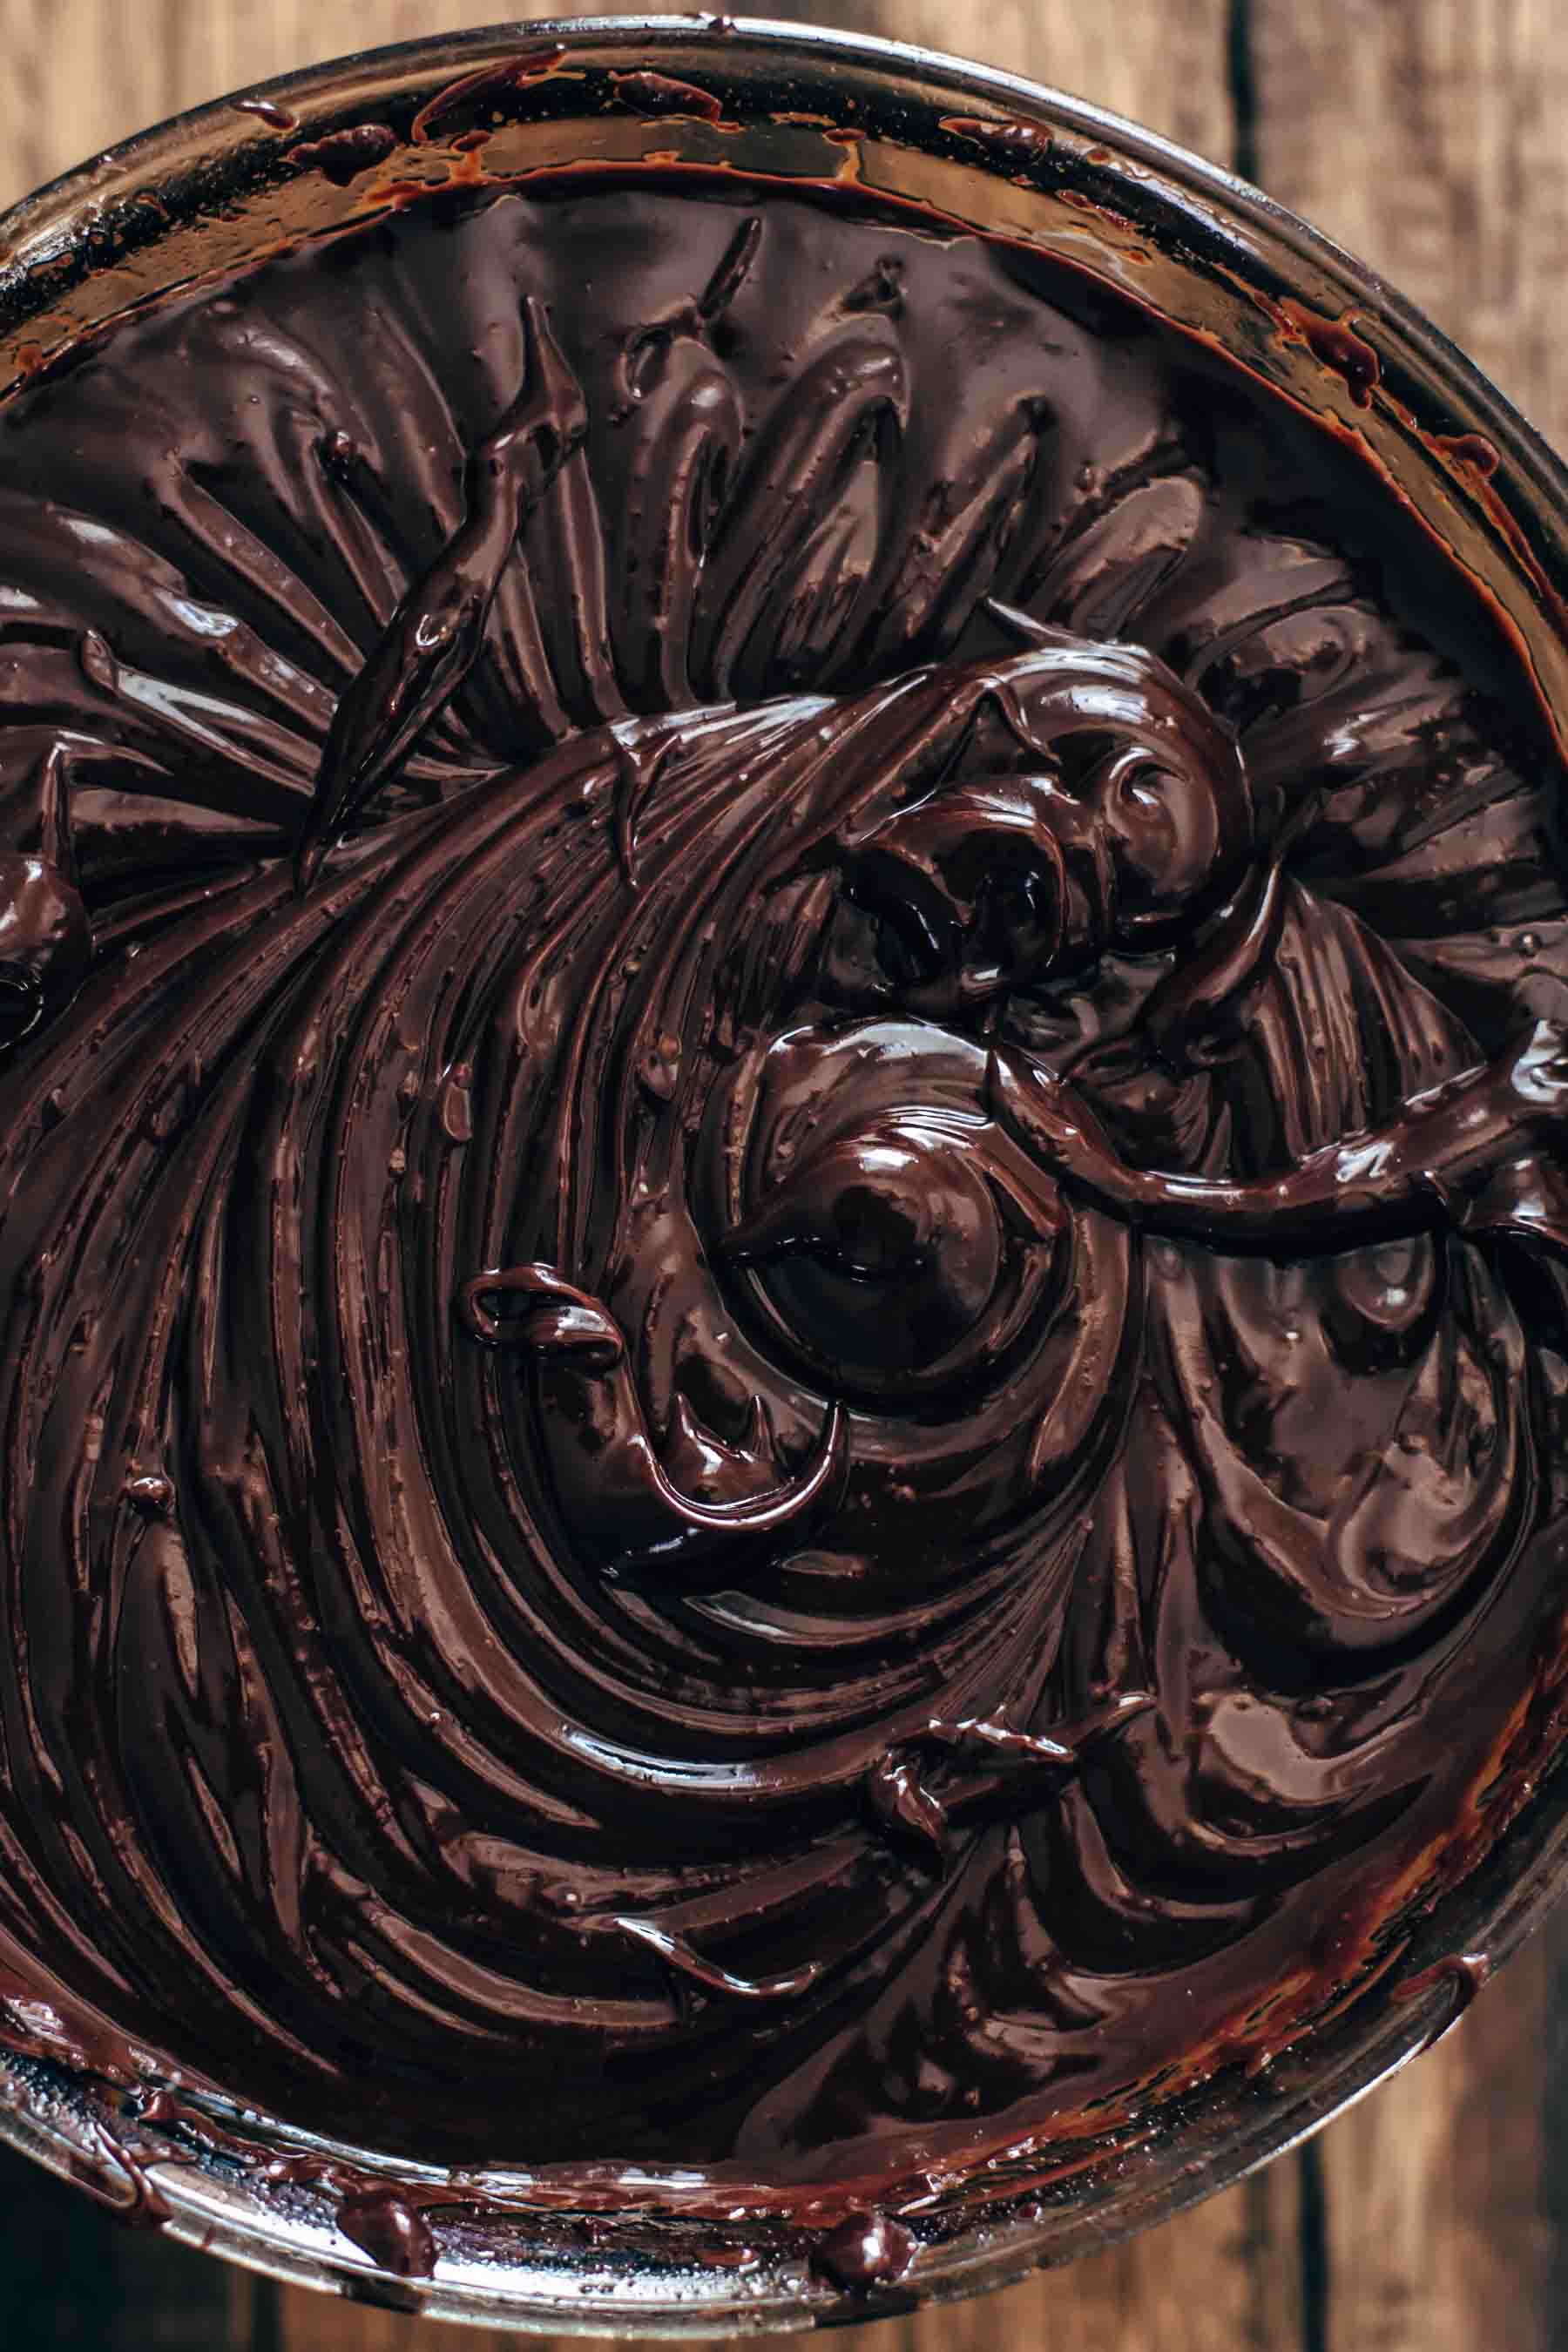
Step 4: Making the Chocolate Ganache
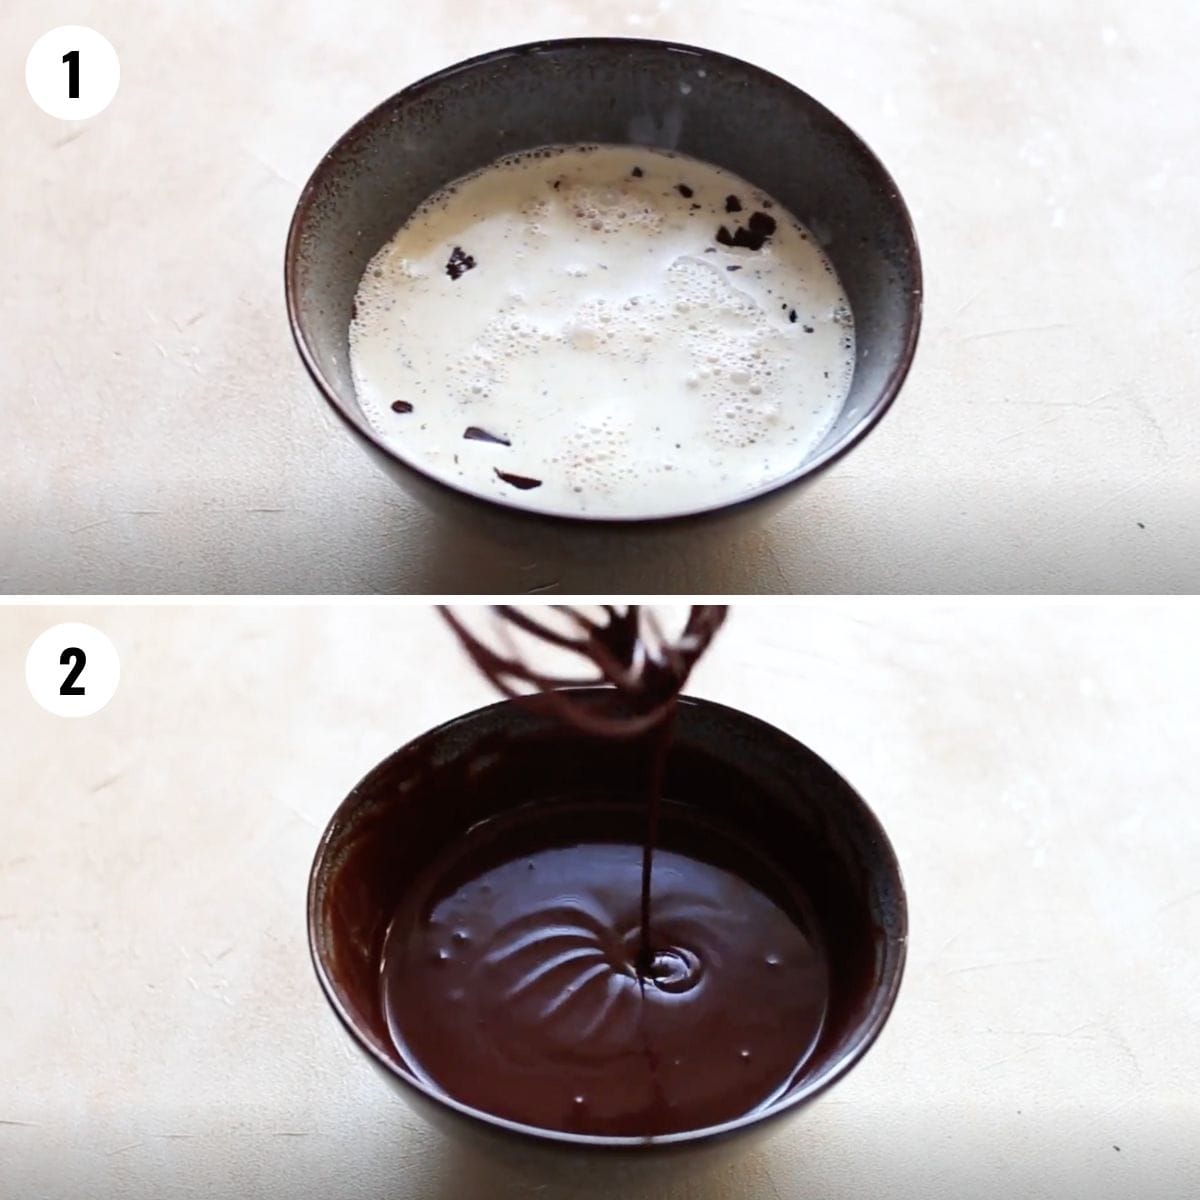
- Step 1: Place the chopped chocolate in a large heatproof bowl and the heavy cream in another heatproof bowl. Microwave the heavy cream until very hot, almost boiling. Pour it over the chocolate and let it stand for 1-2 minutes.
- Step 2: Whisk the mixture until it’s smooth and the chocolate has completely melted. Chill in the fridge for about 10-15 minutes to thicken.
PRO TIP: Test the consistency of the ganache on the side of the bowl. It should drip. The longer it cools, the thicker it gets. If it's too firm, reheat it in the microwave for a few seconds.
Step 5: Assemble the Cake
- Step 1: Spoon the ganache around the edges of the cake, letting it drip down the sides. Do this slowly with a small spoon, making a drop at a time.
- Step 2: Spoon or pour the rest of the ganache frosting onto the cake (you may not need all of it) and smooth it with an offset spatula.
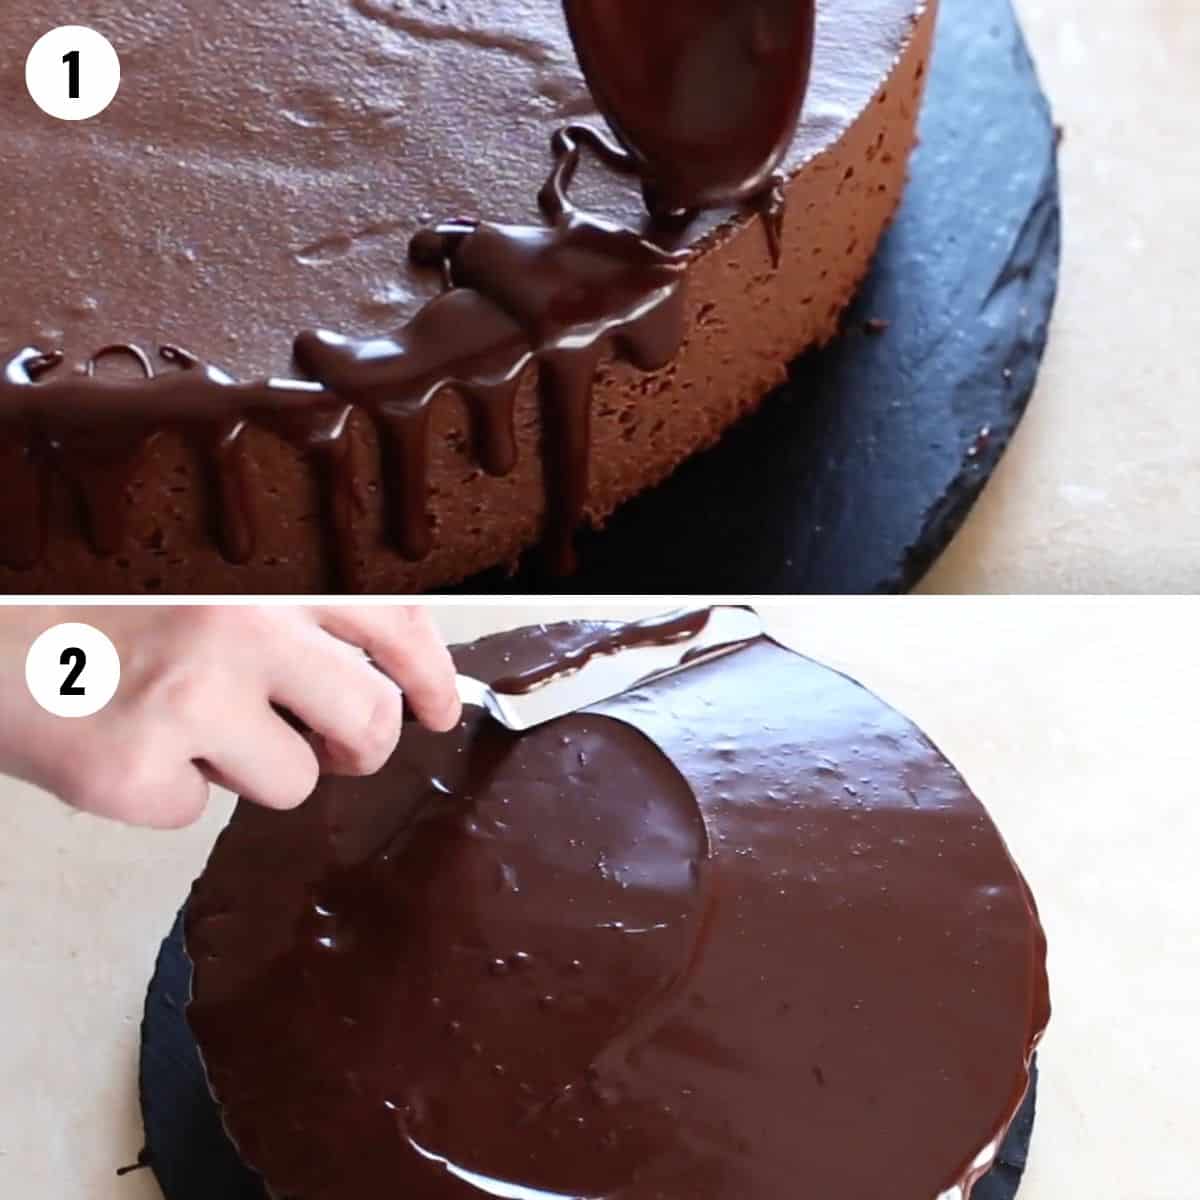
- Step 3: Place the cake in the fridge for 15 minutes to allow the ganache to set. Decorate as you like. Store in an airtight container in the refrigerator for up to 3 days.
Expert Tips for Success
- Measure Dry Ingredients Properly. This is key for the best outcome of your chocolate cake layer. If you're not using a kitchen scale, fluff the dry ingredient up, scoop it into the measuring cup with a spoon, and then level it with the back of a knife without packing. If you don't measure the dry ingredients correctly, the cake layer can become dry and hard.
- Do Not Over-Bake. The cake layer is very thin and over-bakes quickly.
- Cool Completely. Allow the cake base to cool completely before filling it with the chocolate mousse so the mousse will set properly.
- Don't Boil the Egg Yolk Mixture. When making the mousse you want to heat it slowly or you might up with either scrambled eggs or the chocolate custard may split.
- Choosing Chocolate. Use only high-quality chocolate bars for the mousse instead of chocolate chips. The chocolate custard base for the mousse could become grainy and crumbly if you use use chips instead of chocolate bar.
- Folding the Chocolate Into the Whipped Cream. Stop folding the whipped cream into the chocolate custard as soon as it is combined. Don't overmix it or it won't set properly.
- Chill Before Serving. Make sure you chill the cake in the fridge for at least 4 hours before serving as it needs time to set and chill properly. Do not put it in the freezer to speed up the cooling process.
Recipe FAQs
If the chocolate splits and you have an oily film on the surface then the chocolate heated too quickly. Make sure to remove the egg custard from the heat first, continue beating for about 1-2 minutes, then stir in the chocolate. If this has happened to you, the first thing you should do is grab your electric mixer and blend until everything comes together. In most cases, this will work just fine and save your chocolate mousse. It becomes smooth and silky again. If that doesn't help at all, heat 1-2 tablespoons (15-30 ml) of whipping cream and gradually stir it into the custard. Stop adding the cream once it comes together. Normally, that should help.
If your chocolate mousse is runny, there can be a couple of reasons. First, the custard hasn't been cooked long enough. Second, the whipped cream wasn't stiff enough. Be sure to cook the egg custard long enough for it to thicken and coat the back of a spoon. When folding the whipped cream into the chocolate cream, be careful not to destroy any air pockets. Do not overwork the mousse. Also, don't use low-fat whipping cream.
I don't recommend freezing chocolate mousse cake because it changes its texture during the freezing and thawing process. Also, ice crystals may develop within the air pockets. When thawed these ice crystals melt and make the mousse watery.
More Chocolate Cake Recipes to Try


If you tried this Chocolate Mousse Cake Recipe or any other recipe on my website, please leave a 🌟 star rating and let me know how it went in the 📝 comments below. Thanks for visiting!
Recipe
Chocolate Mousse Cake Recipe
Ingredients
Chocolate mousse
- 3 cups heavy whipping cream, divided
- 8 large egg yolks
- ¼ cup granulated white sugar
- 18.5 oz high-quality semi-sweet chocolate bars, melted Use only high-quality chocolate bars for the mousse instead of chocolate chips.
- ¾ cup powdered sugar, sifted
Chocolate cake layer
- 1 cup all-purpose flour, spooned and leveled
- ⅜ cup dutch-processed cocoa powder, spooned and leveled
- ¾ cup granulated white sugar
- 1 ½ teaspoon baking powder
- ½ teaspoon salt
- ¼ cup mild vegetable or canola oil
- 1 large egg
- ¼ cup buttermilk
- 1 teaspoon vanilla extract
- ¼ cup hot cocoa (unsweetened beverage)
Chocolate glaze
- 6 oz high-quality semi-sweet chocolate, finely chopped
- ¾ cup heavy whipping cream
Instructions
- Make the chocolate mousse: In a medium saucepan, whisk together 1 ½ cups heavy cream, egg yolks, and sugar and cook over medium-high heat, until it thickens and coats the back of a spoon, about 1-2 minutes. Whisk continuously. Remove from the heat and continue whisking for about 1-2 minutes. Add melted chocolate and whisk until combined. Transfer the chocolate custard to a large mixing bowl and let cool completely.
- Preheat the oven to 350°F/175°C. Line the bottom and the sides of a 9" / 23cm baking pan with parchment paper and set aside.
- Make the chocolate cake layer: In a medium-sized bowl, mix together the flour, cocoa, sugar, baking powder, and salt and set aside. In a large mixing bowl, using an electric mixer fitted with a whisk or paddle attachment, beat the oil, egg, buttermilk and vanilla, just until combined. Stir in dry ingredients to combine. Slowly mix in the hot cocoa until well combined. The batter will be thin. Pour the batter into the prepared baking pan and bake 14-18 minutes or until a toothpick inserted into the center comes out clean. Leave to cool in the pan for about 20 minutes. Then open the springform pan and let it cool down to room temperature.
- Continue with the chocolate mousse: In a large mixing bowl, using an electric mixer fitted with a whisk attachment, beat the remaining 1 ½ cups heavy whipping cream until soft peaks form. Add powdered sugar and beat until stiff peaks form.
- Using a whisk, stir about ¼ of the whipped cream into the cooled chocolate cream until smooth and combined. Then carefully fold the remaining whipped cream into the chocolate mixture with a spatula until combined. Don't overwork the mousse or it won't set properly.
- Assemble the cake: Slice a thin layer from the top of the cooled cake layer to create a flat surface if needed. Attach the springform ring and close the pan. Then carefully pour the chocolate mousse into the pan and spread evenly. Chill in an airtight container in the refrigerator overnight.
- Make the chocolate ganache: Place chopped chocolate in a large heatproof bowl and set aside. Place heavy cream in another heatproof bowl and microwave until very hot, almost boiling, about 1-2 minutes. Pour over the chocolate and let stand 1-2 minutes. Whisk until smooth and the chocolate has completely melted. Chill in the fridge for about 10-15 minutes to thicken. Test the consistency of the ganache on the side of the bowl. It should drip. The longer it cools, the thicker it gets. If it's too firm, reheat it in the microwave for a few seconds. Once it has reached the desired consistency, it can be spooned onto the cake.
- Remove the ring from the springform pan and gradually spoon the ganache around the edges of the cake, letting it drip down the sides. Do this with a small spoon, making a drop at a time. Then spoon or pour the rest of the frosting onto the cake (you may not need all of it) and smooth with an offset spatula. Place the cake in the fridge for 15 minutes to allow the ganache to set. Decorate as you like. Store in an airtight container in the refrigerator for up to 3 days.
Notes
Video
You can find the video in the post above. If you don't see a video, please check your browser settings.
Marion
"Best cake I've had in my life! You need to sell it". This recipe was labor intense for me in a shared kitchen however worth it! I couldn't eat or give awat within 3 days...so, I froze the left overs sliced on tray - then removed when frozen - individually separating each, then put ice cresm on top...still amazing when kinda frozen!
Stacey
I'm making this right now, I used a brownie base instead of cake, I didn't realize that I had to leave it overnight to set, has anyone tried putting in the freezer? How long do you think it would take to set in the freezer?
Sabine
I'm sorry, I've never tried to let it set in the freezer. I'm not sure if the texture would be the same as when chilled overnight.
Susie L.
WOW! I've never felt compelled to leave a review, but then I made this cake! Perfect texture and taste! Many family birthdays have been celebrated with a run to a local French bakery to pick up a chocolate mousse cake. The bakery will miss us!
Thank you for sharing!