
Let me tell you the reasons why I think these New York-style mini cheesecakes are awesome. They only need 8 ingredients and require very little prep time.
They are incredibly easy to do, even for beginners! You won’t even need to worry about your mini cheesecakes cracking or not setting properly.
They freeze very well, so they’re easy to incorporate these desserts into your meal planning. And most importantly, they are absolutely delicious!
It has a dense yet crunchy graham cracker crust topped with a luscious and velvety cream cheese filling. What more can you ask?
By the way, this is not the only cheesecake recipe you’ll find in Also The Crumbs, Please. Here’s a collection of 43 cheesecake recipes you can also check out.
Jump to:
Video Tutorial
Ingredients
Crust
- ⅔ cups graham cracker crumbs
- ¼ cup unsalted butter melted
- 1 tablespoon granulated sugar (white)
Filling
- 12 oz cream cheese, at room temperature
- ⅜ cup granulated sugar (white)
- 1 tablespoon all-purpose flour
- 1 large egg
- 1 teaspoon vanilla extract
- ¼ cup heavy whipping cream
Kitchen Tools & Equipment Needed
- Oven
- Ramekins
- Parchment paper
- Muffin pan
- Cupcake liners
- Flat-bottomed shot glass
- Utility bowls
- Stand mixer or handheld mixer
- Ice-cream scoop
- Airtight container
Essential Equipment and Ingredients for Mini Cheesecakes
You may skip ahead to the actual recipe if you want. I just want to discuss the essential equipment and ingredients we’re going to use. Let’s start with the baking tray.
What Pans Do I Need?
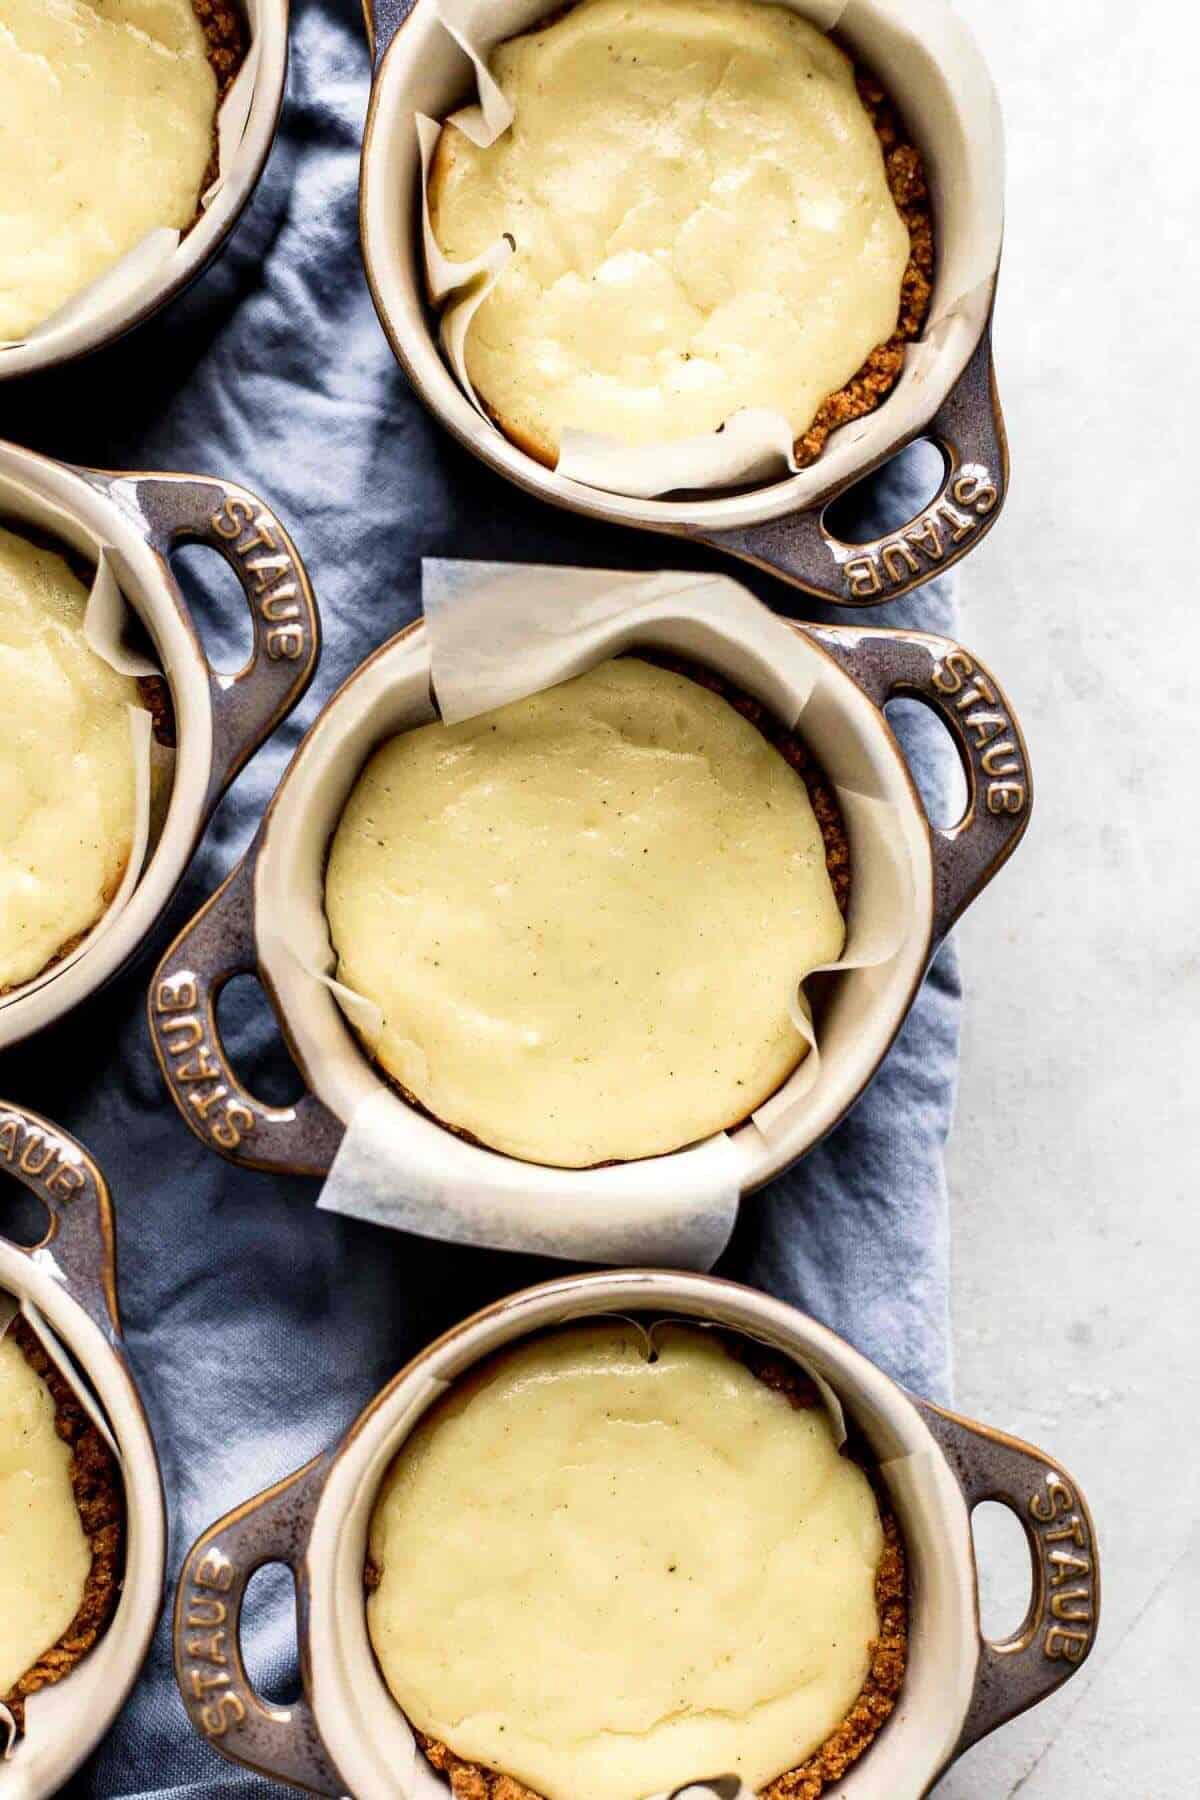
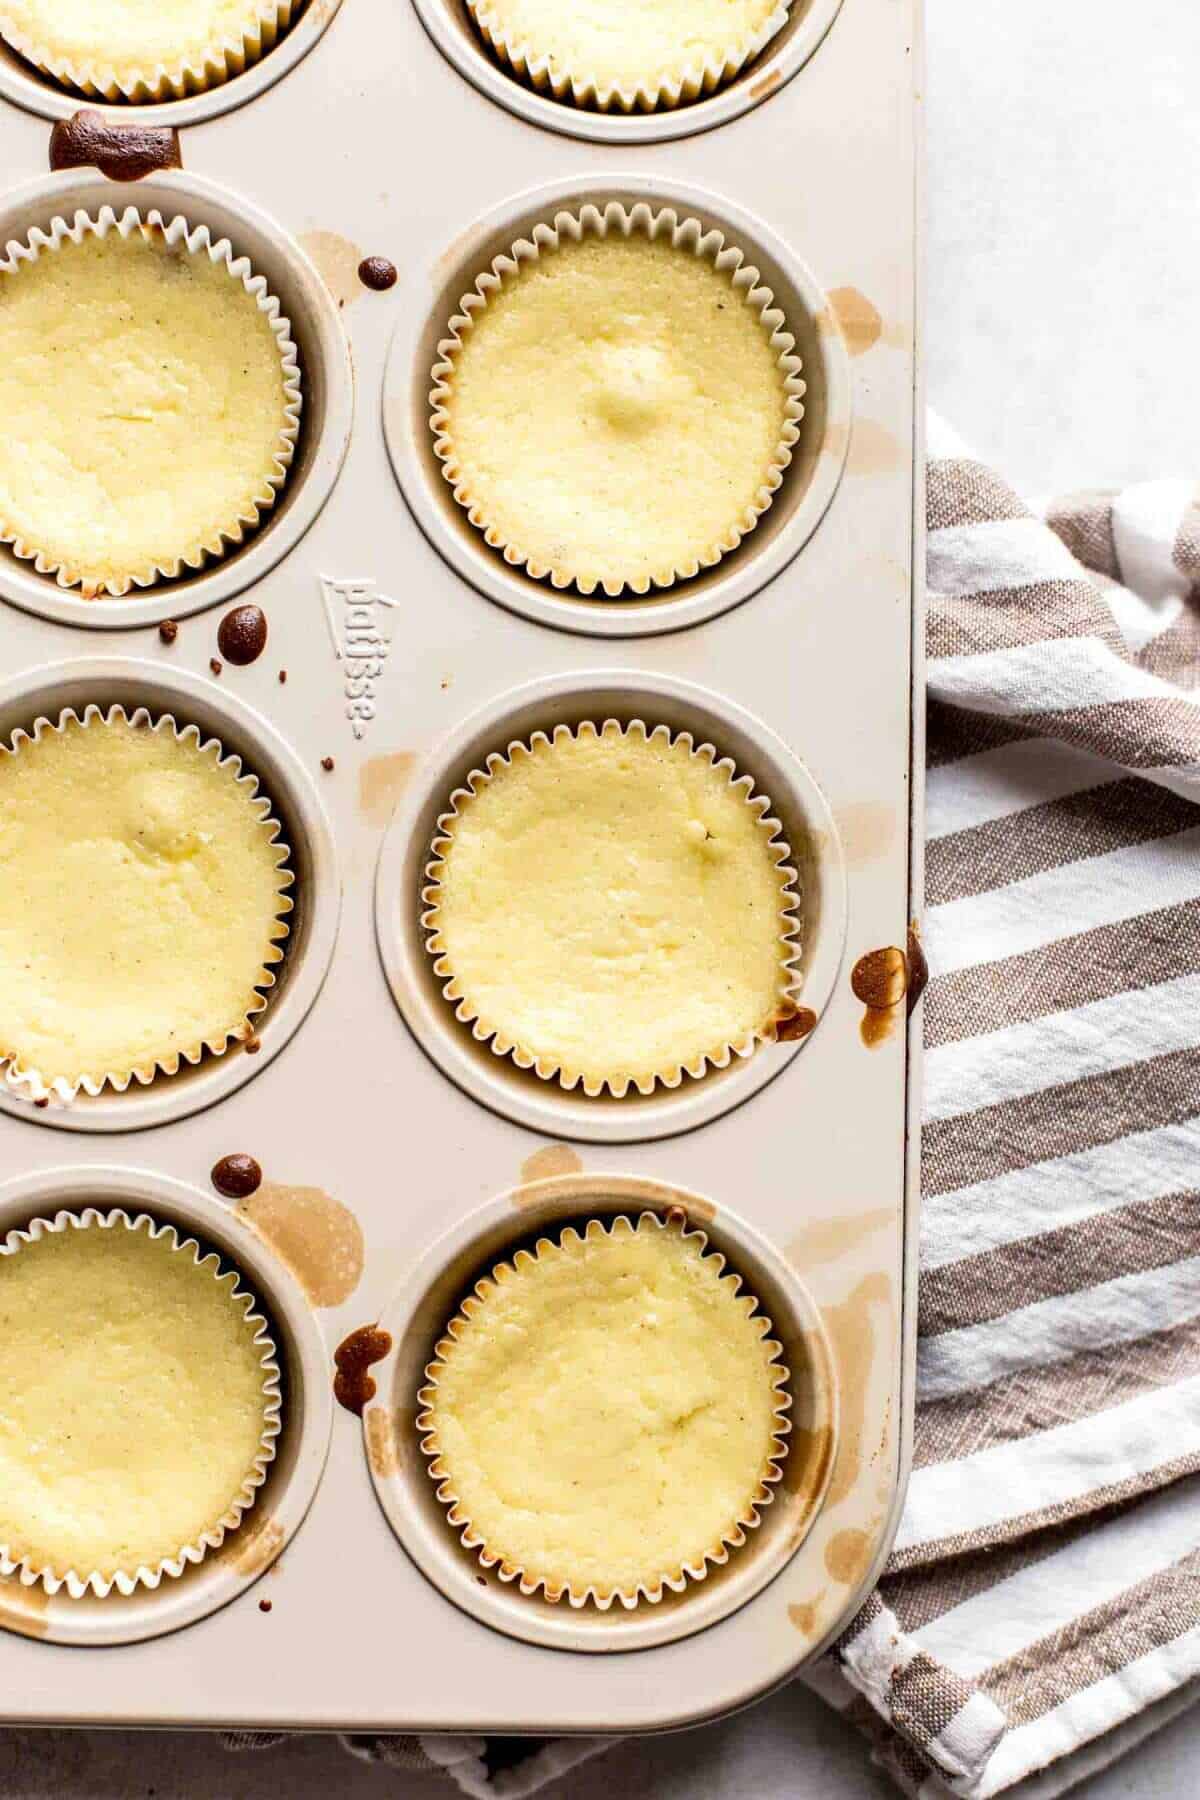
I am going to show you the two ways to make mini cheesecakes in this recipe. To do this, I will be using two types of baking implements: a muffin pan and six 1-cup-sized ramekins. You may choose one method or both. Either way will work.
Just keep in mind that the measurements in this mini cheesecake recipe are enough for either 6 ramekins or 12 muffin-sized mini cheesecakes. Hence, you will need to double everything if you want to try both methods.
Can I use a cupcake pan?
Yes, you can. However, you might need to make adjustments in your measurements depending on the size and depth of your cupcake pan.
Making the Crust
I have a confession to make. I love buttery graham cracker crust. This is one of the reasons why many of my cheesecake recipes use graham crackers.
However, don’t let this limit you! Use the crackers or cookies you want to use as a crust. Base it on your needs and preferences.
For instance, there are gluten-free graham crackers out there if that’s what your diet necessitates. Meanwhile, you can also consider using chocolate sandwich cookies, digestive biscuits, and vanilla wafers, among many other choices.
In relation, you’ll also notice that I will be using graham cracker crumbs for this recipe. That’s because fine crumbs are crucial for me to achieve the texture I want for my crust. It’s convenient that I won’t need to worry about that anymore.
That said, you can certainly make your own crumbs. The easiest method is to put your graham crackers in a zip-top bag and crush them with a rolling pin. However, if you want to form fine crumbs, then it would be ideal to use a food processor, blender, grinder, or similar kitchen appliance instead.
Making the Cheesecake Filling
Finally, let’s not forget the star of any cheesecake recipe: the cream cheese filling! Feel free to choose the type and brand of cream cheese you prefer.
You can use brick-style and spreadable options. As for brands, Philadelphia Cream Cheese is a popular option.
Quick Tip: Brick-style works well as room-temperature cream cheese, while the spreadable type works better cold.
The only thing that I would recommend when you’re trying to determine which cream cheese to use is to choose full fat cream cheese. The high-fat content is essential to achieve that ultra-creamy consistency.
While it is possible to use low-fat cream cheese to make cheesecakes, just keep in mind that the texture will differ.
I will also be using heavy whipping cream for my cheesecake filling. Heavy cream is usually added to cheesecake recipes since it helps in softening and adding moisture to your cream cheese.
However, you can also use sour cream as an alternative, especially if you want to cut through the sweetness and add a hint of tanginess to your dessert.
Anyway, now that we have a better grasp of the most important equipment and ingredients in this mini cheesecakes recipe, we can move on to the fun part: actually making them!
Step-by-Step Guide to Making the Best Mini Cheesecakes
1. Do the Prep
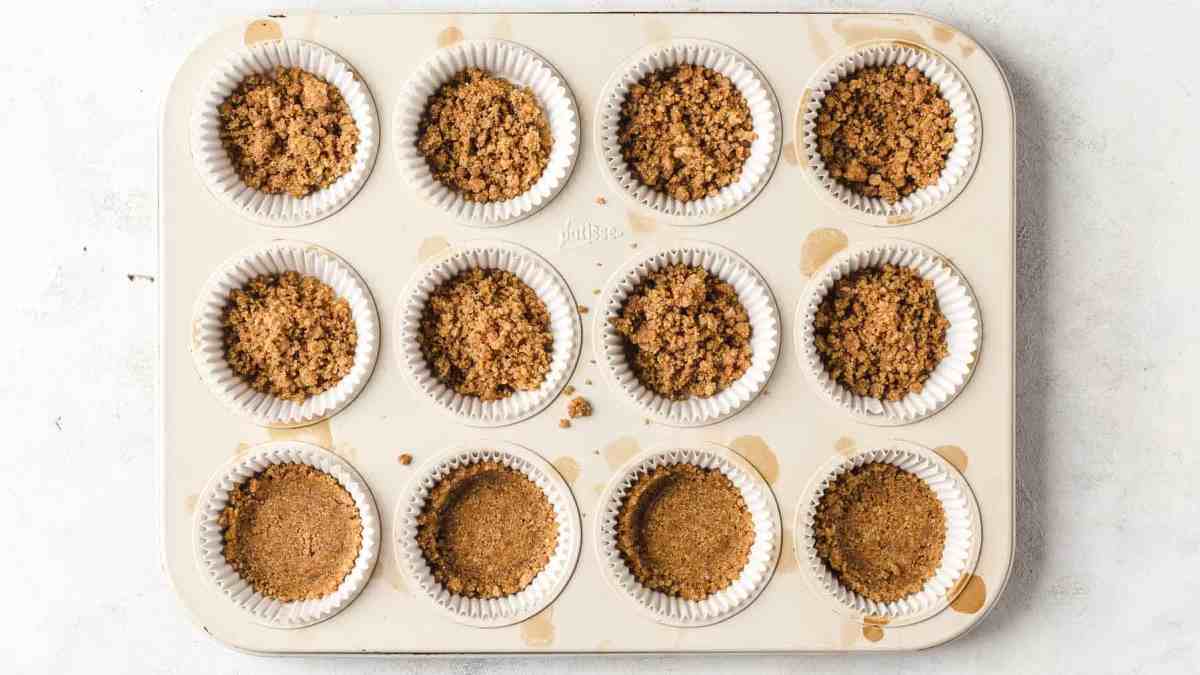
Preheat oven to 350°F (or 175°C). While you’re waiting, line your muffin pan or ramekins with paper liners.
You can use paper cupcake liners right out of the packaging for your muffin pan cups. However, you are going to need a wider sheet of parchment paper if you’re going to use ramekins.
Cut your parchment paper into six 6-inch squares. Then, cut out their corners so that you end up with 6 six-sheets of paper liners shaped like big plus signs. Ensure that the inner corners of your cut paper sheets are the same size as the diameter of your ramekin bottom.
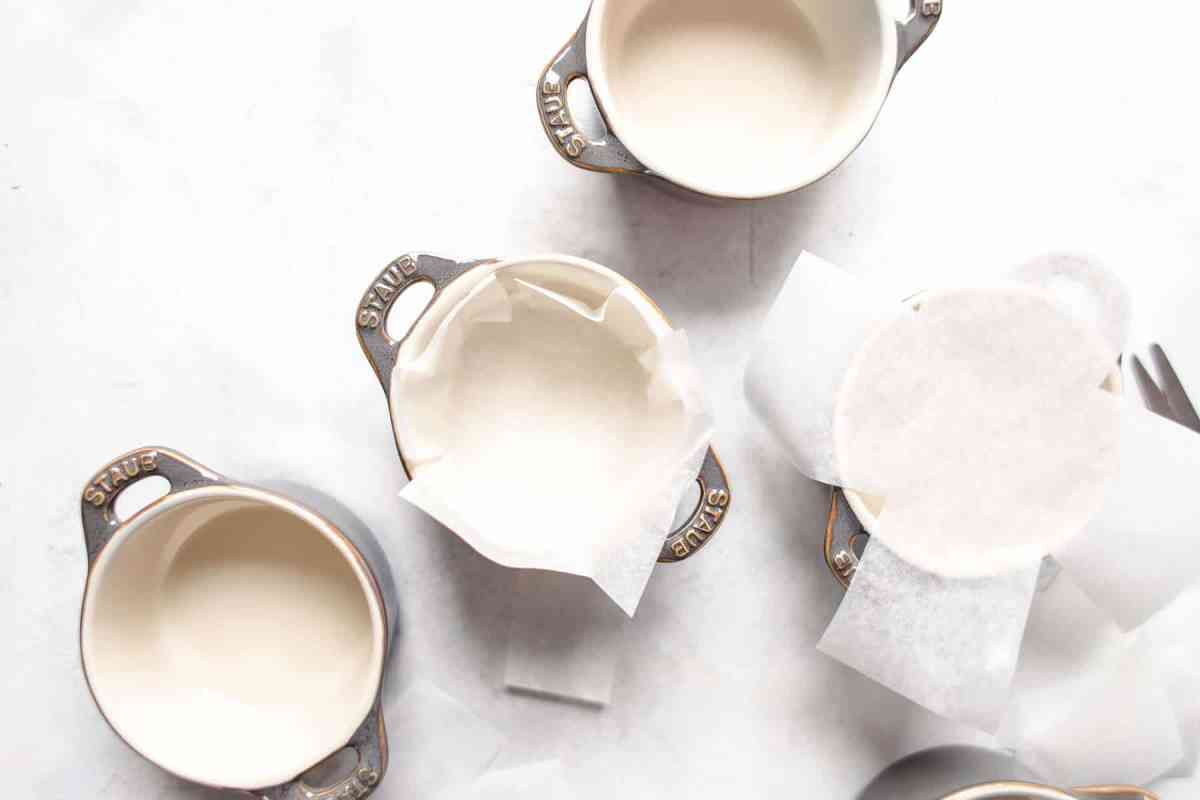
Once ready, push the paper sheets into the bottom of the ramekins, taking care that the bottom and its sides are aptly layered. Lining your ramekins carefully will help you extract your mini cheesecakes from the ramekins with more ease later on.
You also need to crush your graham crackers (preferably with a food processor for finer crumbs) as part of the prep if you’re not using store-bought graham cracker crumbs.
2. Prebake the Crust
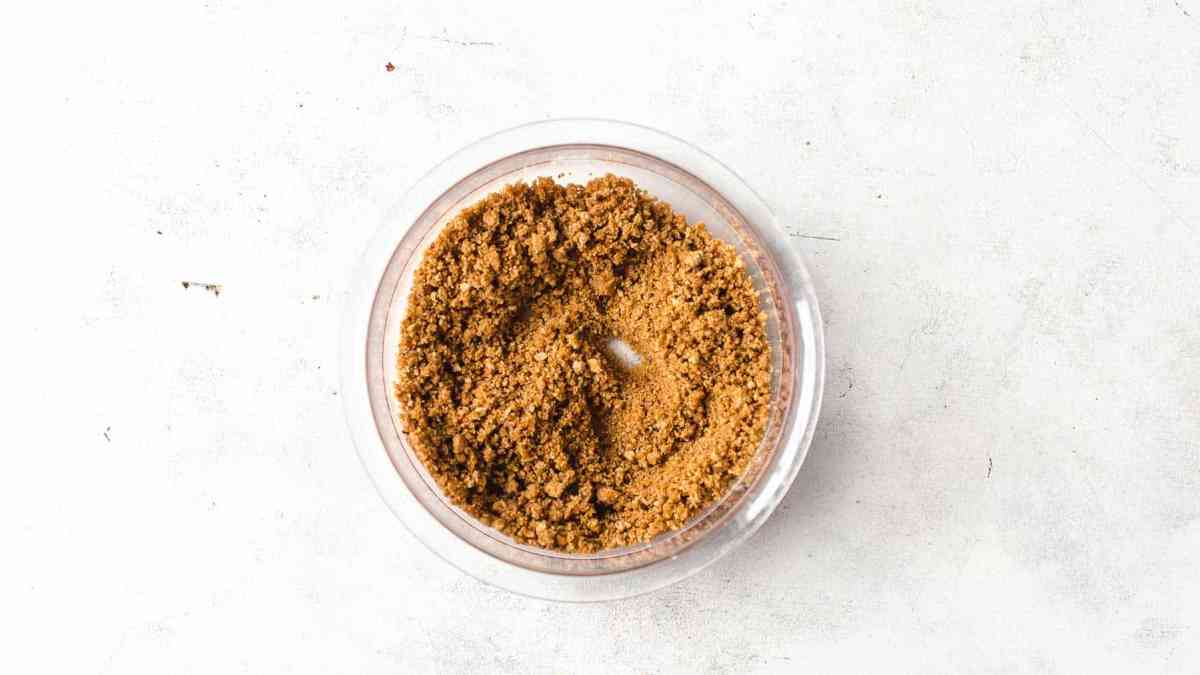
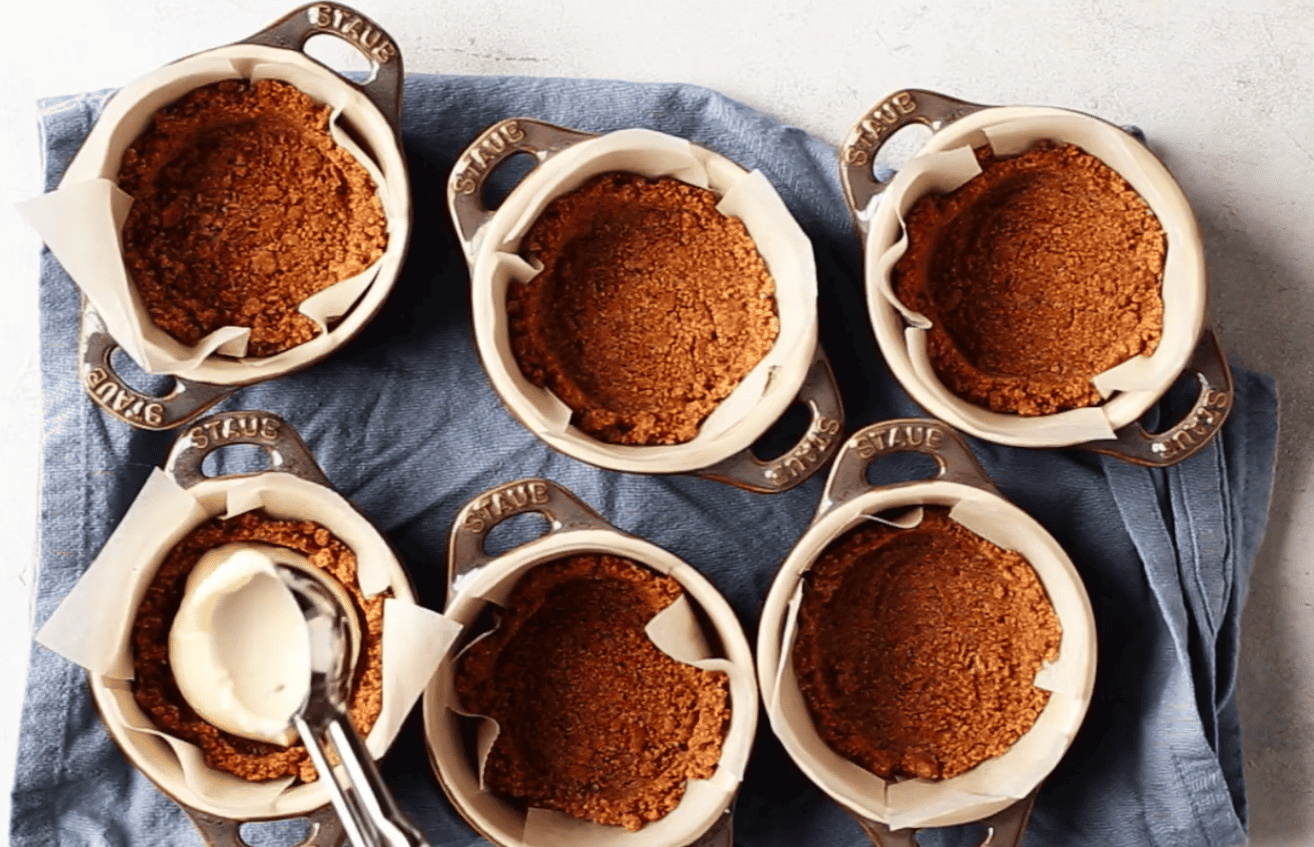
In a large mixing bowl, combine graham cracker crumbs, sugar, and melted butter. Do so until all of your ingredients are evenly moist.
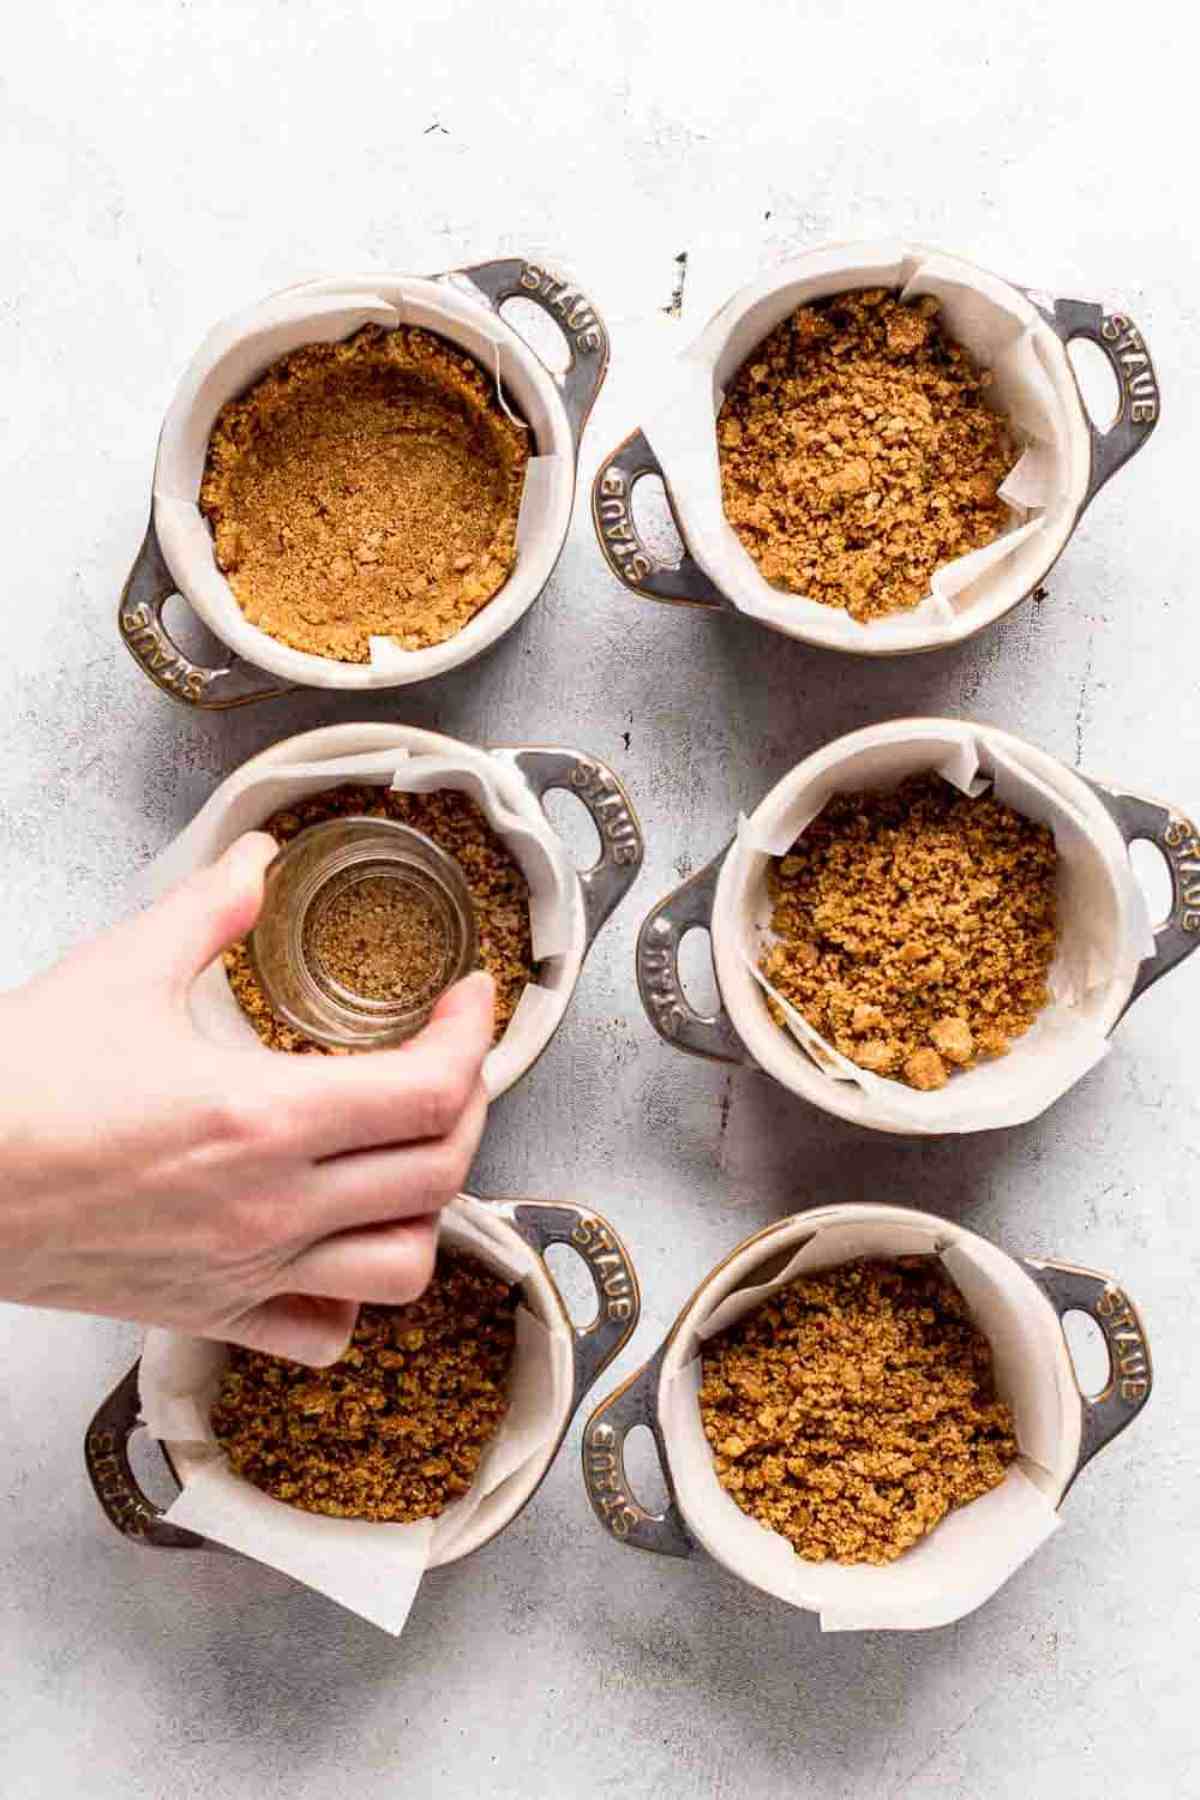
Transfer the crust to your lined muffin pan or ramekins. Press the crumbs down into the muffin cups or ramekins with the back of a flat-bottomed shot glass into the bottom and a bit up the sides.
The back of a spoon will also work but not as efficiently. I’ve found that using my fingers to press down the crust is even better at times.
Then, prebake the crust for 5 minutes. In the meantime, let’s move on to the next step in the mini cheesecake recipe: making the cheesecake filling.
3. Make the Cheesecake Filling
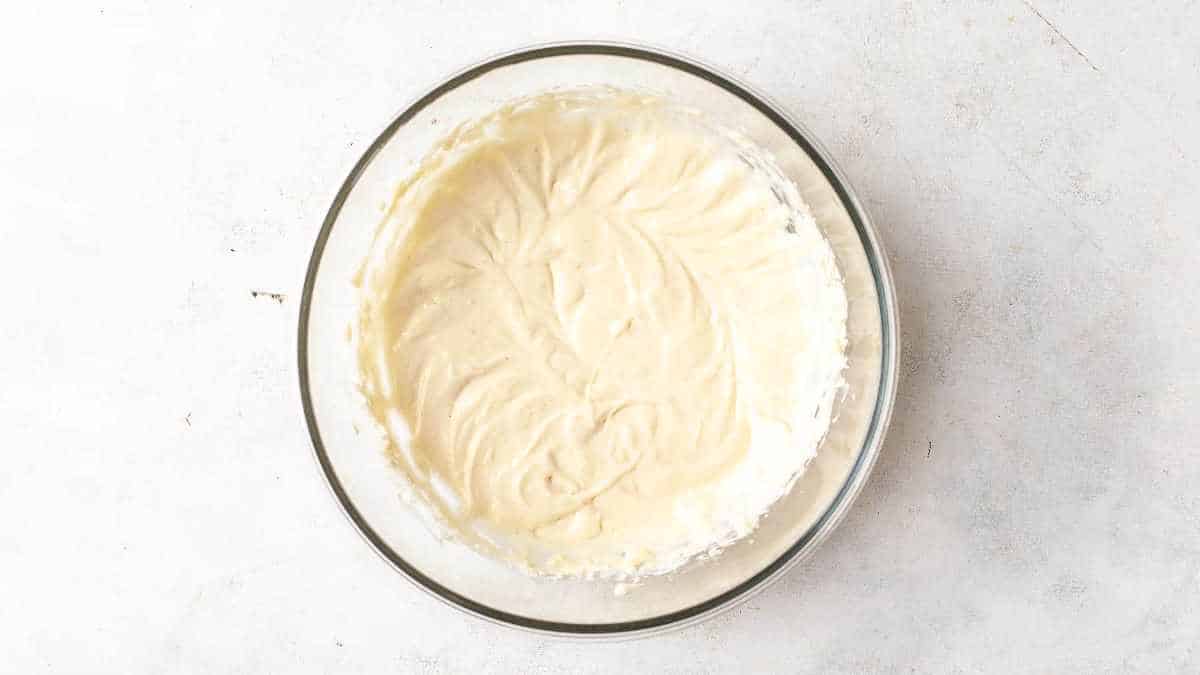
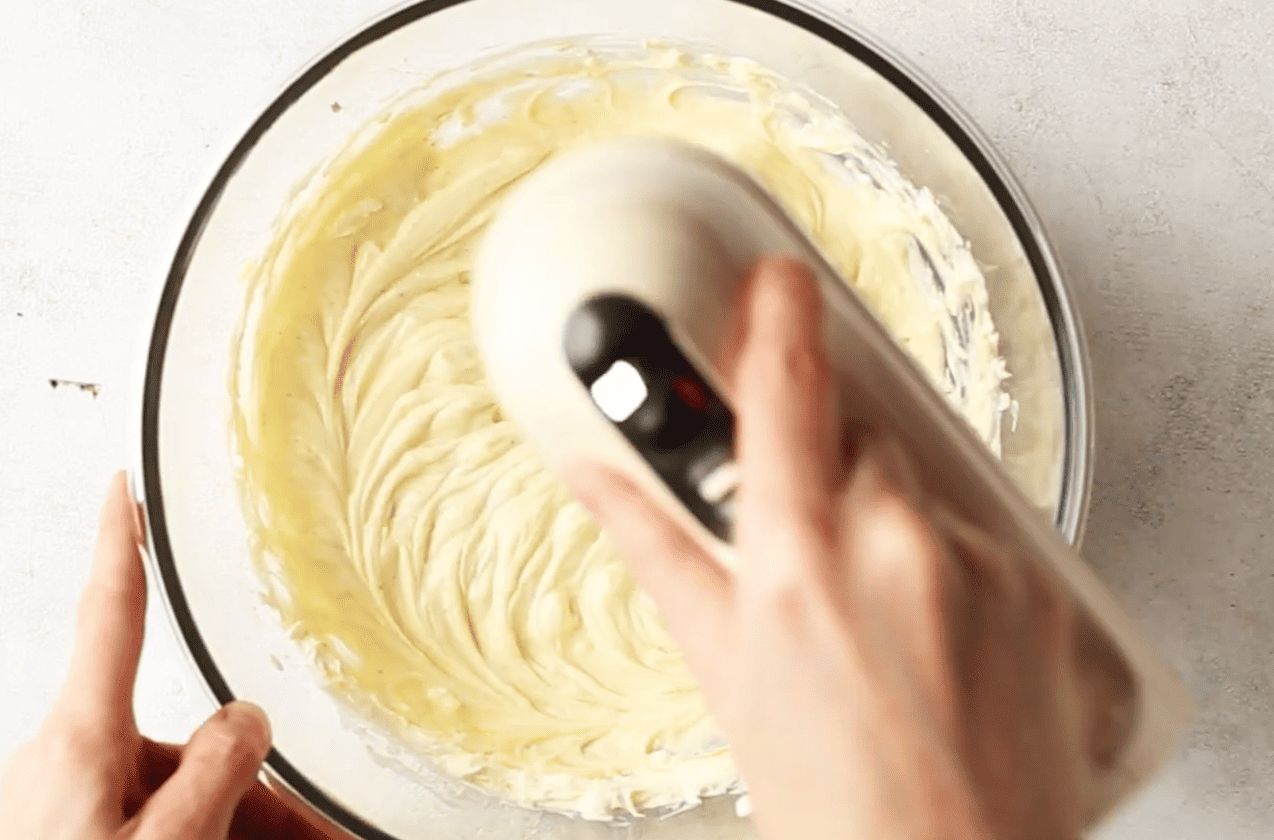
In a large mixing bowl, beat cream cheese on medium speed for 1 to 2 minutes or until it’s creamy. You may use any electric mixer you have on hand and use a whisk or paddle attachment.
I personally use a handheld mixer over a stand mixer because I prefer to have more control over its movement.
In the absence of an electric mixer to use, using a whisk will do. However, don’t expect your mini cheesecake mixture to be as smooth.
Just in case you’ve skipped my quick guide above, I have recommended using room-temperature cream cheese if you’re using the brick-style type. Meanwhile, you need to use spreadable cream cheese straight out of the fridge if possible.
What if my cream cheese is too hard?
If you feel that your cream cheese block is too frozen and hard to use, then you can quickly bring it down to room temperature by placing it in a bowl of warm water. I just make sure that it’s tightly wrapped in plastic wrap so that no water comes through.
Anyway, once your mixture is smooth, add the all-purpose flour and granulated sugar. Again, mix until your ingredients are incorporated.
Then, stir in your egg and vanilla extract. You may also use vanilla bean paste as an alternative. Just know that it will yield a more intense vanilla flavor.
Add your heavy cream and continue mixing. Again, you may also add sour cream as a substitute for heavy cream.
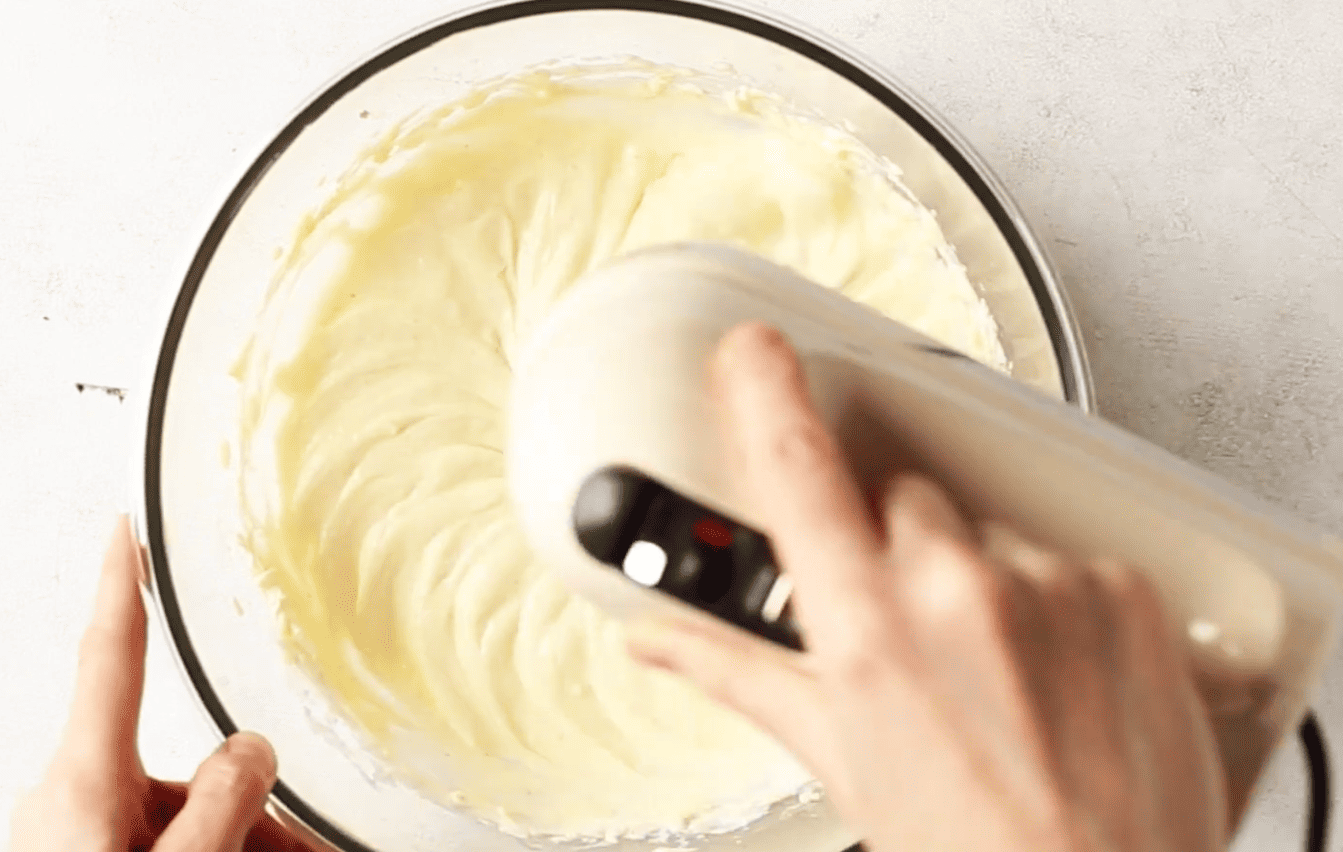
Be careful not to overmix to achieve that nice creamy filling. You also don’t want to introduce too much air in your batter.
Too much air can cause cracking.
4. Bake Your Mini Cheesecakes
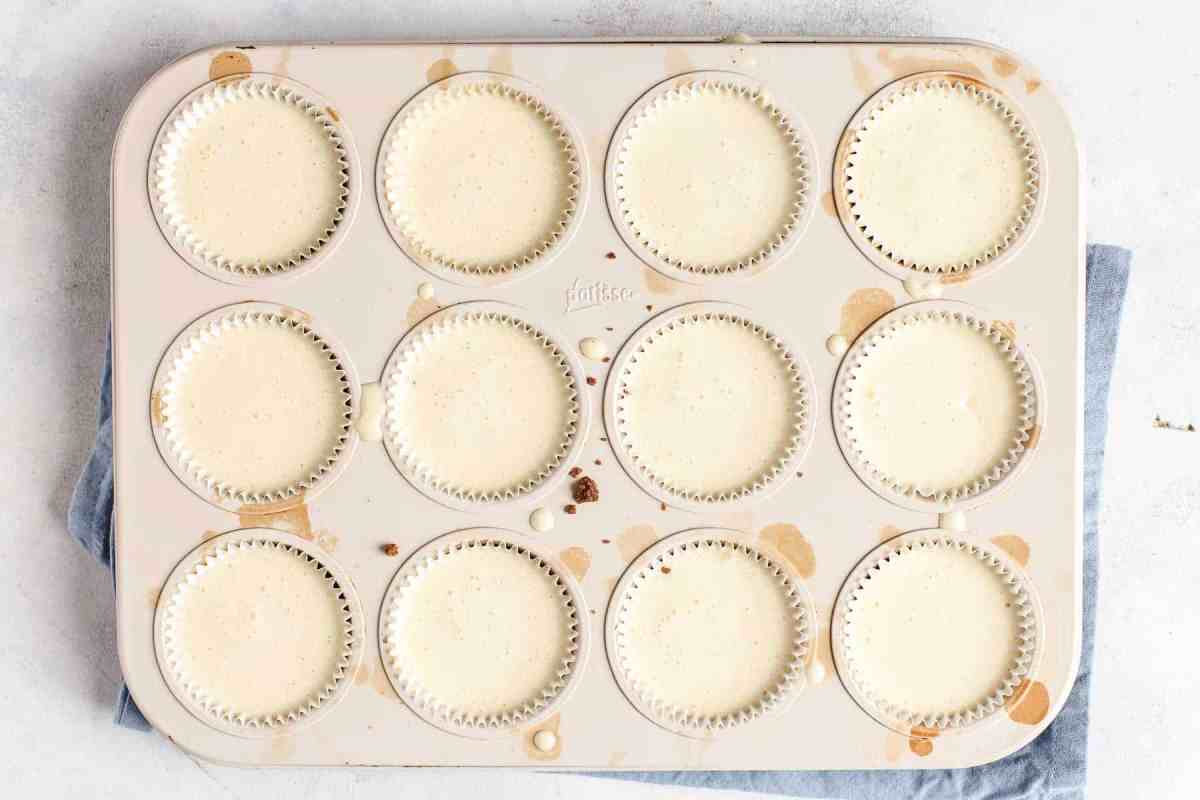
Grab your muffin pan or six ramekins with your prebaked graham cracker crust. You may start dividing your cheesecake batter into your lined muffin cups or ramekins.
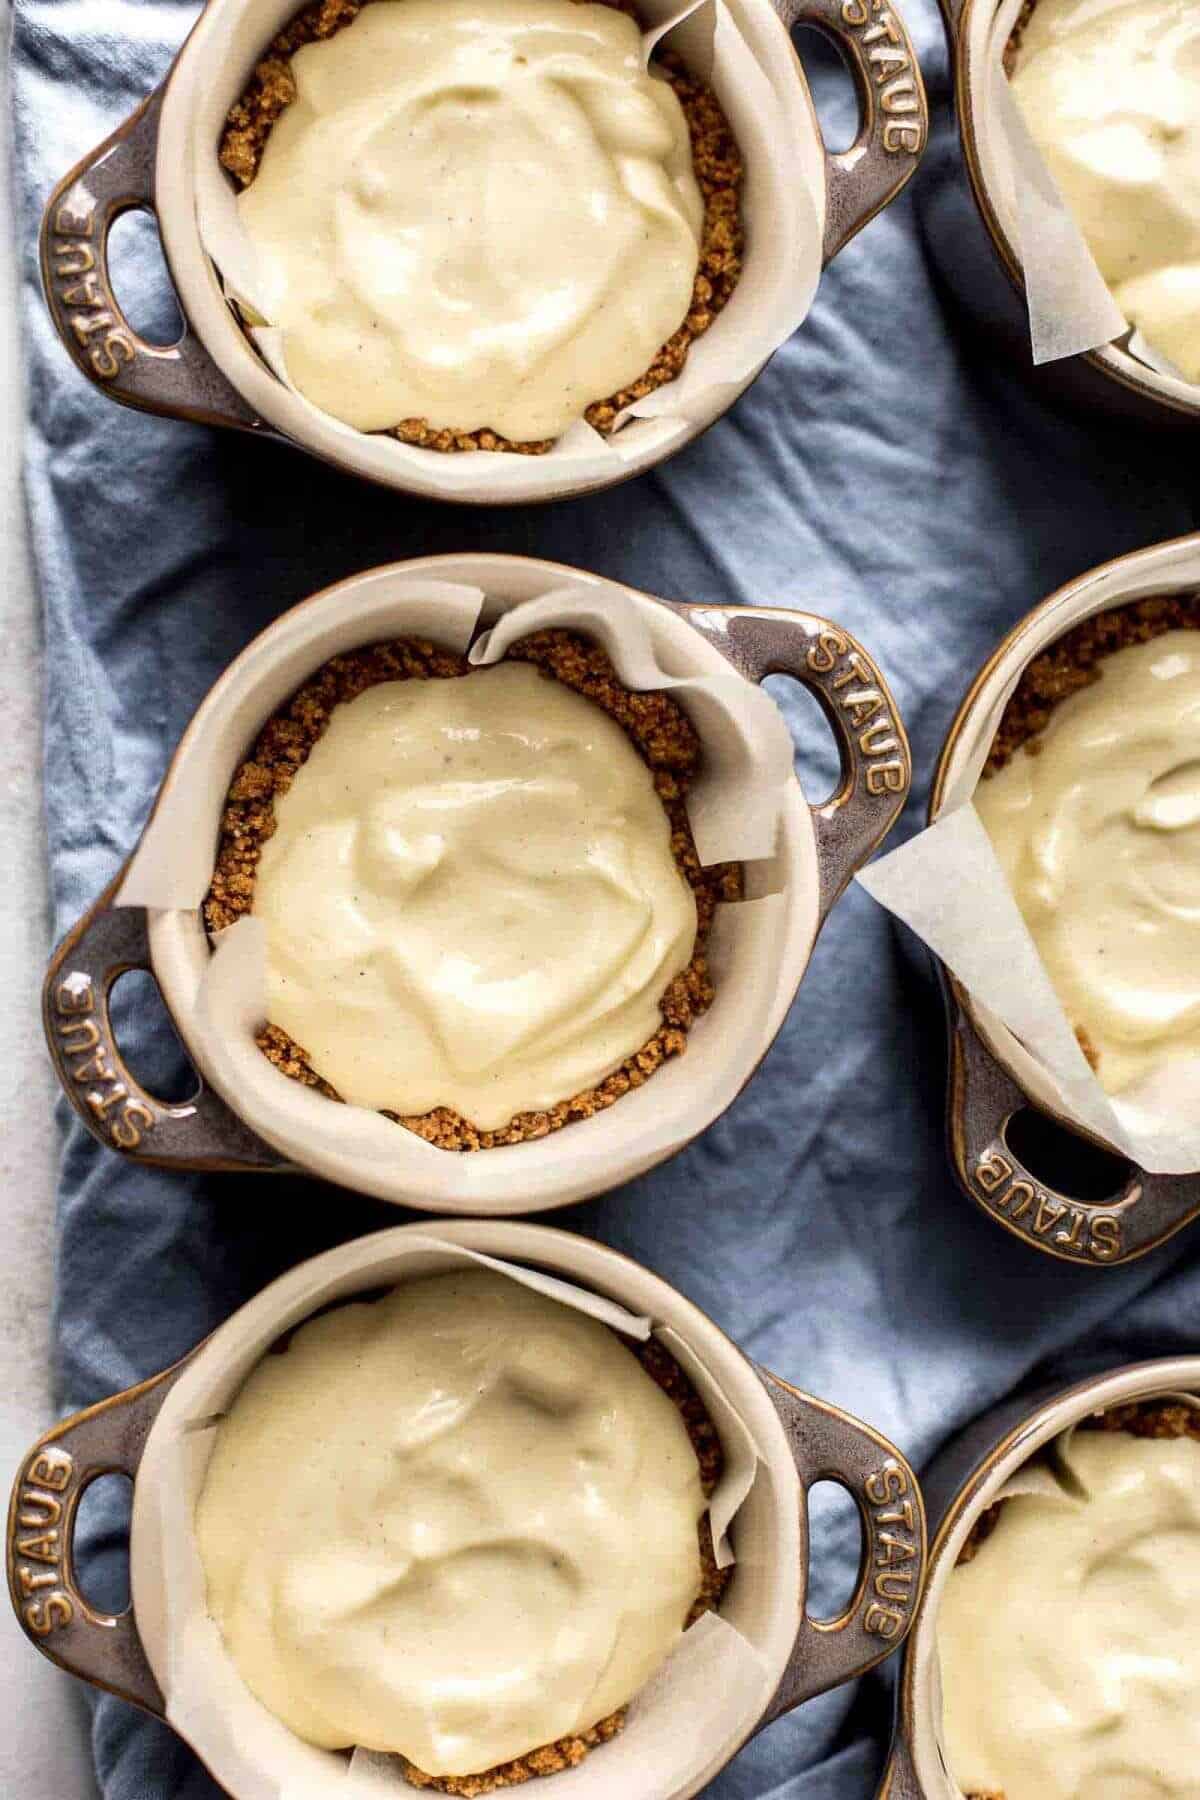
I am just going to use an ice cream scoop to do this, spooning in a scoop for each baking container methodically and one at a time. You may also use a spoon or a spatula in the absence of an ice cream scoop.
Another tip is to use a kitchen scale to divide your batter into equal servings if you want your petite treats to be more uniform in size.
Once you’re done distributing your smooth filling to your cups, it’s time to start baking. Bake your mini cheesecakes for 20 to 23 minutes if you’re using ramekins. Meanwhile, those in a muffin pan only need to bake for 13 to 15 minutes.
You won’t need to poke a toothpick into a mini cheesecake just to when it’s cooked. This is insignificant since your batter will continue to set as your cheesecakes cool when they’re done.
What you don’t want to do is overbake them since your adorable mini cheesecakes will end up less creamy this way. Instead, you’d want to see a slight jiggle in the center of your desserts.
5. Let Your Cheesecakes Set
We have finally reached the last step of this mini cheesecake recipe. It’s time to let your mini cheesecakes set.
If you’re worried that the center of your mini cheesecakes is still wobbly, then rest assured that this is normal when you make mini cheesecakes. The setting phase will take care of that.
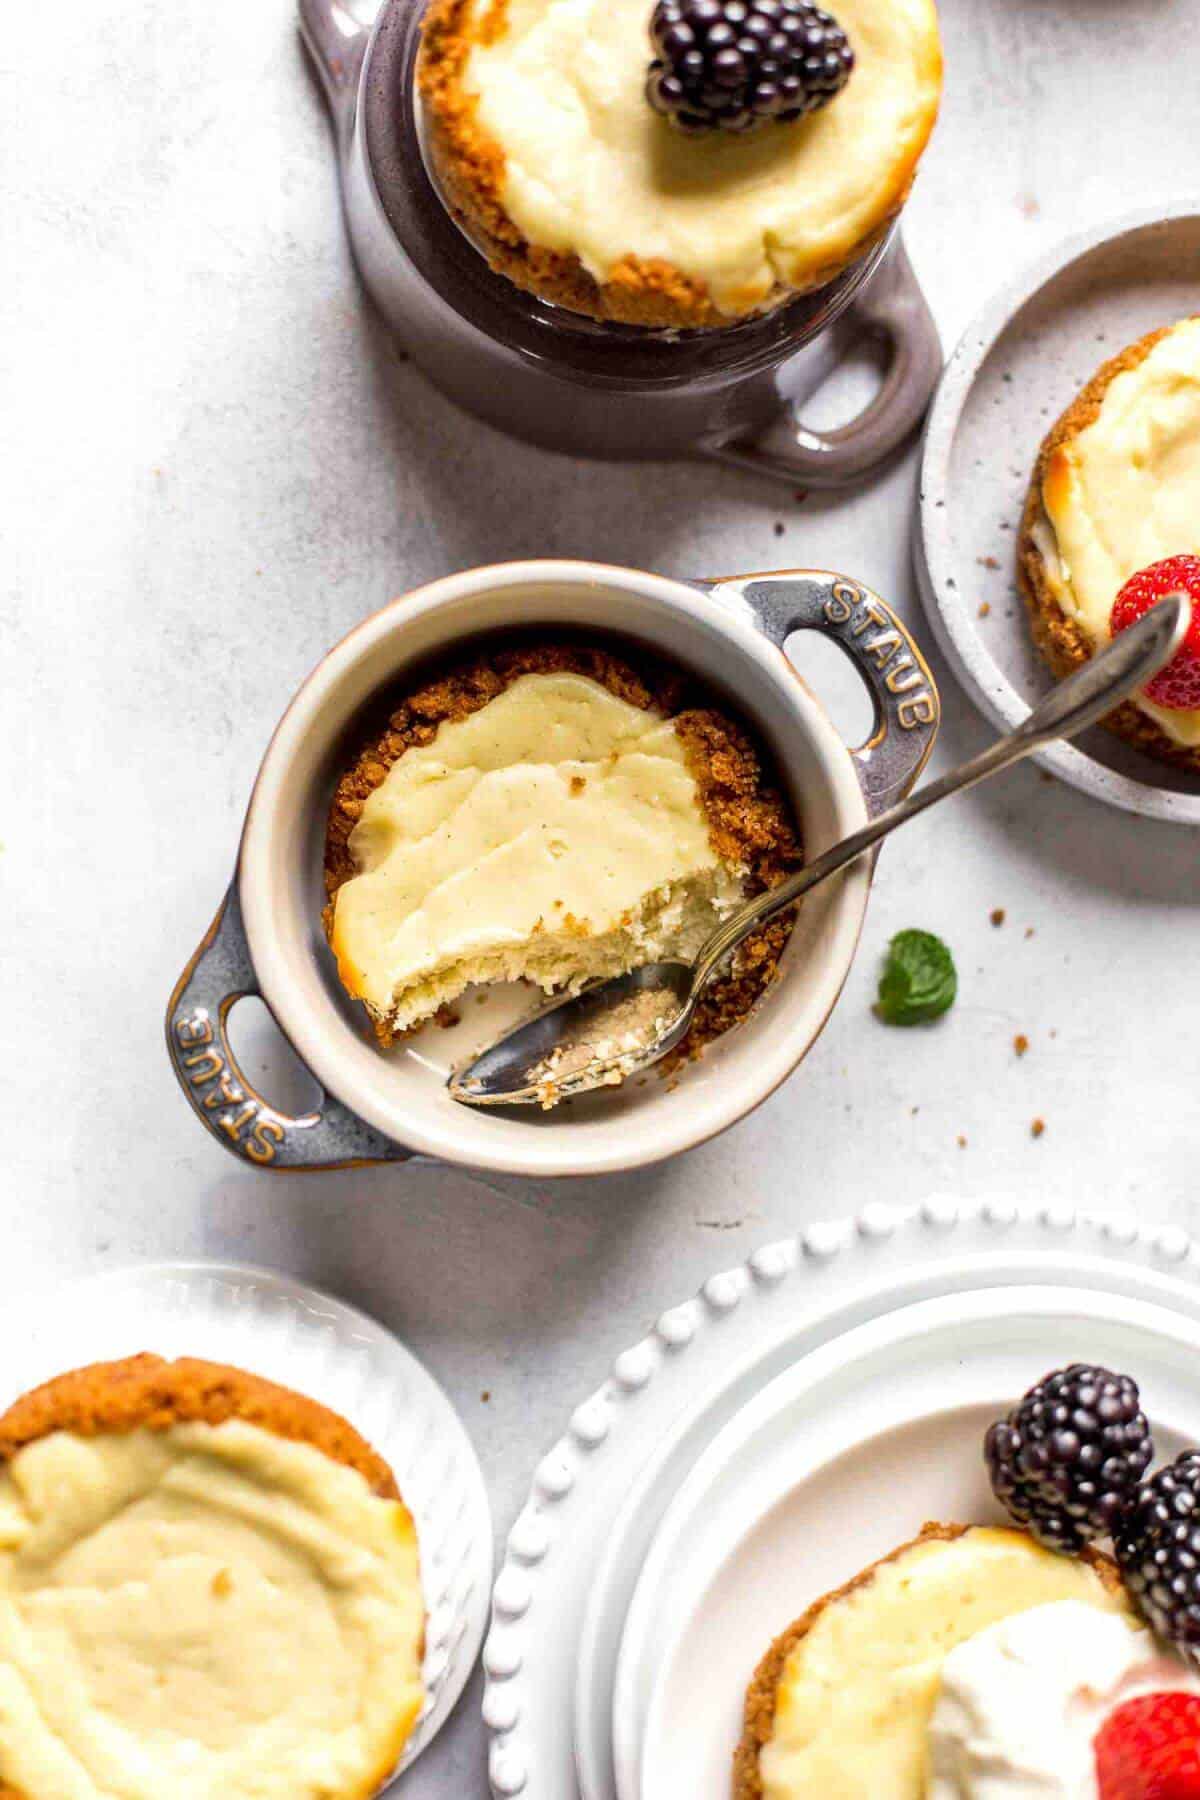
To do this, start by letting your mini cheesecakes cool completely to room temperature. It’s a good thing that we have lined our individual cheesecakes with parchment paper, for this will make it easy for us to remove them. I like to place my baked cheesecakes on a cooling rack.
Once you have gotten your mini cheesecakes to cool to room temperature (a good indicator is to check if your centers are still wobbling), you may now let them chill in your fridge for a few hours.
You should chill your desserts for at least 2 hours before serving. However, I have found it ideal to let them stay in the fridge overnight and just serve them the next day.
You can keep your mini cheesecakes fresh for up to the 3 days by putting them in an airtight container and keeping them refrigerated.
Can I keep my mini cheesecakes for longer than 3 days?
Yes, you can. It is possible to freeze your mini cheesecakes and store them for up to a month. You just need to wrap your individual cheesecakes tightly with plastic wrap and put them in a freezer bag to further keep the moisture out.
I personally like using a zip-top freezer bag.
To thaw, unwrap your mini cheesecakes first, place them in an airtight container, and keep them in the fridge overnight. You may also thaw your cheesecakes by unwrapping them and just letting them sit at room temperature for an hour if you don’t have the time.
And that’s it! You may serve your mini cheesecakes and enjoy their creamy goodness.
Serving Recommendations
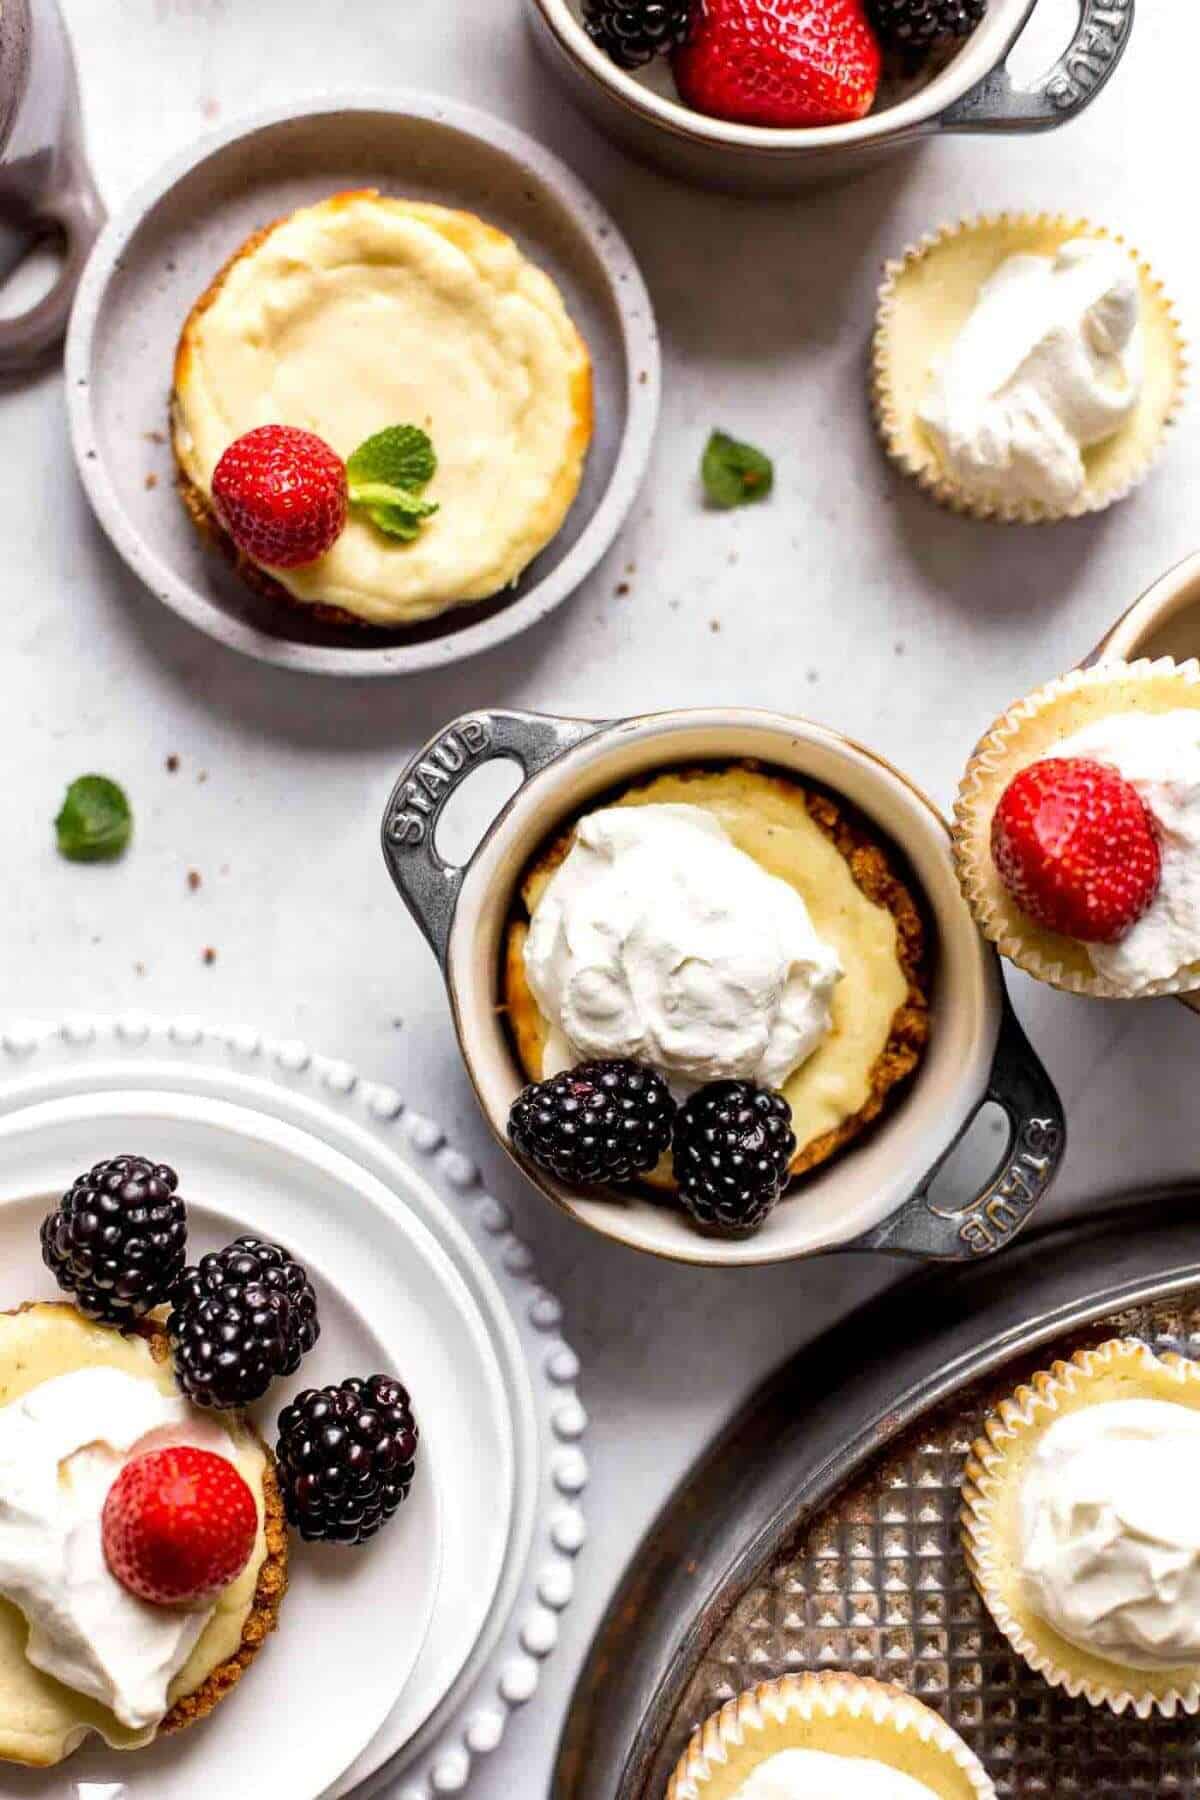
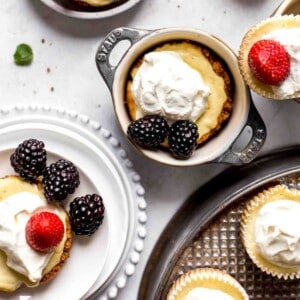
I love these mini cheesecakes just as they are, but please feel free to serve them with your favorite toppings.
Topping Ideas
My personal favorites are berries and fresh fruit. For this batch, you will see that I have used blackberries and sliced strawberries. I also love pairing my mini cheesecakes with my raspberry jam if I don’t have fresh ingredients available.
Another idea is to top them with melted chocolate ganache, especially if you’re serving them to chocolate lovers.
Lastly, I have tried using this recipe to make a regular-sized cheesecake using a springform pan. That said, I did need to adjust the measurements and baking time.
Want a regular-sized cheesecake? Spare yourself the headache of converting. Just check out more cheesecake recipes here. I’m confident that my website has what you need.
FAQs
What makes New York-style cheesecake different from others is the extra cream cheese it has, especially when compared to traditional cheesecake. This is the secret to why they are typically more creamy and dense.
Some New York-style cheesecakes also have a hint of tanginess to them. This happens when you use sour cream instead of heavy cream. Other recipes even recommend adding fresh lemon juice to achieve this flavor profile.
The answer to this question depends on how you want to classify cheesecakes. For instance, cheesecakes can be categorized according to how they are made. They can either be baked or non-baked.
You may also determine them based on their size, shape, or form. There are mini cheesecakes, regular-sized cheesecakes, and even cheesecake bars (which I also have a recipe for!).
Lastly, you can categorize cheesecake types according to their place of origin, distinct ingredients, and flavor profiles, such as New York-style cheesecakes, Oreo cheesecakes, and chocolate cheesecakes, just to name a few.
No, they are not, but it is understandable why they are commonly mistaken for each other. After all, they have the same essential ingredients. These are cream cheese, sugar, and eggs.
However, as I have previously mentioned, it is worth noting that New York cheesecake is known for having more cream cheese compared to other cheesecake types. Mini cheesecake versions aside, New York cheesecake is typically larger in size as well.
Wrapping Up Our Mini Cheesecake Recipe
I hope you have enjoyed following my mini cheesecake recipe and that you were able to recreate this dessert cuisine in your home kitchen. Please feel free to tell me how your experience went, as I really want to know! Just drop a comment below.
If you want other fun cheesecake recipes to try, then I highly recommend checking out my air fryer cheesecake and cheesecake bars recipe.
We also have ingredient substitutions and air fryer tips for those who want to further level up their culinary skills. See you in the next recipe!
More Cheesecake Recipes to Try
Recipe
How to Make Mini Cheesecakes
Ingredients
Crust
- ⅔ cups graham cracker crumbs
- ¼ cup unsalted butter, melted
- 1 tablespoon granulated white sugar
Filling
- 12 oz cream cheese, at room temperature
- ⅜ cup granulated white sugar
- 1 tablespoon all-purpose flour
- 1 large egg
- 1 teaspoon vanilla extract
- ¼ cup heavy whipping cream
Instructions
- Preheat oven to 350°F / 175°C. Line six 6oz sized ramekins with parchment paper or a muffin pan with 12 cupcake liners. Set aside.
- Crust: In a large bowl stir together all ingredients until evenly moist. Transfer crust to the prepared ramekins or muffin liners and press crumbs with the back of a flat-bottomed shot glass or the back of a spoon into the bottom and a bit up the sides. Prebake crust in both cases (ramekins or muffin liners) for 5 minutes.
- Filling: In a large mixing bowl, using a handheld or stand mixer fitted with a whisk or paddle attachment, beat the cream cheese on medium speed until creamy about 1-2 minutes. Add sugar and flour and mix until combined and no lumps remain. Stir in egg and vanilla until combined. Scrape down the bowl and add heavy cream. Mix until smooth and combined. Don't overmix at any step. Spoon filling evenly into the prebaked crust.
- Bake ramekin-sized cakes for 20-23 minutes. Bake cupcake-sized cakes for 13-15 minutes. The edges should be set and the center slightly jiggly. The centers firm up while cooling.
- Let cool to room temperature, then chill for 2 hours in the fridge. They will stay fresh in an airtight container at room temperature up to 3 days.
You can find the video in the post above. If you don't see a video, please check your browser settings.
Jaynine Taylor
Good Afternoon Ms. Sabine,
I LOVE this recipe.. I've made it several times and it comes out perfect every single tine.. Thank God! I do have a question.... Can I make a 8' Chocolate chip cookie dough cheesecake using this recipe as a base. I want to make an 8' so I will double the recipe. Is this possible?
Sabine
Hello Jaynine, I'm very happy that you like this recipe. If you are planning on making an 8- or 9-inch cheesecake, I recommend using a different cheesecake recipe. This is designed for small portions. For your plans, I think my Oreo Cheesecake is the best base recipe for you. Just search for Oreo Cheesecake and you will find it. I hope that helps!
Jaynine
Thank you so much...
Azza
I absolutely love this recipe! I was thinking of doubling the recipe and making it in a 8” whole cake , do you think that would work? And can I substitute gf flour instead of regular flour?
Sabine
Thank you so much! Yes, you can make an 8" cake when doubling the recipe, and yes, gf flour will work fine. I hope that helps.
Mara
Have you ever used a fruit yogurt or plain in place of sour cream ie. Heavy cream? Thankyou always delighted with your recipes
Sabine
I tried Greek yogurt as a replacement and it was delicious. You can replace the heavy cream with Greek yogurt 1:1. I don't have any experience with regular or fruit yogurt.
Thank you so much, I'm happy that you like my recipes.