
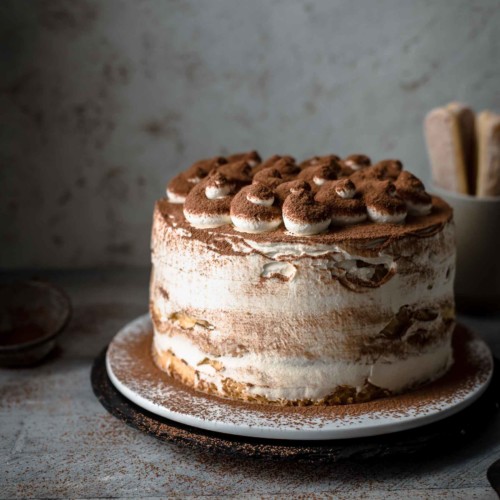
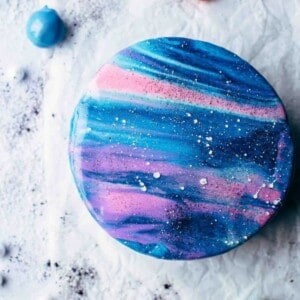
Discover our full tutorial showing you step by step how to make a Mirror Glaze Galaxy Cake! From colorful galaxy cake pop planets cooked in a galaxy cake batter to a galaxy vanilla buttercream and galaxy mirror glaze, this colorful cake looks like the galaxy inside and out! By the way, have you seen my Pink and White Cake with red hearts?
Jump to:
Why You Will Love This Galaxy Cake Recipe
- A True Showstopper. If you're looking for a cake that truly impresses this is it!
- Step by Step Tutorial. I've outlined the recipe step by step using photos, a video, and in the recipe card to help you successfully tackle this advanced cake recipe.
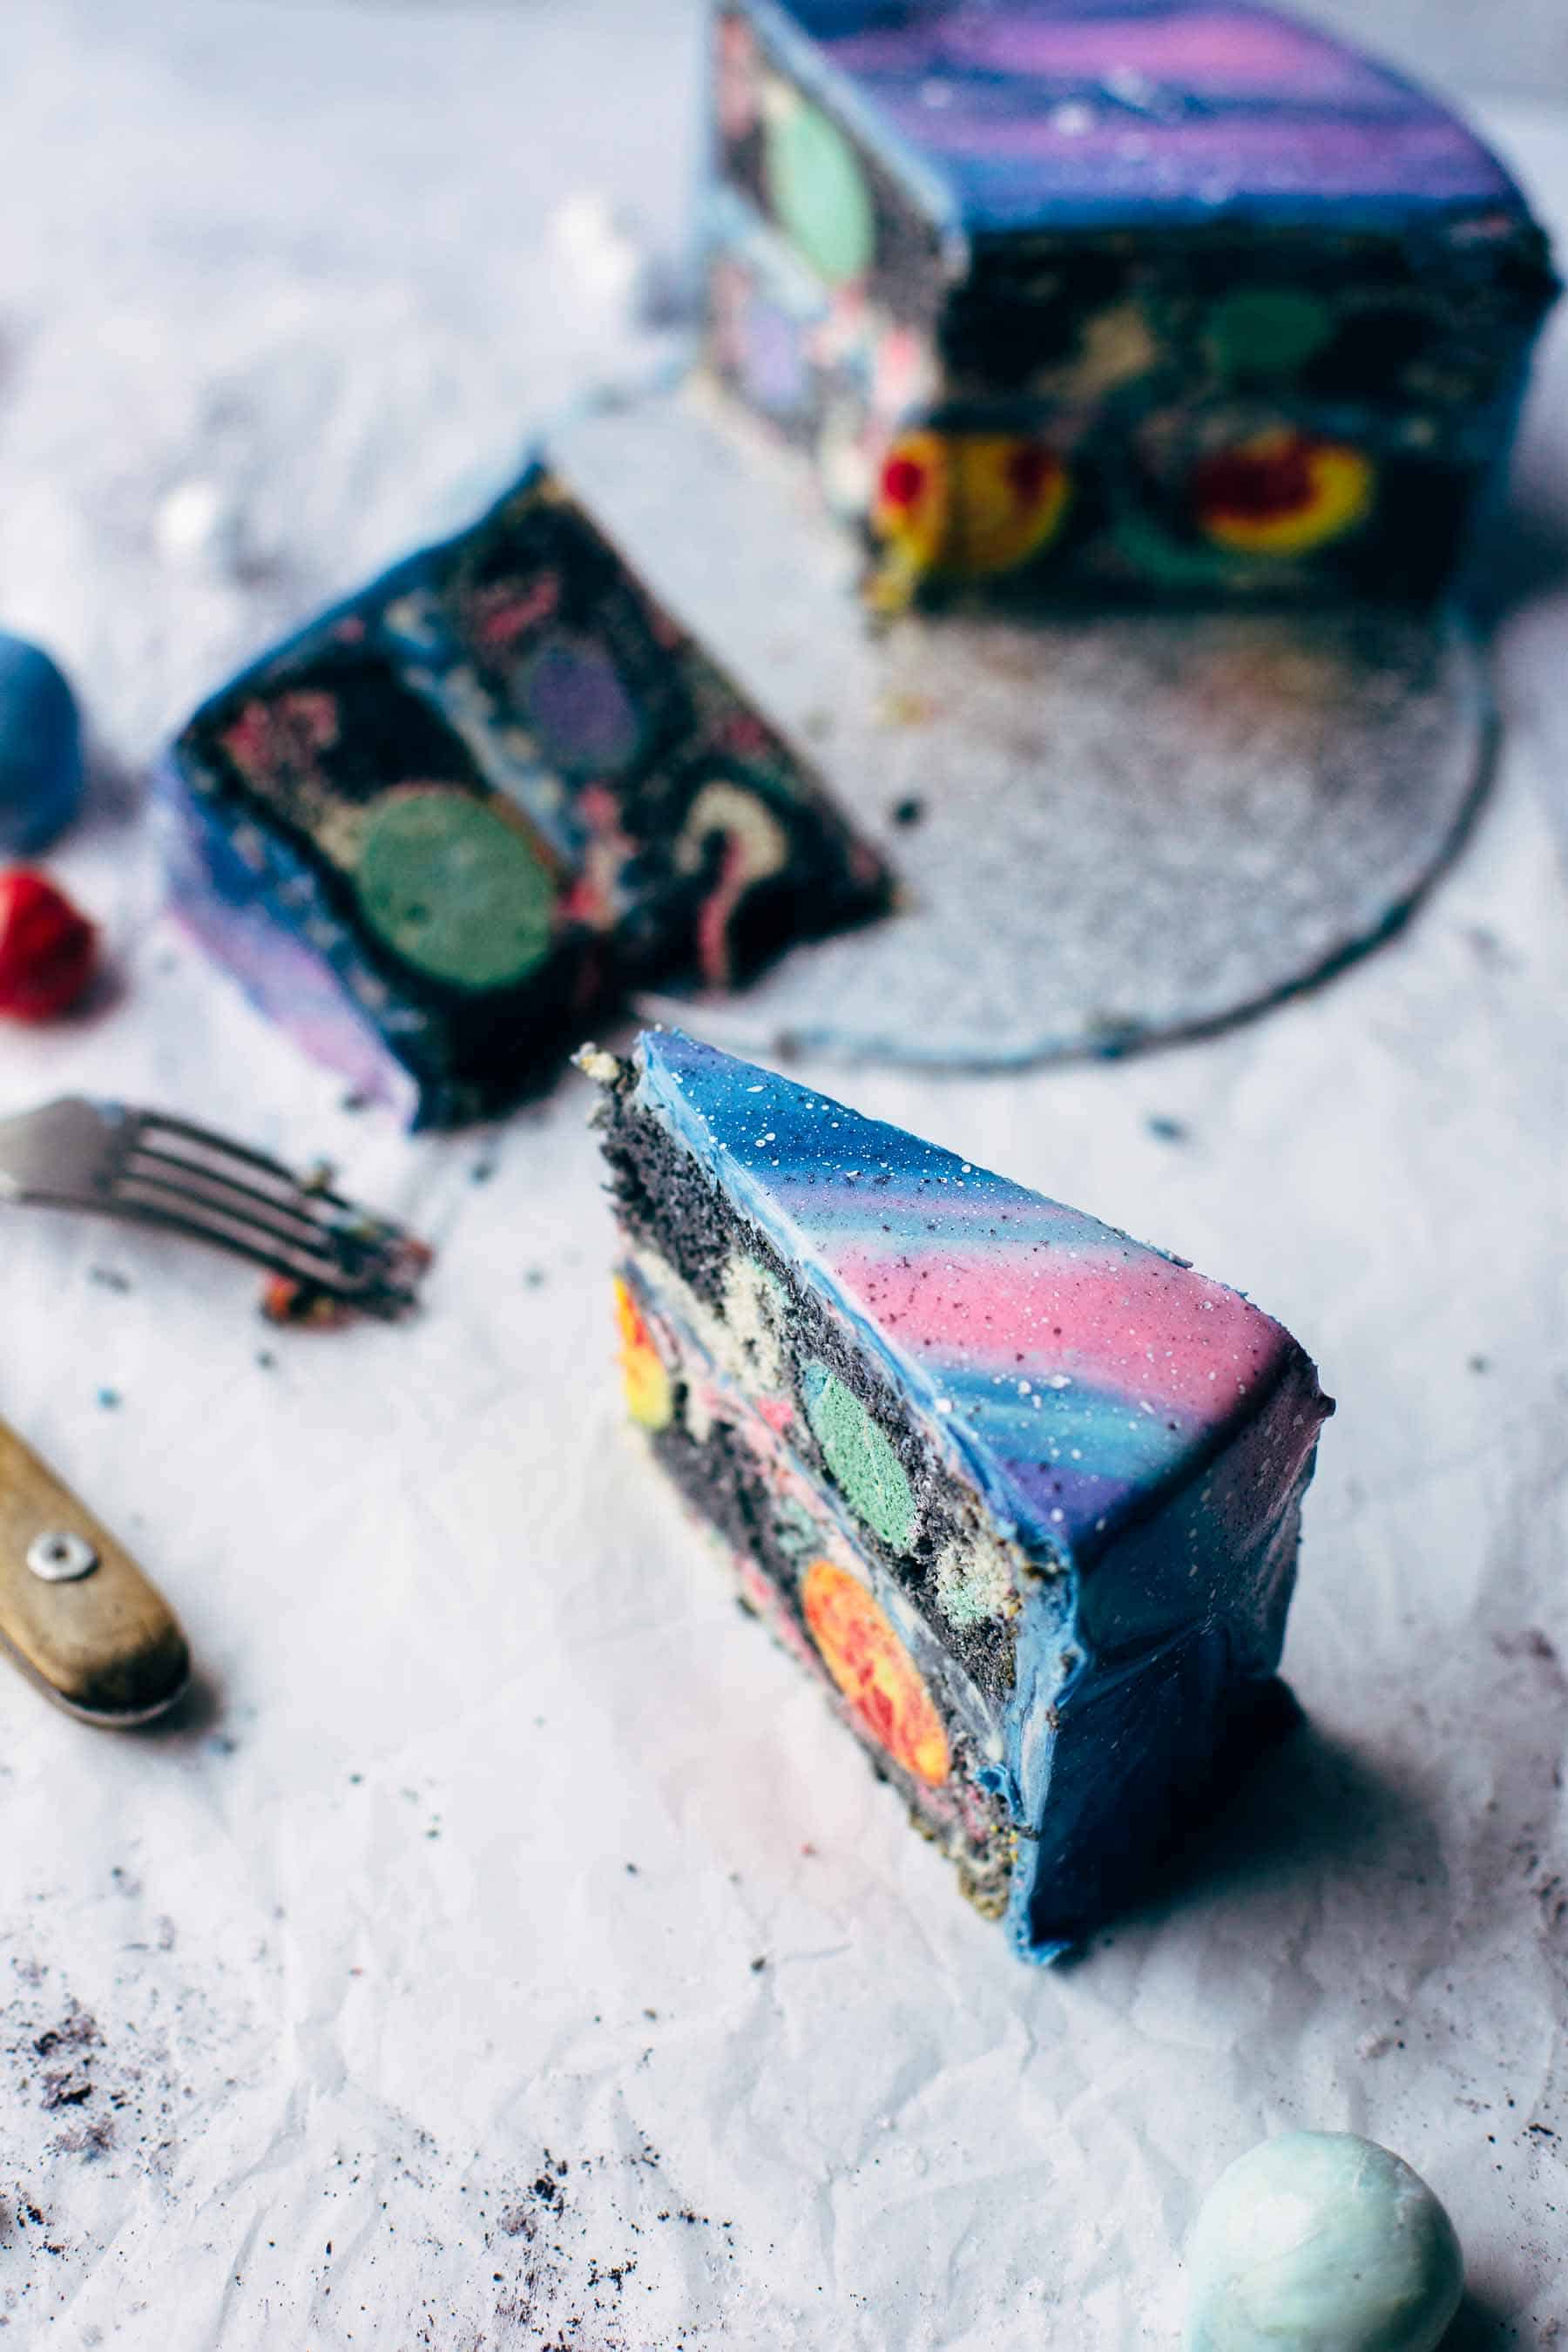
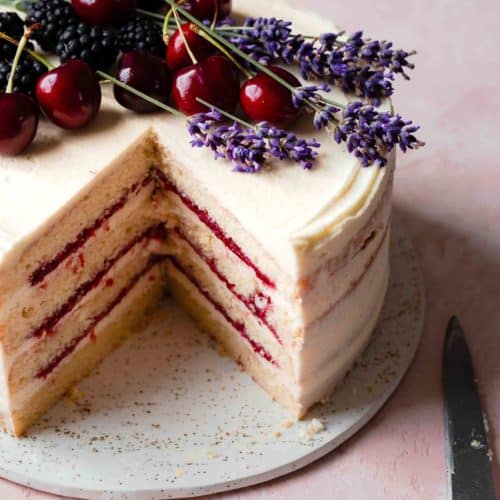
- Galaxy Cake Inside and Out. This cake carries the galaxy them beyond just the mirror glaze with a colorful swirled cake and cake pop balls baked into it to look like planets.
Ingredient & Equipment Highlights
There are multiple components for this recipe each requiring a different set of ingredients. Here is a look at some of the ingredient highlights. Be sure to see the recipe card for the full list of ingredients and the quantities you need of each.
- Butter: We will be using this in several parts of the recipe. I recommend using unsalted butter so you have a bit more control over the saltiness. Before you start mixing let it warm up to room temperature.
- Flour: The cake and cake pops both use all-purpose flour. Make sure you measure it properly by spooning it into the measuring cup and then leveling it off with a knife.
- Baking powder: This is our leavener in the recipe. If you don’t have any you can one of our recommended baking powder substitutes.
- Vanilla: I’m a big fan of using whole vanilla beans as they have a much better flavor. But you can use pure vanilla extract, vanilla paste, or use one of our recommendations for a vanilla extract substitute.
- Sugar: The cakes and mirror glaze use granulated sugar but you will need powdered sugar for the buttercream. It works best for a creamy consistency.
- Powdered gelatin: This is a key ingredient in the mirror glaze. You can find it in the same aisle with flavored gelatin. It is basically the same thing but it is flavorless.
- White couverture: This is a high-quality chocolate that has extra cocoa butter added and sometimes an emulsifier to reduce viscosity. It’s smoother and glossier than regular chocolate.
- Light corn syrup and sweetened condensed milk: Sweetens the mirror glaze and contributes to its texture. These do not have substitutes when making a mirror glaze.
- Gel or paste food coloring: I use yellow, red, green, navy blue, purple, white, and Aztec blue, a teal tone to make the cake pops. I use yellow and red for the sun, green and blue for Earth, teal and white for Uranus, and purple with white for Neptune. Add as much food coloring as described on the package until you reach the desired color. Do not try to use liquid food coloring it will be much easier to get vibrant color with the gel or paste color.
- Cake pop mold: I recommend using a silicone cake pop mold to bake the planets.
Step by Step Video Tutorial
How to Make a Galaxy Cake
What makes this the best galaxy cake is that the theme is incorporated into the cake and the mirror glaze that covers the cake. This also means there are multiple steps for making the cake. Here’s a breakdown of each component. Be sure to check the recipe card for all the details.
Making the Galaxy Cake Pop Planets
These are going to be baked into final cake so that when you cut into it, you get the look of planets in the slices. Here's how to make them.
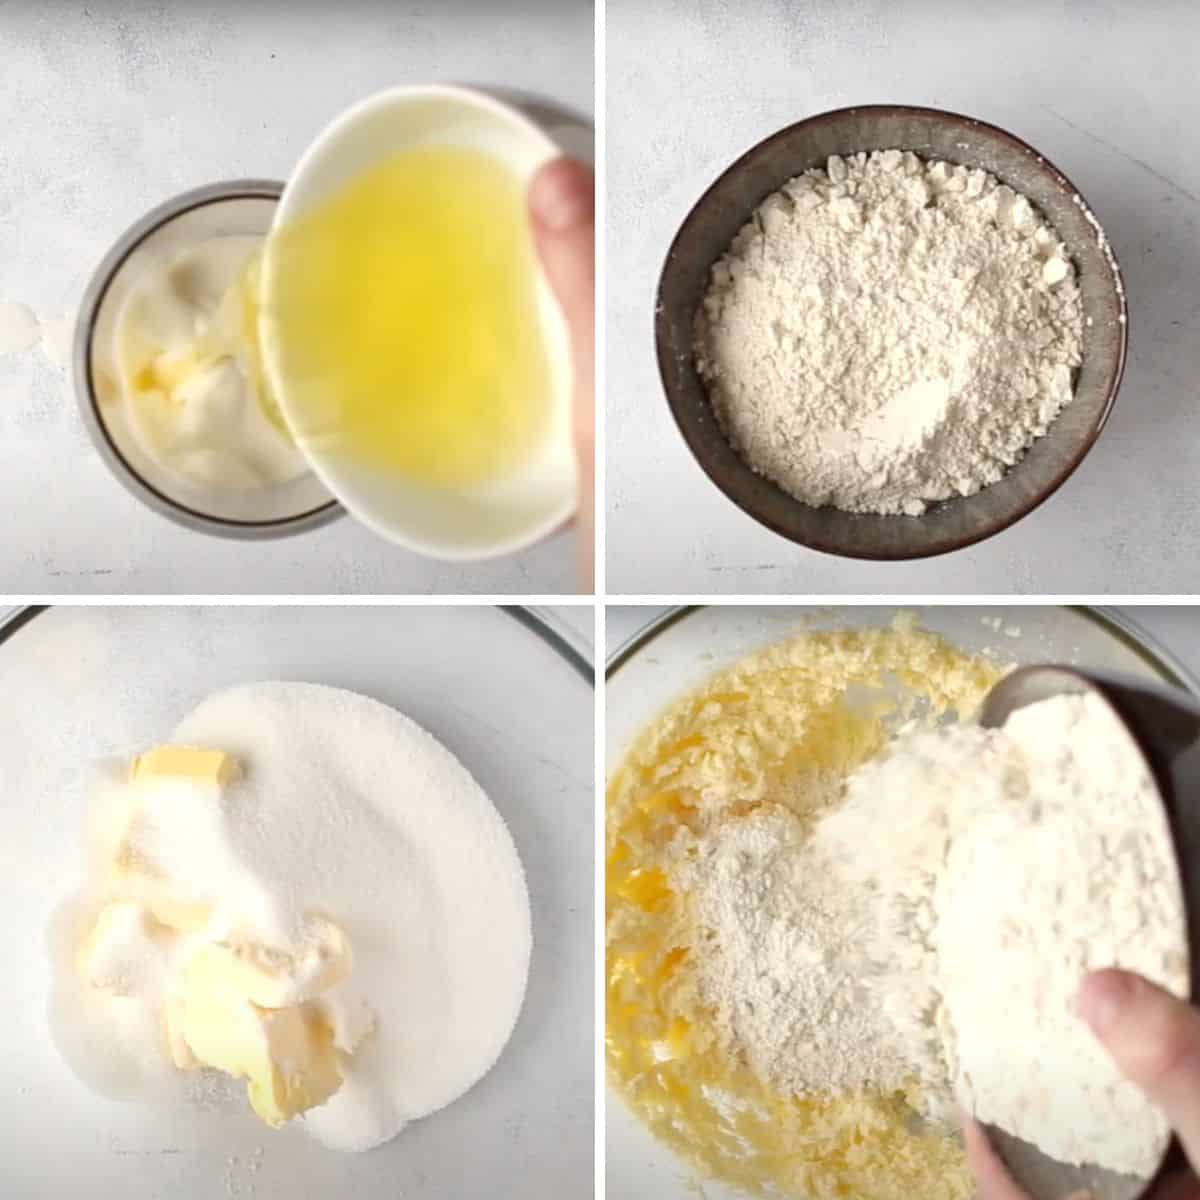
- Step 1: Beat the eggs on medium-high speed with an electric mixer until combined for about 1 minute. Add the sugar and mix until light and creamy. Add the butter and mix until creamy. Last, add the flour, baking powder, and salt and mix until the batter is fully combined and smooth.
- Step 2: Separate the batter into bowls for each color. If you are using the same color combination as me you will need six bowls. Add a few drops of your food coloring to your bowls of batter until you reach the desired color. I also added a bit of white food coloring to each bowl to lighten up the colors.

PRO TIP: If you want to use more of one color and less of another, consider the required amount of batter per color while separating into bowls.
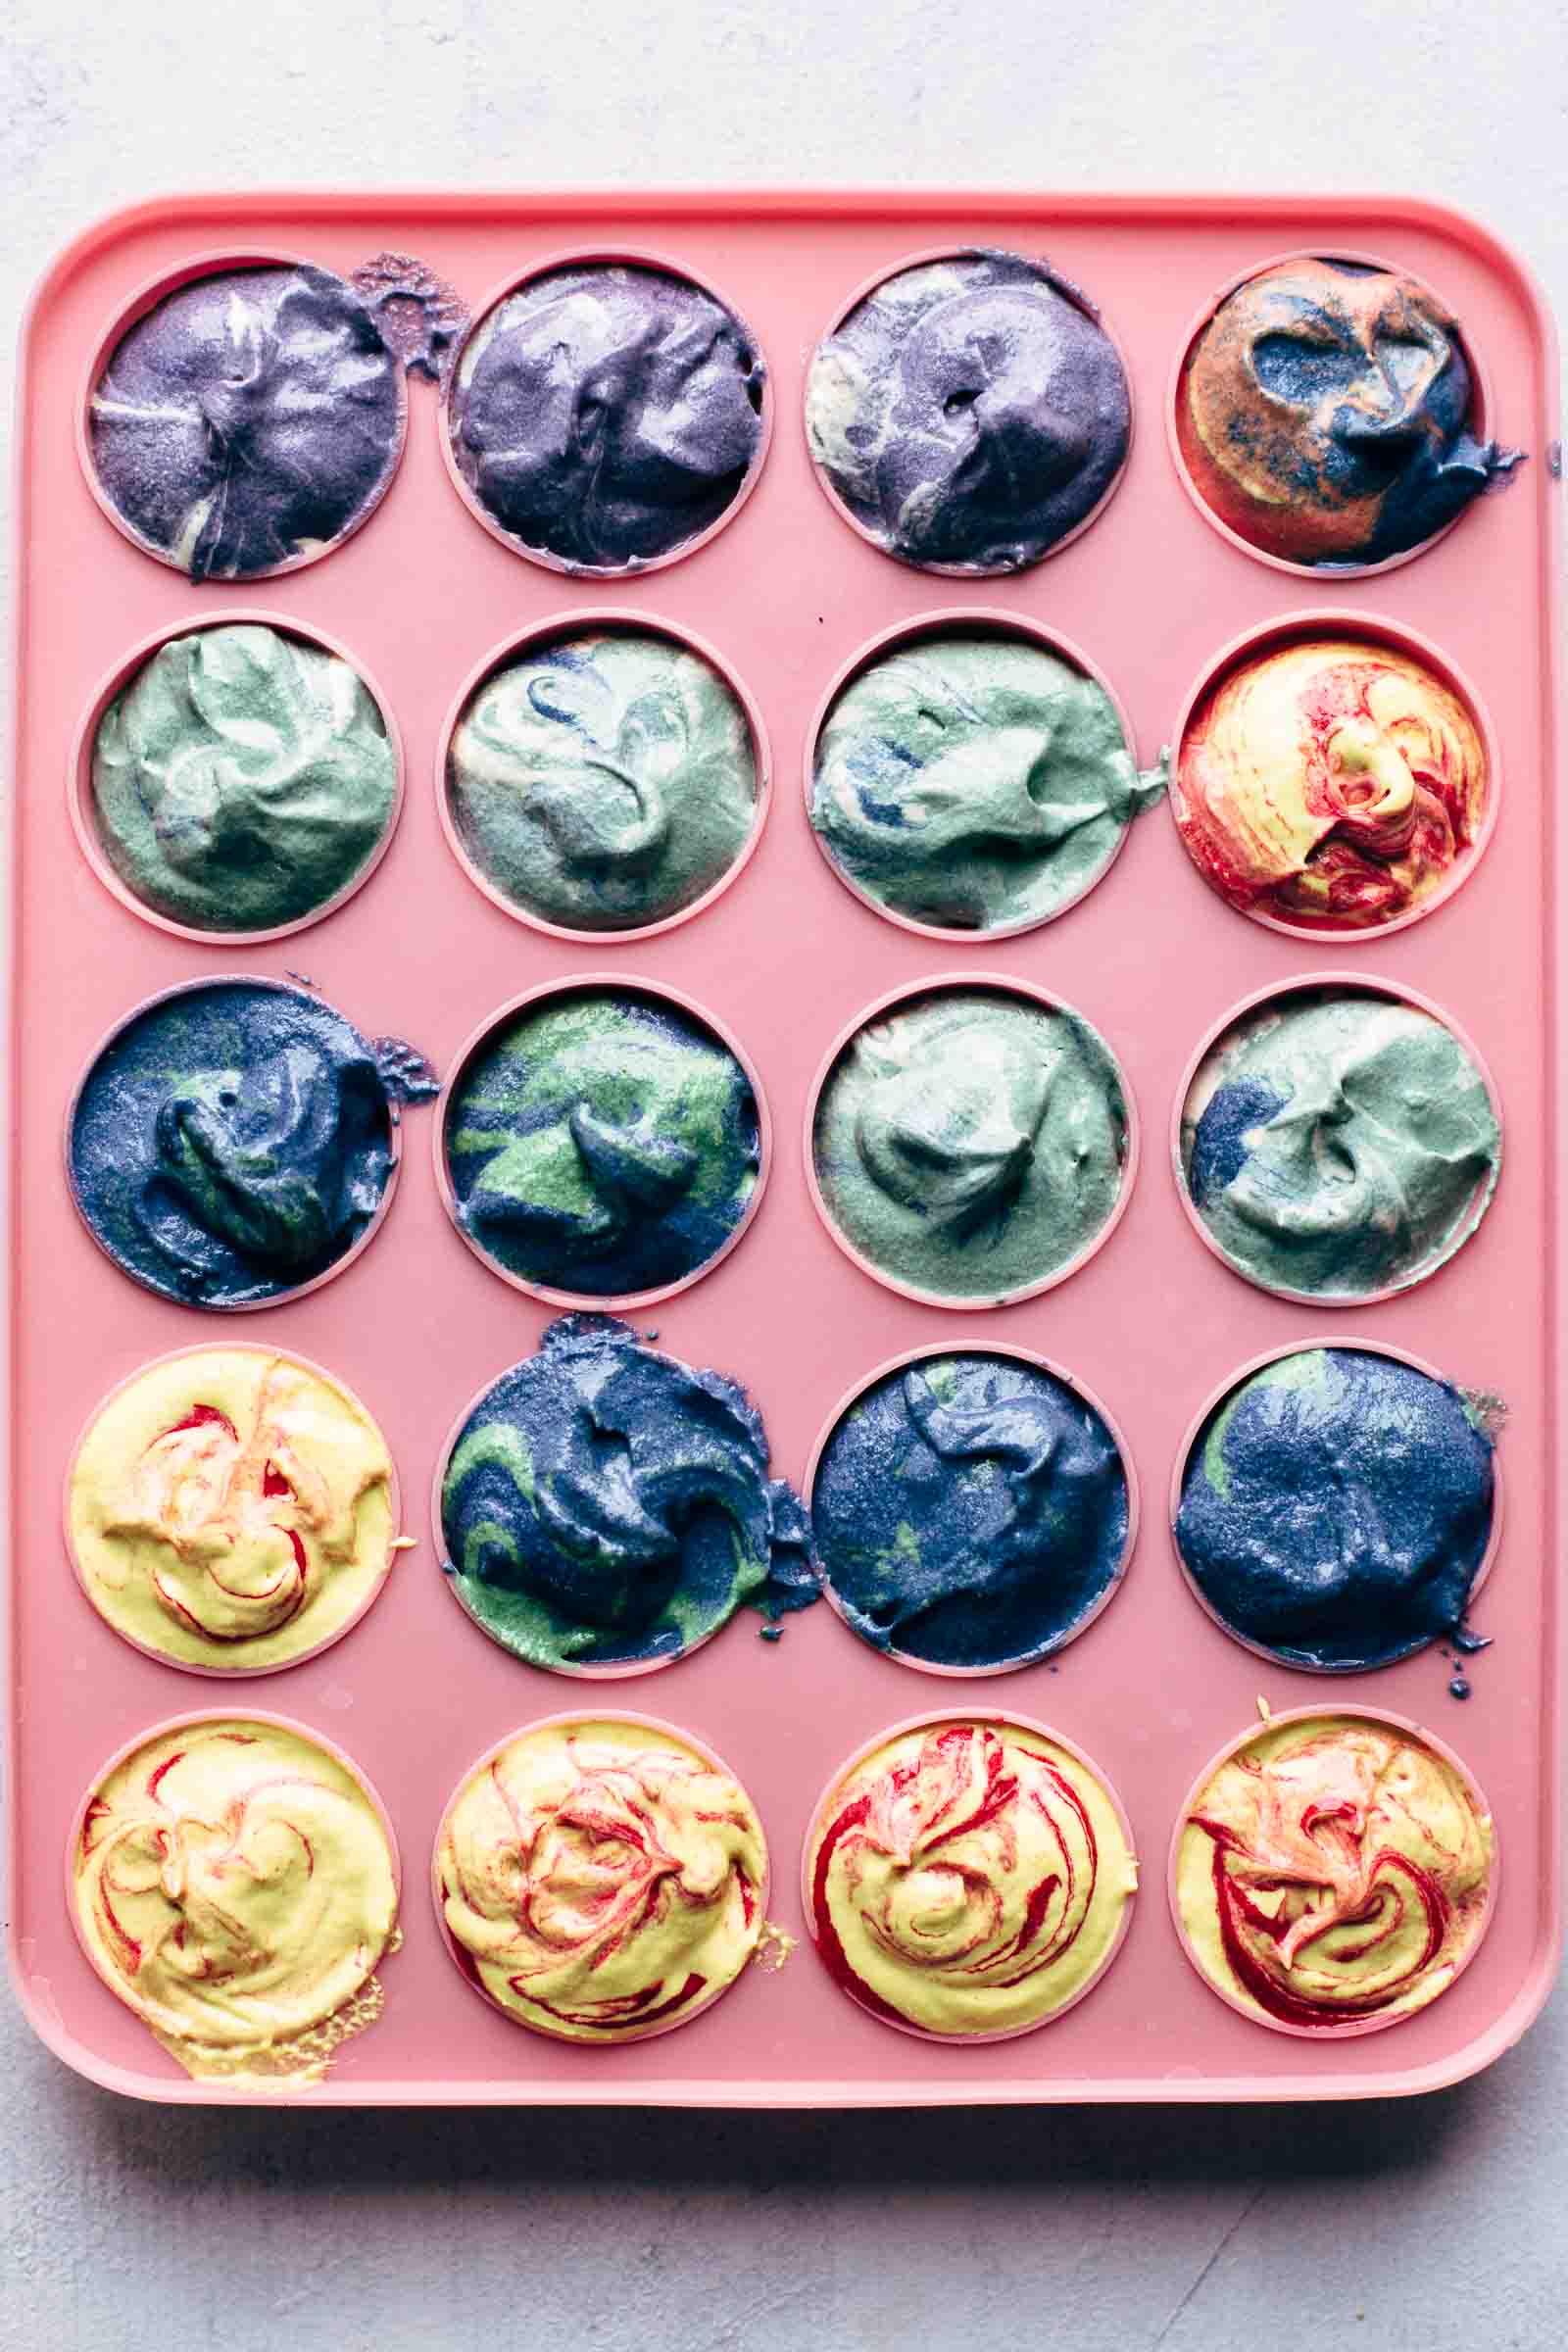
- Step 3: Spoon the colored batter into the cake pop mold to make the different planets and sun. Fill until the batter fills up the opening slightly heaping up. Draw a few swirls with a skewer. Place the second side of the cake pop mold on top (the one with the hole) and close tightly.
- Step 4: Bake them in the oven and then cool in the mold.
Mixing the Galaxy Cake Batter
- Step 1: Whisk together the milk and egg whites until combined and set aside.
- Step 2: Combine the flour, baking powder, and salt in a bowl and stir to combine. Set this aside as well.
- Step 3: Cream the butter and sugar on medium speed until creamy and combined for about 1-2 minutes. Add the vanilla and mix until combined.
- Step 4: Add the dry and wet mixtures to the butter mixture with the mixer on low speed, beginning and ending with dry ingredients. I added the dry ingredients in 3 batches and the wet ingredients in 2. Mix until smooth and combined.
Assembling the Galaxy Cake for the Oven
- Step 1: Divide the cake up into bowls for coloring. I am using four colors for the cake -- black, white, pink, and Aztec blue -- and will need 2 large bowls and 2 small bowls. Black and white food coloring are each added to one of the large bowsl while the pink and Aztec blue are added to the batter in the small bowls. Mix until blended into the batter.
- Step 2: Spoon about one-quarter of the colored batter into two 8" (20cm) cake pans just until the bottom is fully covered. Drizzling to create a swirled pattern
- Step 3: Arrange the baked cake pops on top of the batter in the two cake pans.
- Step 4: Spoon the remaining batter on top of the planets to cover them completely. Carefully run the tip of a knife through the batter to draw a pattern. Be careful not to mix up the colors too much. Bake the cake per the instructions in the recipe card.

Make the Galaxy Vanilla Buttercream
The buttercream is regular vanilla buttercream with food coloring. Be sure to use a food coloring that's suitable for cake batters, buttercreams, icing, and icing. I recommend using gel or paste food coloring.
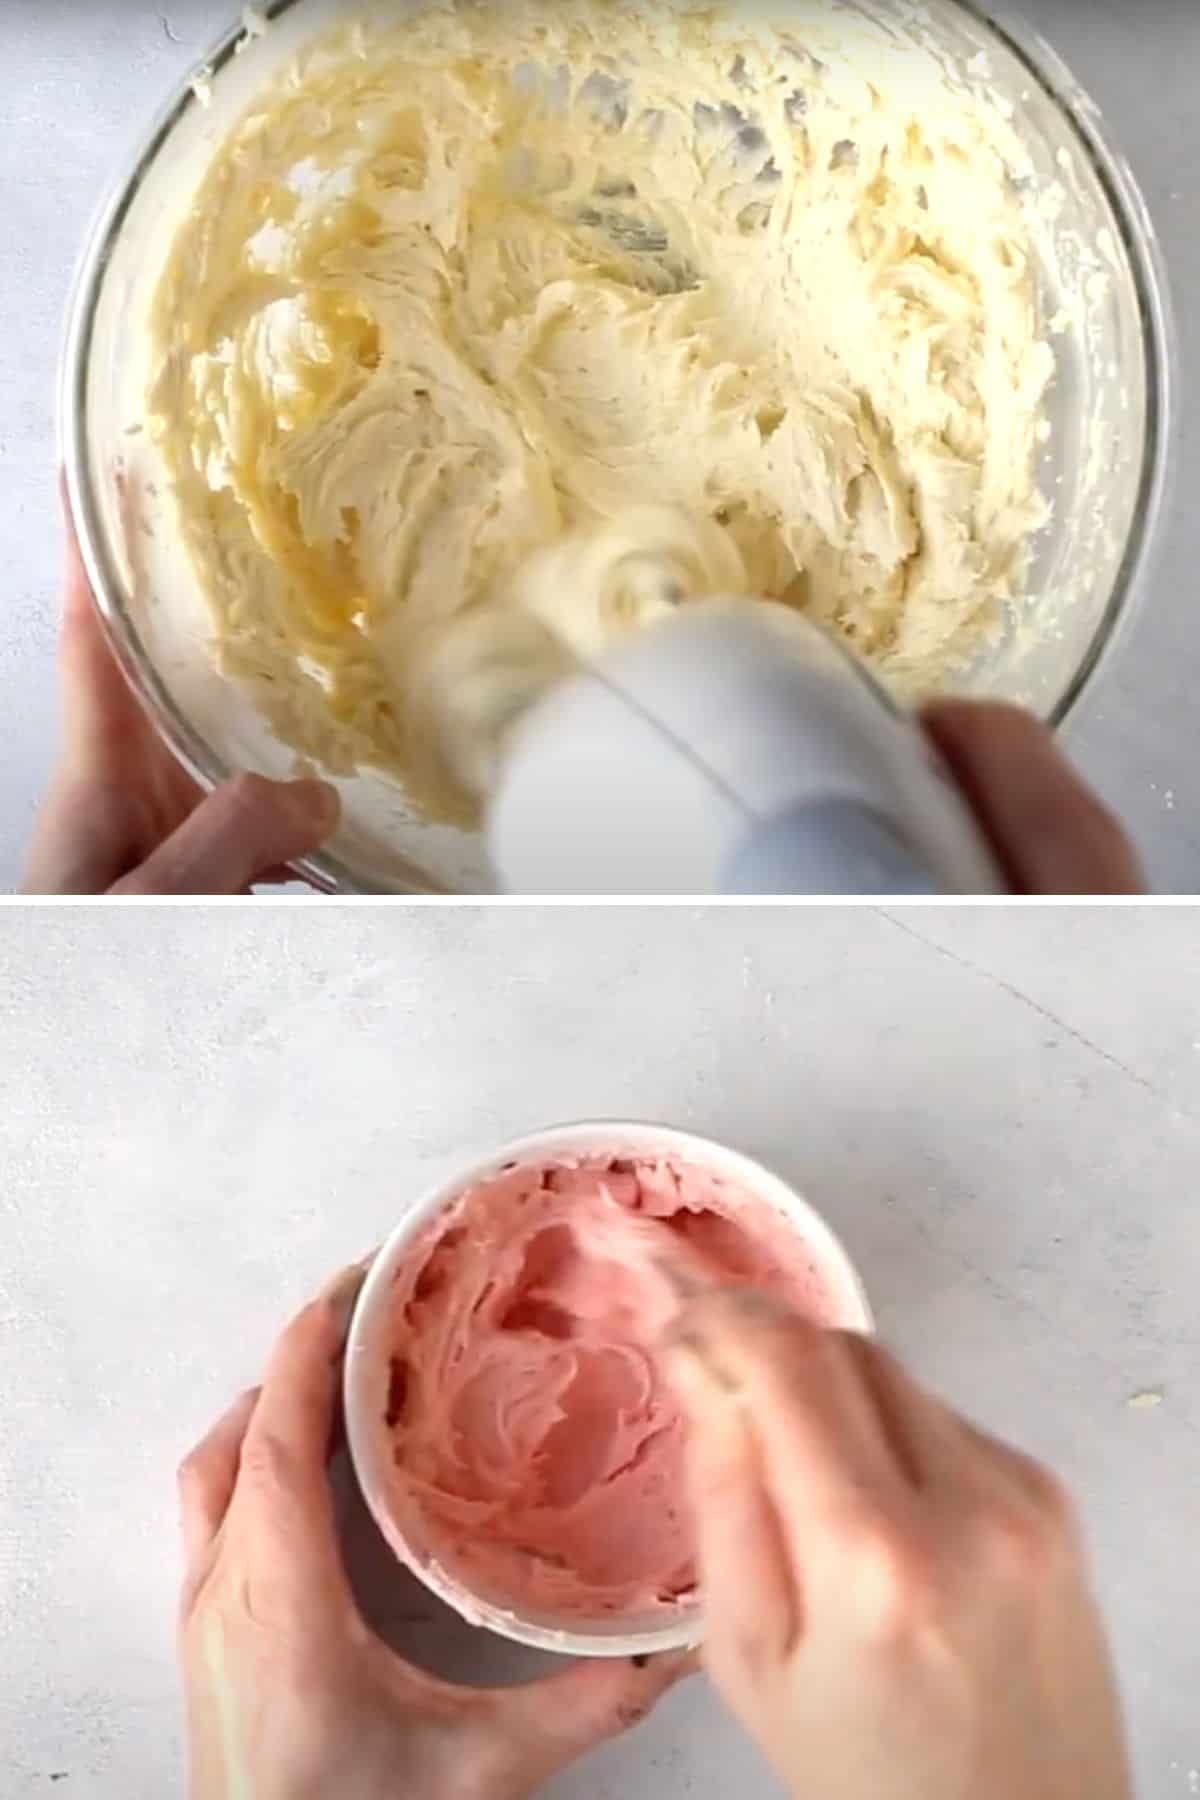
- Step 1: Mix the butter with a whisk attachment on medium speed until creamy. Add the sugar one cup at the time and mix on low speed until combined. . Last, add the vanilla and milk, mixing until the buttercream is smooth and the ingredients are fully combined.
- Step 2: Divide the buttercream into four bowls and add black, blue, white, and pink coloring.
- Step 3: Spoon the colored buttercream alternating colors into a piping bag.
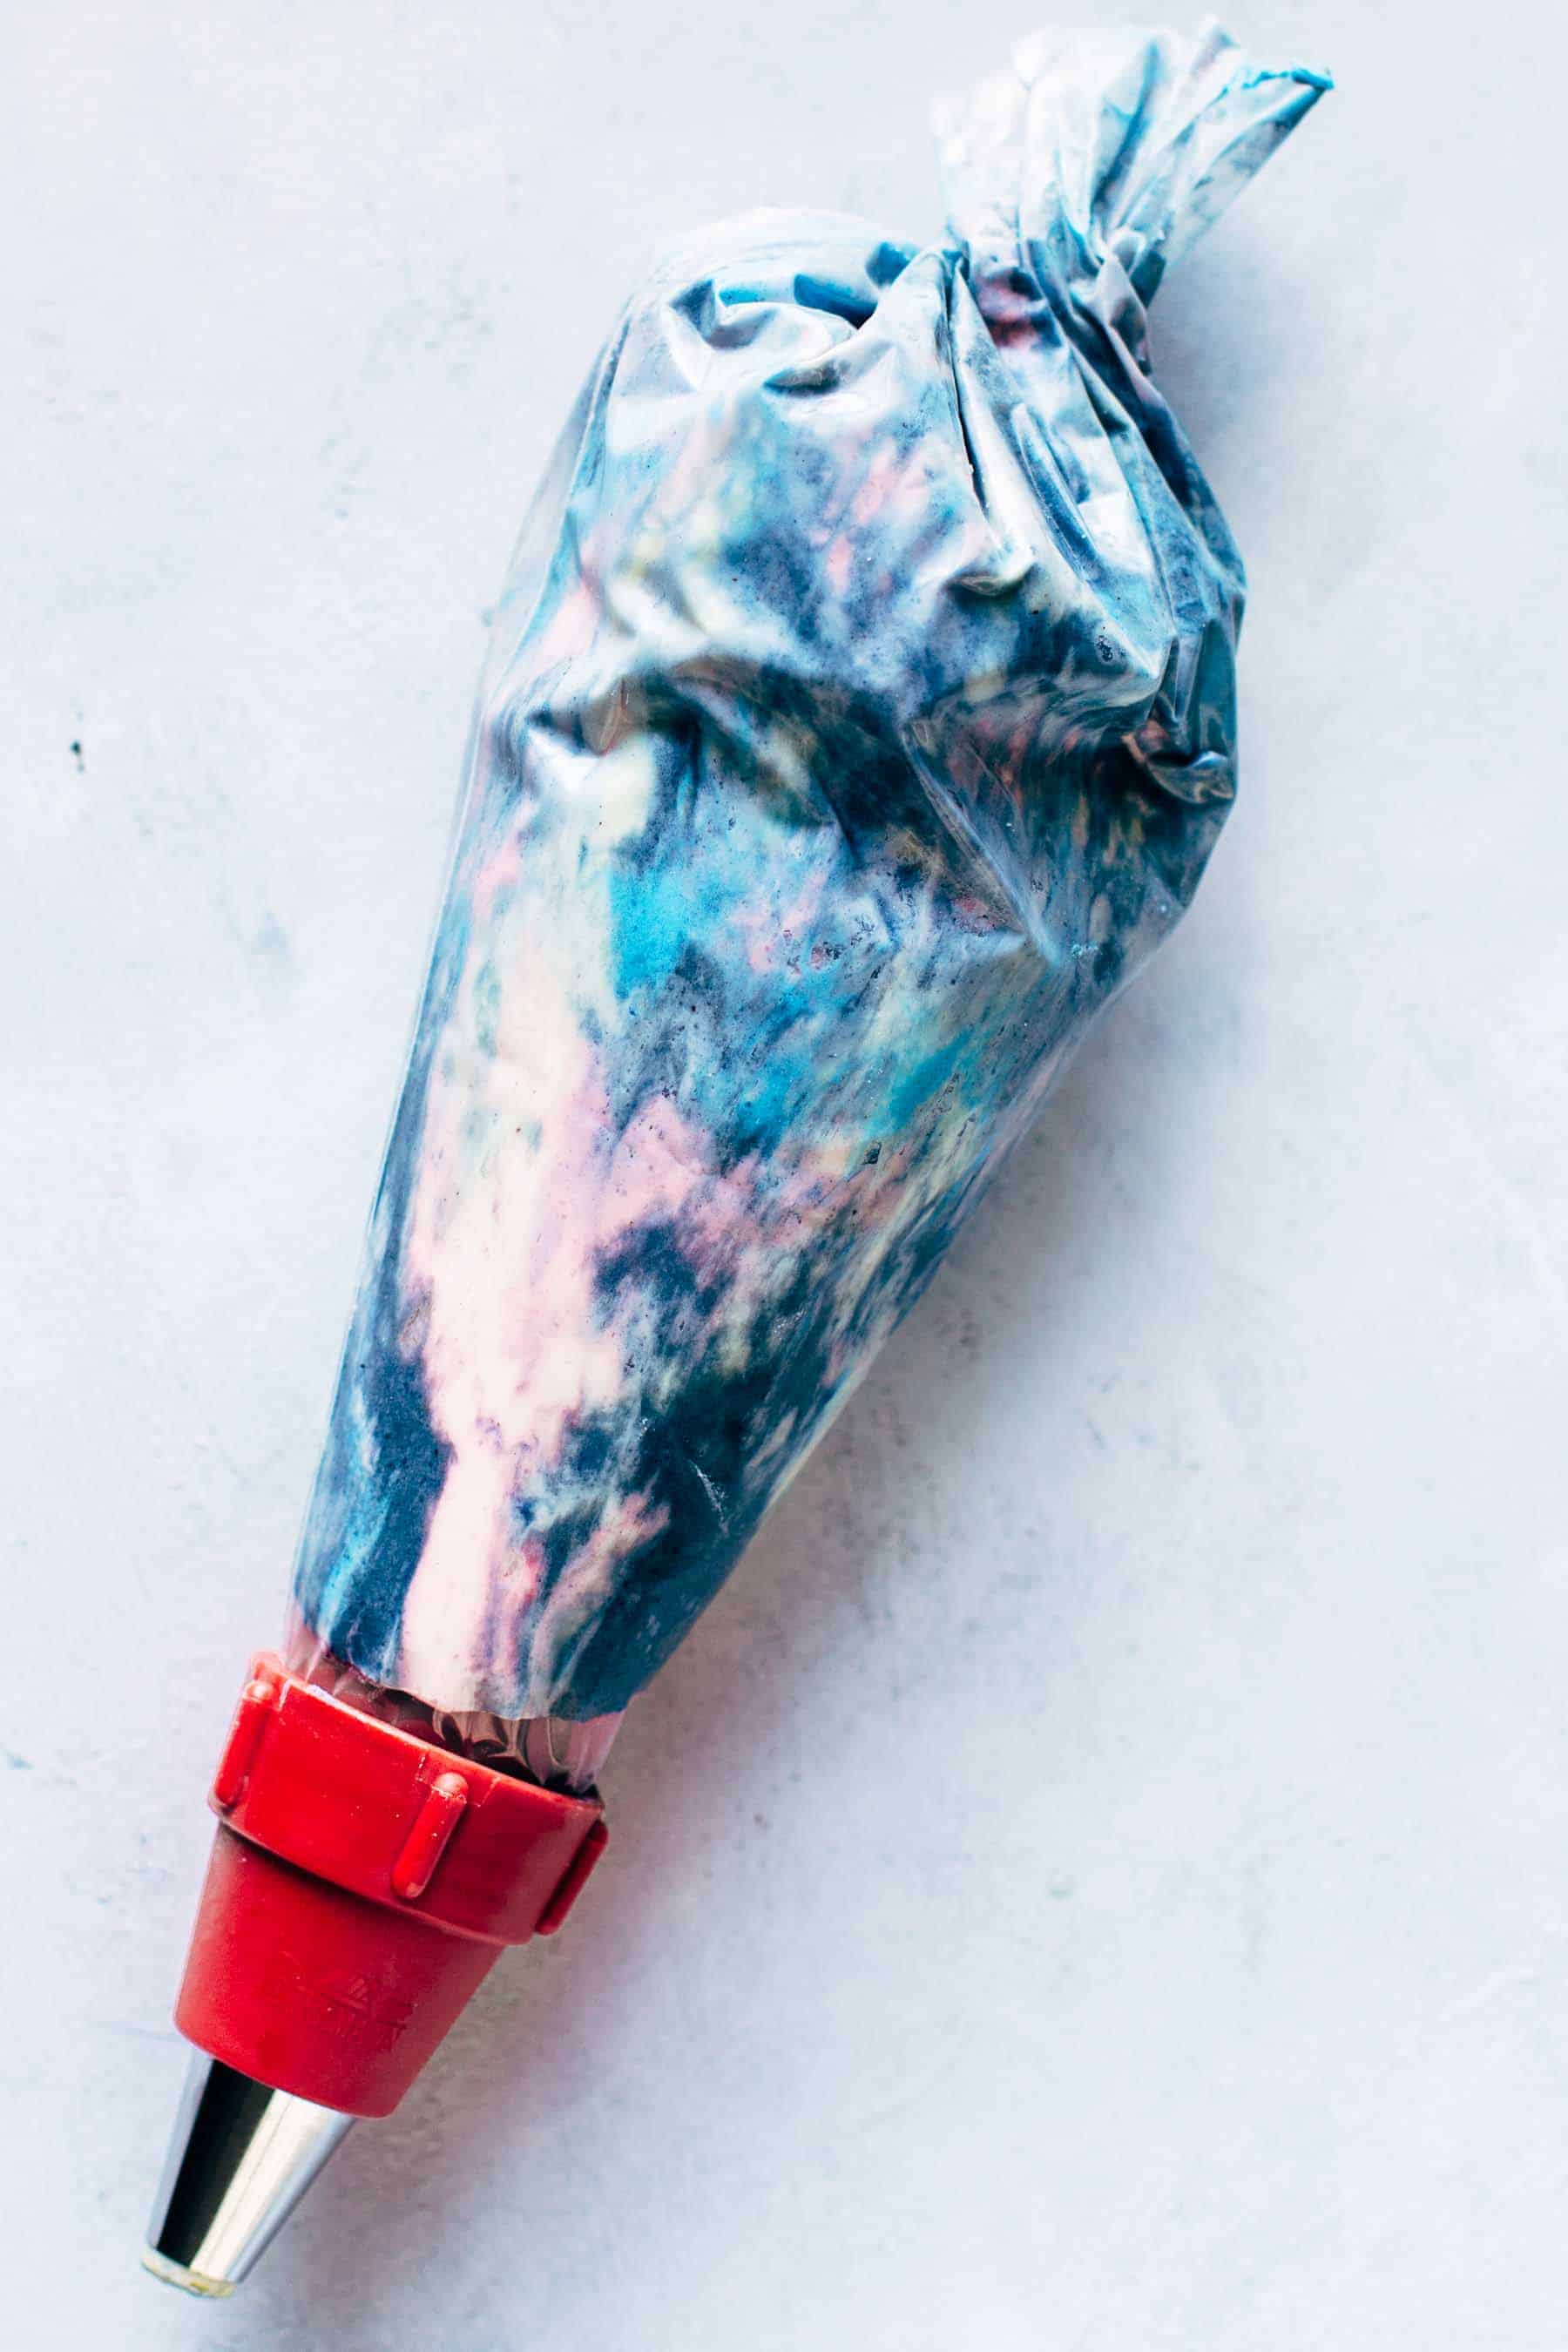
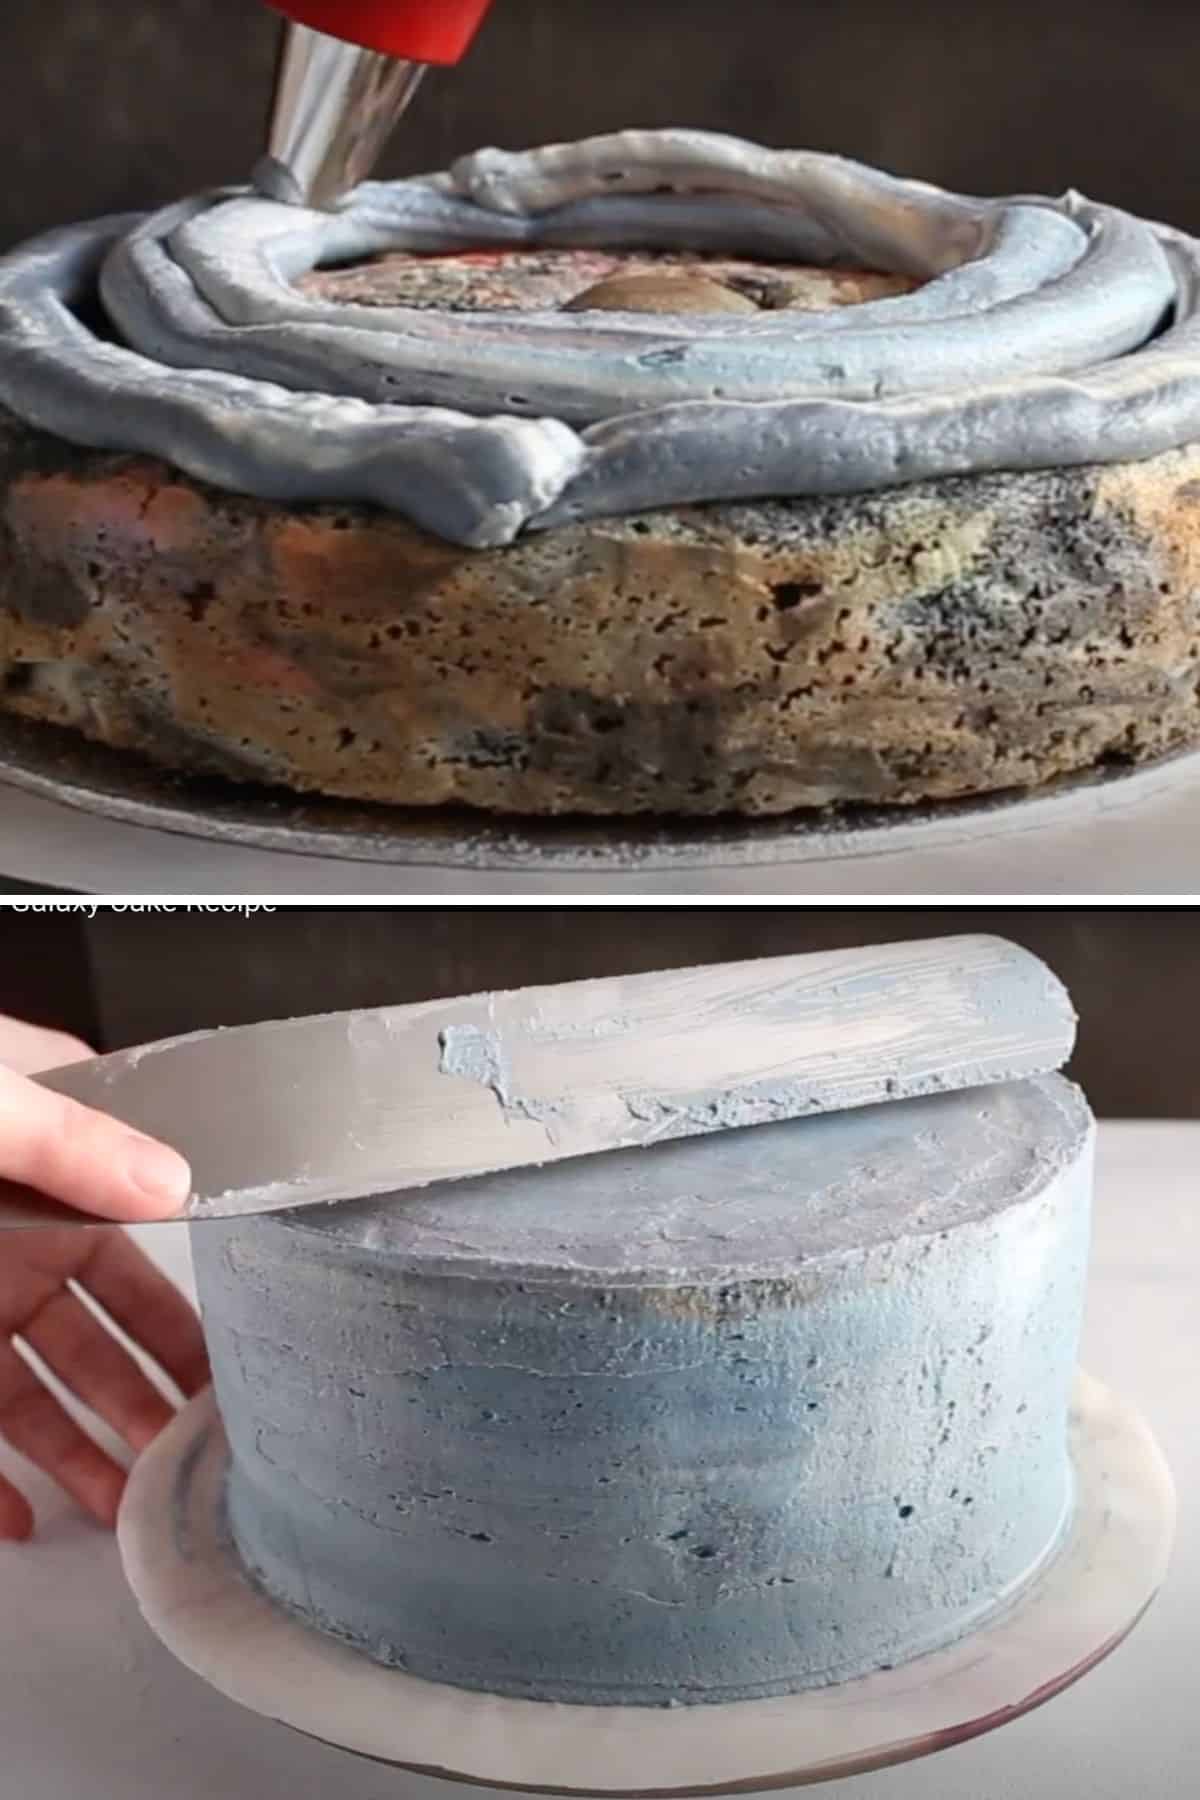
- Step 4: Pipe the frosting onto the cake.
- Step 5: Smooth the frosting onto the cake with an offset spatula. Be careful not to mix the colors too much while frosting the cake. Freeze the cake uncovered for 1 hour, until the buttercream is very firm. This will ensure your frosting doesn't melt while applying the mirror glaze.
How to Make a Mirror Glaze
The mirror glaze is the most challenging part of the recipe. Be sure to watch the video, read through the instructions, and read through the tips below before getting started!
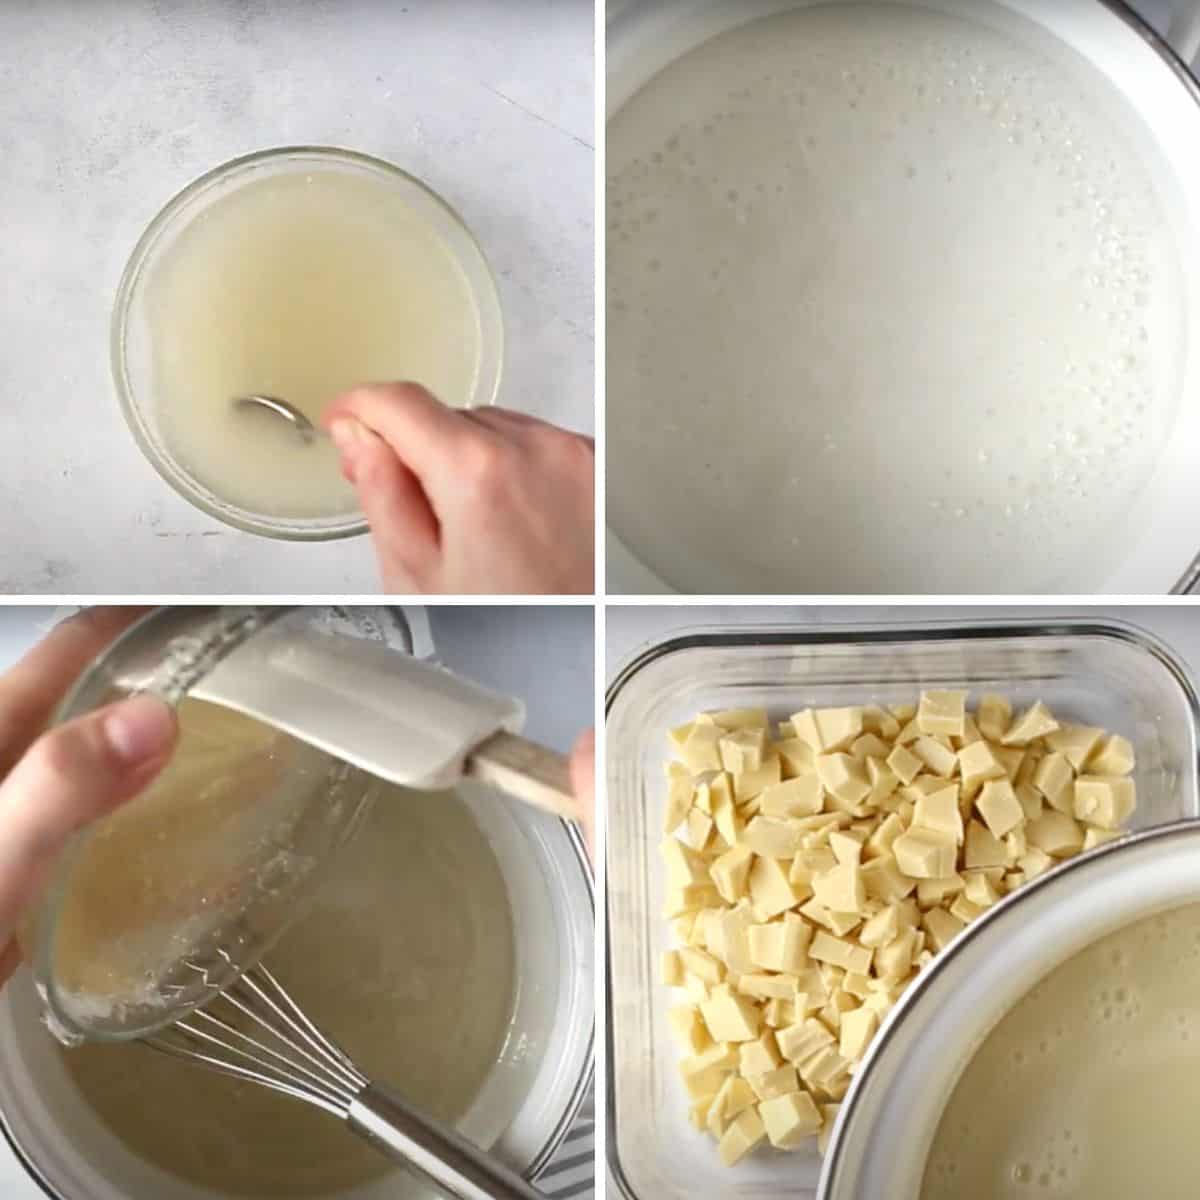
- Step 1: Combine a ¾ cup of water and gelatin in a small bowl and stir to combine. Let bloom for about 10 minutes. It needs to be firm to touch.
- Step 2: Bring sugar, ⅜ cup of water, and corn syrup in a saucepan over medium heat to a boil and simmer for about 2-3 minutes.
- Step 3: Remove from stove and stir in the bloomed gelatin and the condensed milk until combined.
- Step 4: Pour the mixture over the couverture. Cover with a towel and let stand for about 2 minutes. Mix with a handheld emersion blender until smooth and no lumps remain. Strain the glaze.
- Step 5: Divide the mirror glaze among five bowls. 2 large bowls and 3 smaller bowls. Add aztec blue and navy blue in a 3:1 ratio to either of the two large bowls. In the second large bowl, add black and navy blue in a 1:1 ratio until you have a very dark shade of blue.
- Step 6: Add a little pink food coloring to one of the small bowls, purple to the second bowl, and aztec (teal) blue to the last bowl. Add some white if any of the colors have become too intense or too dark.
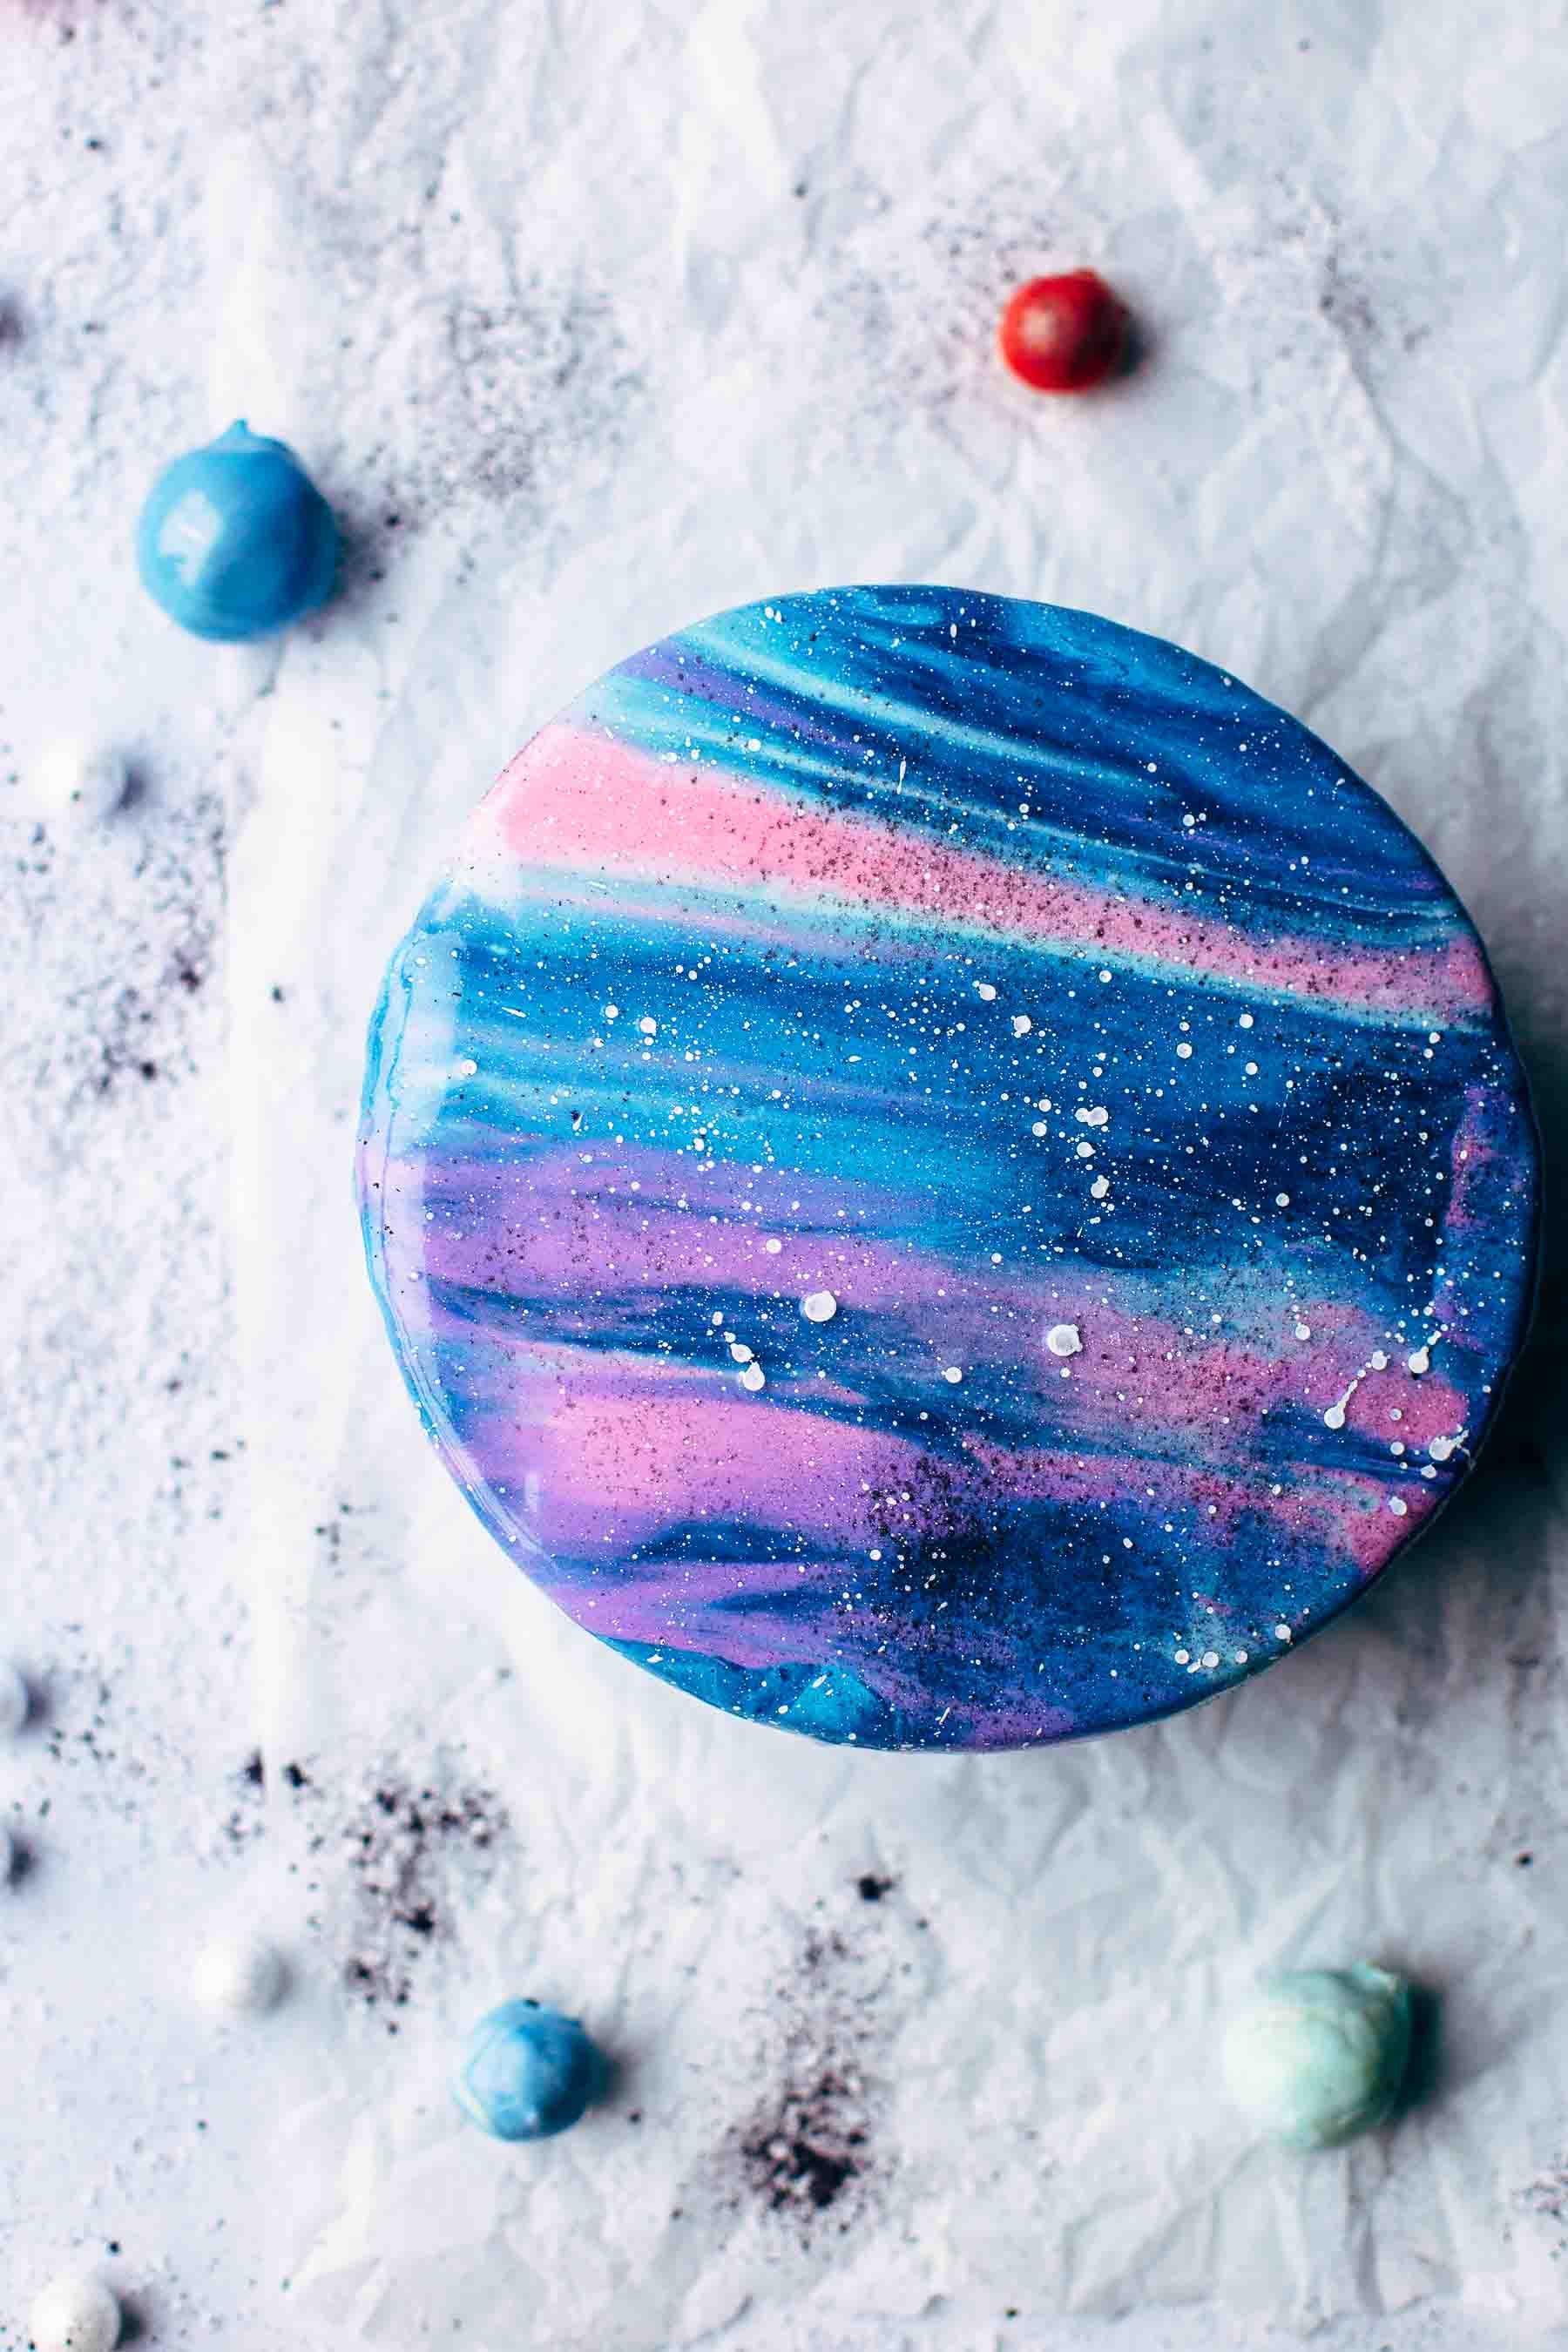
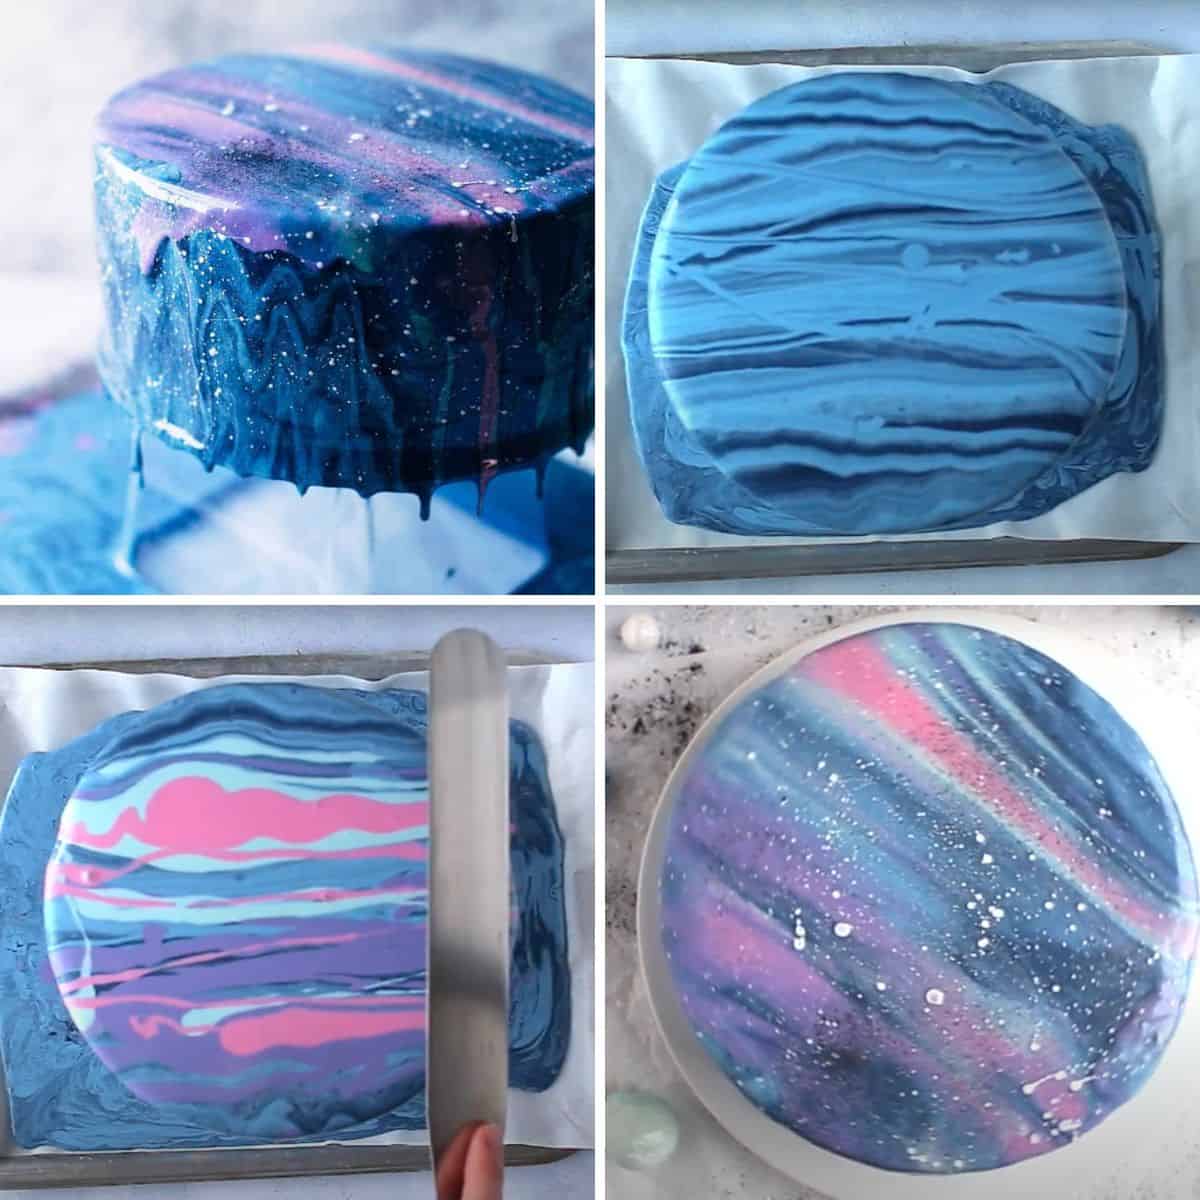
Adding the Mirror Glaze to the Cake
- Step 1: Line a cookie or baking sheet with parchment paper and place a vase or glass container upside down in the center of the sheet. Make sure the diameter of the vase or jar you use is smaller than the cake but large enough to support the cake. Then place the cake on top.
PRO TIP: The glaze must be 90°F / 32°C so that it is neither too thin nor too thick. If your frosting is too hot, let it sit until it has cooled slightly. Otherwise the frosting will not stick to your cake and will be too runny. If the frosting is too cold, it will be too sticky and you won't be able to pour it over your cake. In this case, heat in the microwave for a few seconds.
- Step 2: Pour the aztec and navy glaze into the black and navy glaze and carefully draw in a few swirls without mixing the colors. Pour the glaze over the cake, starting in the center and moving the bowl in a circular motion to the edges of the cake while pouring and let drip over the sides until the cake is fully glazed.
- Step 3: Use small spoons to pour lines of the teal, purple, and pink glaze onto the cake. Finish the pattern by gently stroking the top of the cake with the large offset spatula. I recommend working the spatula in the direction of the lines on the cake for the most beautiful effect.
- Step 4: Sprinkle some black pearl dust on top of the cake and spritz small drops of white food coloring on top with a brush for the perfect finish.
Expert Tips
- Watch the Video. Familiarize yourself with the process by watching the video multiple times and thinking the process through in your head. Analyze what you see, how I apply the glaze, and the consistency of the glaze.
- Plan and Prepare in Advance. Read the directions carefully to have all the ingredients and tools ready when you need them. Make sure you give yourself plenty of time.
- Use a Food Thermometer. It's an invaluable investment and gives you peace of mind that the glaze is at the right temperature to be neither too thick nor too thin.
- Adjusting the Colors. I add a bit of white food coloring to every color to brighten up the color of the batter.
- Use Any Vanilla Cake. A light colored cake works best for coloring. But you can really use any vanilla or white cake recipe you want.
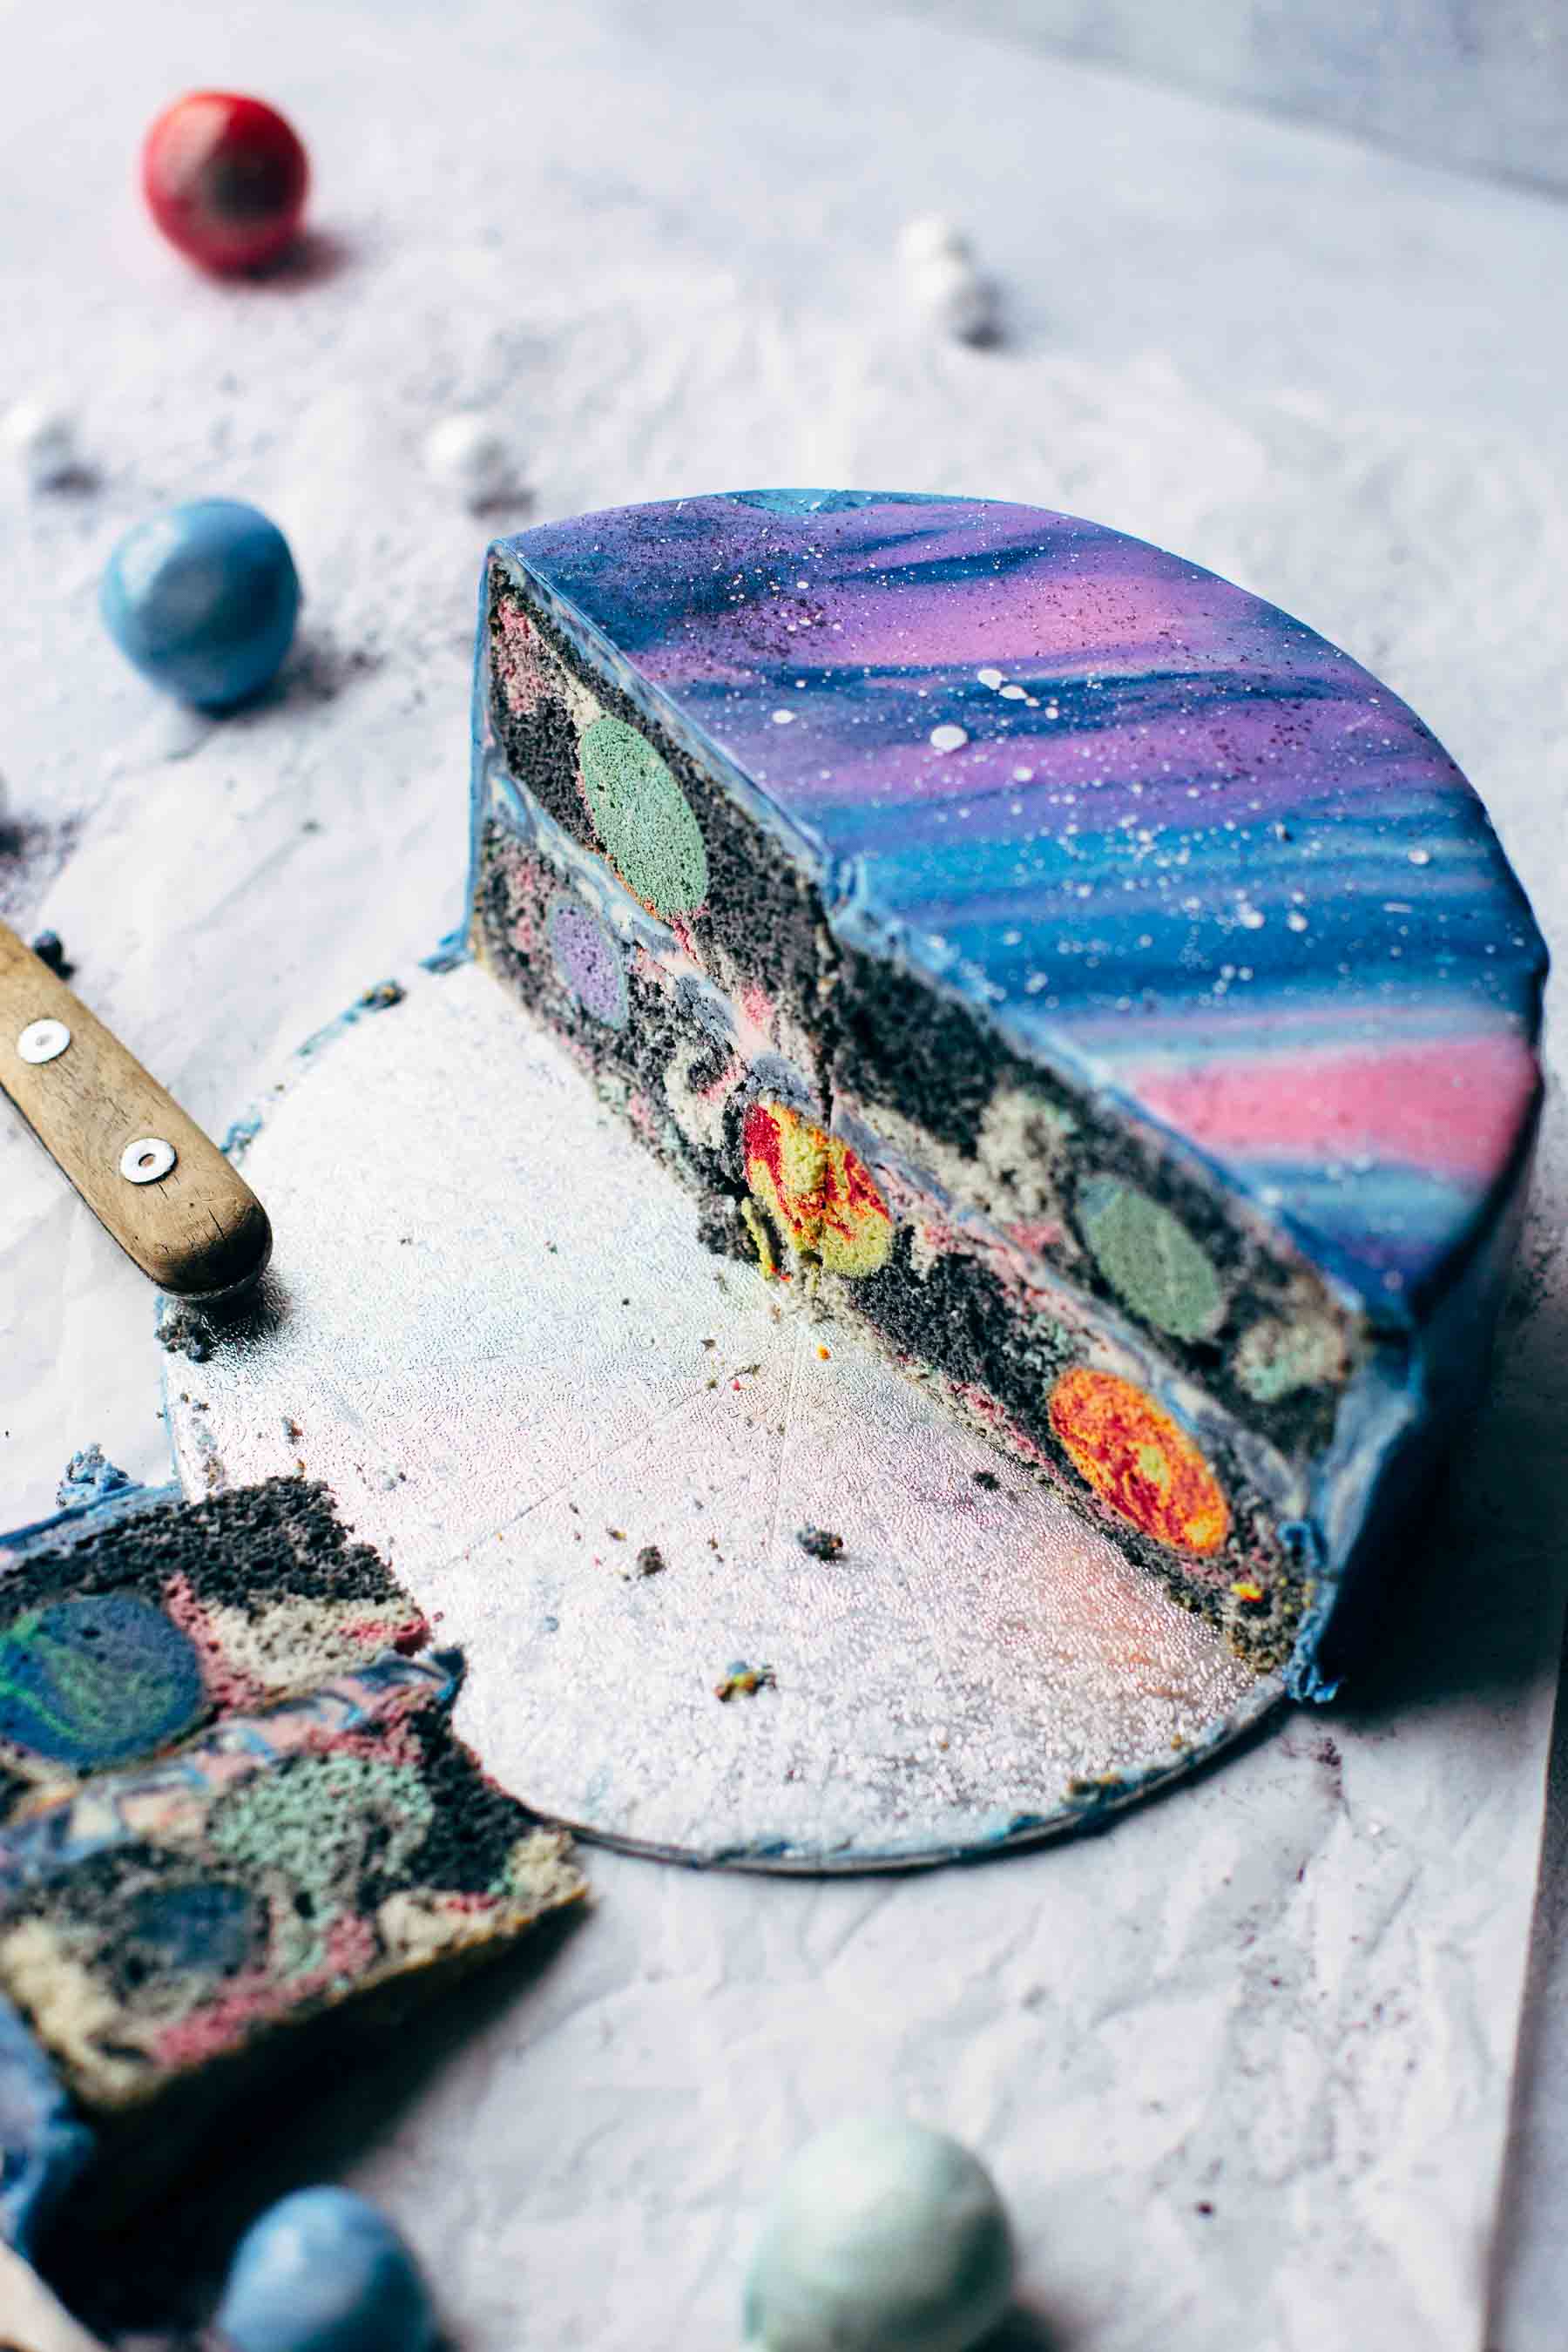
- Storing. This cake looks best served on the day it's first completely made. The glaze it will lose its shine over time. However you can store any cake that's left in the fridge for up to five days and still enjoy the leftovers.
Recipe FAQs
Yes, the cake planets are baked twice. Although I don't find the cake pops too dry, they are definitely not moist after baking them twice.
You can bake and frost the cake ahead of time and refrigerate until ready to serve. However, I recommend glazing the cake the day you serve it, as the mirror glaze loses its perfect shine over time.
More Cake Recipes for a Celebration


If you tried this Galaxy Cake and Mirror Glaze Recipe or any other recipe on my website, please leave a 🌟 star rating and let me know how it went in the 📝 comments below. Thanks for visiting!
Recipe
Mirror Glaze Galaxy Cake Recipe
Ingredients
Galaxy Cake Pop Planets
- 3 large eggs
- ½ cup granulated white sugar
- ½ cup unsalted butter, at room temperature
- 1 cup all-purpose flour, spooned and leveled
- ½ teaspoon baking powder
- ¼ teaspoon salt
Galaxy Cake
- 1 cup milk, room temperature
- 6 large egg whites, room temperature
- 2 ¼ cups all-purpose flour, spooned and leveled
- 4 teaspoon baking powder
- ½ teaspoon salt
- ¾ cup unsalted butter, at room temperature
- 1 ¼ cups granulated white sugar
- 1 vanilla bean* (or 1 teaspoon vanilla extract)
Galaxy Vanilla Buttercream
Galaxy Mirror Glaze
- ¾ cup cold water
- 1 ¼ oz powdered gelatin
- 12 oz white couverture chopped
- 1 ½ cups granulated white sugar
- ⅜ cup water
- ¾ cup light corn syrup
- ¾ cup sweetened condensed milk
Instructions
Galaxy Cake Pop Planets
- Microwave butter for about 15-20 seconds until very soft and a bit melted. Set aside.
- Preheat oven to 350°F / 175°C.
- With a handheld or stand mixer fitted with a whisk or paddle attachment, mix eggs on medium-high speed until combined for about 1 minute. Add sugar and mix until light and creamy for about 2-3 minutes. Add butter and mix until creamy. In the end, add flour, baking powder, and salt and mix until fully combined and smooth.
- If you want to make the same planets like me, separate batter in 6 bowls and color with navy blue, purple, green, Aztec blue (teal tone), yellow, red, and white. Use gel or paste food coloring. Depending on your food coloring brand, add a few drops to your batter until you reach the desired color. If you want to use more of one color and less of another, consider the required amount of batter per color while separating into bowls. I added to every portion a bit of white to lighten up the colors.
- Use a 20 cake pop mold. Spoon red and yellow batter into a few mold for the sun (the side of the mold without the holes). Blue and green (with a bit of white if desired) for the Earth, teal with a bit of white for Uranus, and purple with a bit of white for Neptune. Fill until level with a very slightly heaping and draw a few swirls with a skewer. Place the second side of the cake pop mold on top (the one with the hole) and close tightly. Bake for about 18-20 minutes. I baked mine for 20 minutes. Let cool in the mold until you are done with the cake batter. Set aside.
Galaxy Cake
- Line two 8-inch baking pans with parchment paper by cutting 8-inch circles for the bottom and about 2-3 inch wide strips for the sides. Use very less baking spray underneath the paper that it sticks to the pan for easier filling.
- In a small bowl, whisk milk and egg whites until combined. Set aside.
- In another small bowl combine flour, baking powder, and salt and stir to combine. Set aside.
- With a handheld or stand mixer fitted with a whisk or paddle attachment mix butter and sugar on medium speed until creamy and combined for about 1-2 minutes. Add vanilla* and mix until combined. Mixing on low speed, alternately add dry and wet mixtures, beginning and ending with dry ingredients. I added the dry ingredients in 3 batches and the wet ingredients in 2. Mix until smooth and combined.
- I used 4 colors for the galaxy cake batter. Black, white, pink, and Aztec blue (teal tone). Divide batter into 2 big and 2 small bowls. Add black food coloring and white food coloring in the two big bowls and pink and a bit of Aztec blue in the two small bowls. Add white if you want to lighten up the colors.
- Spoon about ¼ of the colored batter alternately in the two pans equally until the bottom is covered. Gently draw a pattern. Be careful that you don't mix up the colors. Place 10 cake pops planets in each pan. Spoon remaining batter on top of the planets. Bake for about 27-30 minutes until a toothpick centered in the middle comes out clean (don't pick inside a cake pop). Let cool in pans for about 10 minutes then transfer to a wire rack to cool completely.
Galaxy Vanilla Buttercream
- Mix butter with a whisk attachment on medium speed until creamy for about 2 minutes. Add 1 cup sugar at the time and mix on low speed until combined. Add salt and mix to combine. Mix in vanilla* and milk until smooth and fully incorporated. Divide buttercream into 4 bowls. I used black, white, blue, and pink. Add white to lighten up the colors if desired. Spoon the colored buttercream alternately into a piping bag.
Frost the cake
- Place bottom cake layer with a cake board underneath on a turner. Pipe a thin layer of buttercream on top. Even with a big offset spatula by placing the edge of the spatula on top of the cream horizontally and spin the cake around. Place the second cake layer on top. Pipe remaining buttercream on top and the sides until the cake is fully covered. Level the top with the spatula like you did with the bottom cake layer until buttercream is smooth and even.
- To level the buttercream on the sides, plant the spatula next to one side uprightly and spin the cake around. Take care that you keep the same angle while spinning the cake around. Smooth the edges by leveling the top again and push frosting very slightly and carefully to the edges. Then level the edges on the sides again and repeat until edges are smoothed.
- Freeze cake with the board underneath for about 1 hour that the buttercream is very firm and doesn't melt away while glazing.
Galaxy Mirror Glaze
- Add ¾ cup of water and gelatin in a small bowl and stir to combine. Let bloom for about 10 minutes. It needs to be firm to touch.
- Place chopped couverture in a big bowl and set aside.
- In a small saucepan bring sugar, ⅜ cup water, and corn syrup over medium heat to a boil and simmer for about 2-3 minutes. Remove from stove and stir in bloomed gelatin and condensed milk until combined. Pour over couverture, cover with a towel and let stand for about 2 minutes.
- Mix with a handheld emersion blender until smooth, and no lumps remain. Strain and separate mirror glaze in 5 bowls. Two big ones, and 3 smaller ones. Add Aztec blue and navy blue in a 3:1 ratio in one big bowl. Add black and navy blue in equal amounts to the second big bowl. In the 3 small bowls, add purple, pink, and Aztec blue (teal tone). Add white to brighten up the colors if needed.
Glaze the cake
- Line a cookie or baking sheet with parchment paper. Place a vase upside down in the middle. Remove cake from the freezer and place on top of the vase.
- The mirror glaze needs to be 90°F / 32°C while glazing that it is not too thin and not too thick. Use a candy thermometer. When your glaze is too hot, let it stand until it cools down a bit. This will go very fast. Otherwise, the glaze doesn’t stick to your cake and is too runny. When the glaze is too cold, it is too sticky, and you can’t pour it over your cake. In this case, warm it up in the microwave for a few seconds.
- Pour the blue from the first big bowl into the very dark space blue in the second big bowl. Give it a few gentle swirls and draw a pattern. Don't mix up the colors. Pour over cake beginning on the top and then let drip over the sides until the cake is fully glazed. Drip with a spoon a few lines of teal, purple, and pink on top. Go with the lines of the light and dark blue pattern.
- Brush with a big offset spatula over the top of the cake to smooth the colors. Sprinkle a bit of black pearl dust and white food coloring on top of the cake with a brush.
- Let dry for about ½ hour then transfer to the fridge and chill for 2 hours. Cut cake with a very warm knife (warm with hot water then dry) for best cutting results. Store leftovers in an airtight container in the fridge up to 3 days.
Notes
You can find the video in the post above. If you don't see a video, please check your browser settings.
Ruth Williams
I could only find flaked couverture. Can I use that instead of the chopped?
Sabine
You can buy white couverture in bars and chop it yourself. I hope that helps.
Petra
Wow! This cake looks amazing and even better than what I was looking for when my daughter asked me for a Galaxy cake this year. I admit I'm a bit scared mainly of the mirror glaze because I'm not an experienced Baker and I habe never done one before but will do a practice run beforehand. Quick q to the ingredients. Will I need more than one tub of the food colouring or is one tub for each colour enough? Also, could I use liquid glucose instead of corn syrup? It's easier to get a hold of here in the UK. Thank you. Petra
Sabine
Hi Petra, One tub for each color is more than enough. I've never tried the glaze with glucose syrup but I've done several other recipes where I used glucose syrup instead of corn syrup and got great results. Good luck!
Petra
Thank you so much for getting back to me so quickly, that's so helpful. I'm just doing a trial bake but can I ask- is it 175° fan assisted or conventional? My cakes have been in for 40 mins and they are still not done? Also my batter seems quite thin and runny. Any idea what I might have done wrong?
Thank you
Petra
Sabine
It's just bottom and top heat, so conventional. It's hard for me to tell from the distance what could have gone wrong on your end. Please watch the video to see how the required consistency of the cake batter is. Does it look anything like that?
Colleen Dartez
Love the details you gave and the glaze taste and sheen came out great! Wish you would mention when to clean the bottom of the glaze from the cake in the directions. I waited too long thinking I could cut it, but it was too gummy.
Gabs
Hi, I love the sound of this cake and was wondering if i can make the cake a week before and freeze and glaze on the day?
Sabine
Hi Gabs, Yes, that works fine.
Kim Ko
Making this for my toddler’s “two the moon” themed birthday and the cakes are in the oven right now!!! Hopefully I don’t mess it all up when it comes time to do the buttercream layer!! Cutest idea, thank you for the recipe 🙂
Lauren Cox
Hi can you make a chocolate buttercream icing or does it have to be white buttercream under the glaze? Thank you.
Sabine
You can do chocolate buttercream instead of vanilla buttercream as well.
April
I am making this cake for my son's first birthday! Our theme is First Trip Around the Sun 🙂
I'm wondering if I can use cream cheese frosting instead of the buttercream. Thank you!
Sabine
That sounds exciting! I've never tried it with cream cheese frosting. If you make cream cheese frosting, please make sure that it's not soft and more of a buttercream texture, or it won't give the glaze the stable foundation it needs. Hope that helps!
Rose Zink
What is white couverture? And is there a specific brand that works best?Rose
Sabine
White couverture is white chocolate with extra cocoa butter added. It's easy to temper and melts smoothly and evenly. Hope that helps!
Alex
Awesome recipe. I am new to the mirror glaze. Can you replace the couverture with another item?
Sabine
You can use high-quality white chocolate instead. Hope that helps!
Louise
I’ve made this cake for my son and would like to know if you need to serve this cake on the day of making it or will it be okay to store in the refrigerator until the next day this is with the mirror glass applied. Thank you
Sabine
It's absolutely okay to store it in the fridge overnight but the longer you store it in the fridge the more of its shine and gloss the glaze will lose. Hope that helps!