
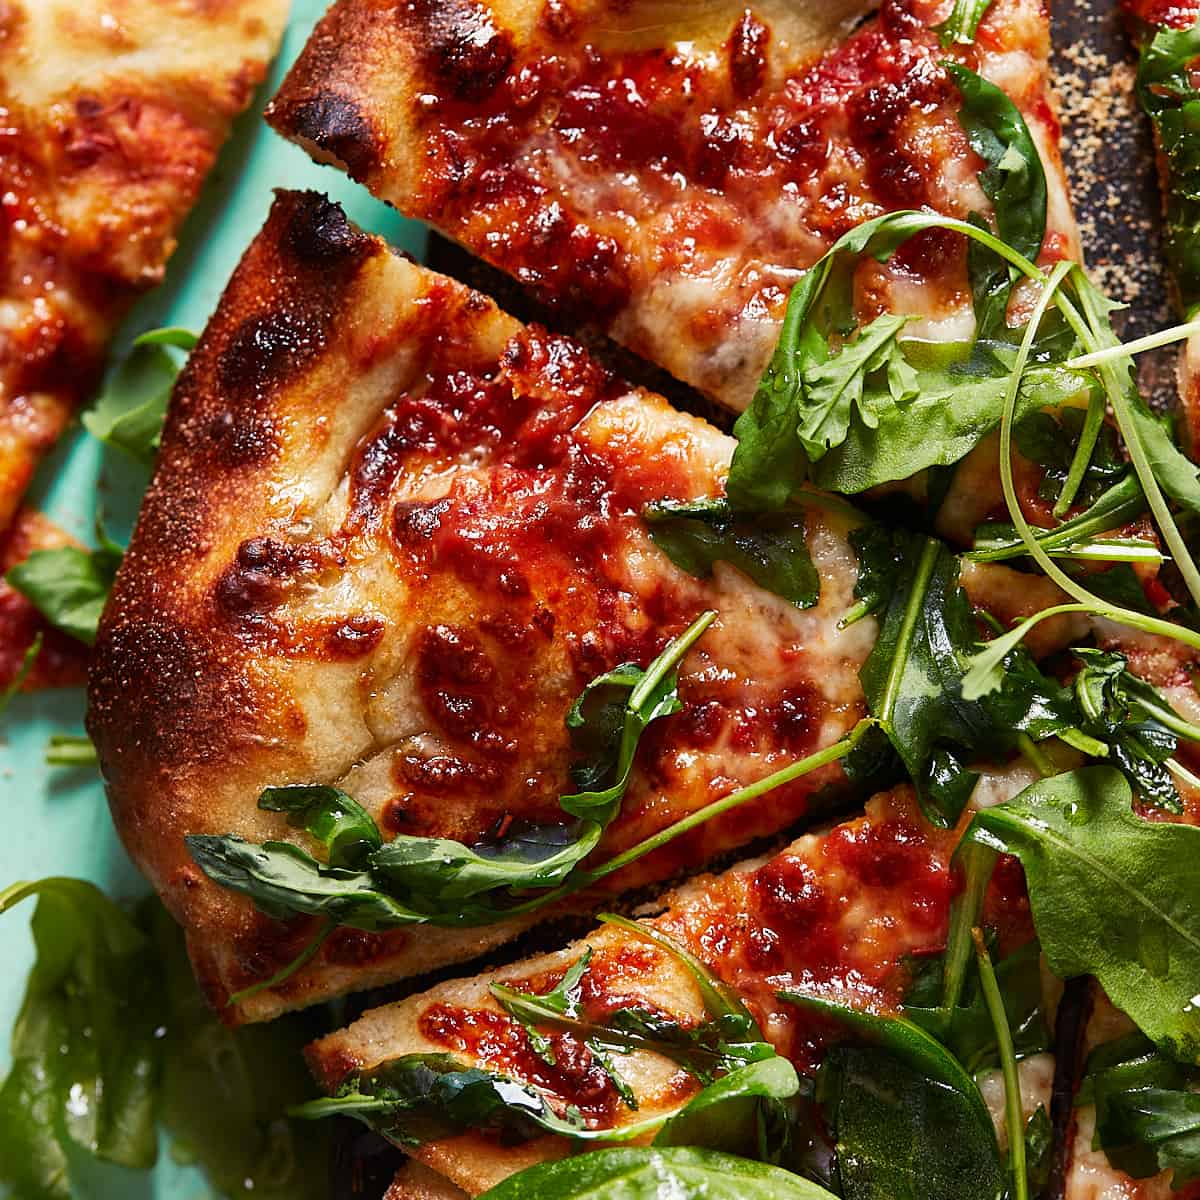
There is nothing like homemade sourdough pizza crust. The crispy and chewy texture, together with the slight tanginess of the sourdough, is just amazing. Learn everything you need to know to make pizzeria-style sourdough pizza at home. The long cold fermentation in the refrigerator ensures that the pizza dough is full of flavor and bubbles, resulting in a light and crispy yet chewy crust. In my opinion, the best use for sourdough starter discard.

Jump to:
Recommended equipment
- Straight-sided vessel - to easier monitor the development of the dough, I recommend using a straight-sided vessel for the dough to rise in. It's easier to tell how much the dough has risen with a straight-sided vessel than with a round bowl.
- Pizza steel - if plan to bake pizza at home on a regular basis, this investment is well worth it. Pizza steel transforms your domestic oven into a professional pizza baking oven. It ensures that the crust bakes through quickly and makes it light, airy, bubbly, and crispy.
Ingredients notes
- Best flour - without a doubt, strong white bread flour. Since the dough develops over several days, you need strong, high-protein flour. I get great results when I use flour with a protein content between 13.4-14.9% protein.
- Water - since it's a sourdough pizza dough, it's best to use filtered or bottled water. The chlorine in unfiltered tap water can negatively affect the development of the dough.
- Sourdough starter - it's best to use the levain (active and recently fed sourdough starter) when it's strong and before peak activity or at peak. You should aim for about 75% volume growth. The young and still growing starter has a nice mild flavor profile and helps to prevent your crust from getting too tangy. Don't have a sourdough starter yet? Try my yeast pizza dough instead.
- Best oil - olive oil. This is the only oil I recommend to create an Italian-flavored, savory, delicious-tasting crust.
Tips for perfect pizza crust every time
- Once the dough is ready to bake, work the dough as little as possible. The reason for this is that the more you work the dough, the more air bubbles will pop and you will get a tough crust.
- Use enough flour for the dough, your hands, and the work surface while stretching and shaping the dough. This keeps the dough from sticking and tearing.
- If you use a pizza peel, sprinkle it with semolina flour to prevent the dough from sticking to the peel. If you don't have a pizza peel, sprinkle parchment paper with semolina flour that you can rearrange and reshape the dough on the paper without sticking.
Baker's percentages and hydration
| Ingredient | Weight | Baker's Percentage |
| Strong white bread flour | 250g | 100% |
| Water | 168g | 67,2% |
| Sourdough starter (100% hydration) | 50g | 20% |
| Salt | 5g | 2% |
It's basically a lean, high hydration sourdough bread dough. I aim for 70% hydration for my sourdough pizza dough which is achieved when the hydration of the sourdough starter is included in the calculation. I didn't include the olive oil in the calculation because you use it just for your hands to knead the dough and stretch and fold it and for the container in which the dough is stored.
By the way, my sourdough sandwich has similar hydration and is super soft and delicious.
How to store it
The key to a great texture is a long cold fermentation in the refrigerator. For best results, keep it in the refrigerator for 4-6 days. During this time, the dough develops lots of small and big bubbles, making your crust extra delicious.
Same day and overnight option
Temperature determines how quickly the dough rises and develops. If you want your sourdough pizza dough to be ready the same or the next day, let the dough rise at room temperature. How long the bulk fermentation takes depends on many different factors, but it takes around 6-8 hours for the dough to double in volume, be full of bubbles, and wobble like jellyfish when the container is gently shaken. Then use it immediately or put it in the refrigerator until you need it.
FAQs
Can I freeze it?
Yes. Simply place the container in the freezer when the dough has developed and risen by about 75% in volume. To thaw, place the container in the refrigerator until the dough has doubled in volume, about 1-2 days. Then continue with the recipe.
Can I overproof it?
Absolutely. If you notice that the dough becomes soupy and loses volume, you know it has been overproofed. It will be very difficult or almost impossible to shape an overproofed pizza dough and I recommend at this point kneading it a few times and using it elsewhere. Otherwise, you will end up with a tough and chewy pizza crust that is very difficult to chew.
Why is my dough so sticky?
There could be several reasons why the dough is sticky. This may be due to a low absorption rate or a low protein content in the flour. Or you accidentally added too much oil while kneading the dough. In addition, under- and over-developed dough is very sticky. As long as your dough is well developed, you can counteract the stickiness by using generous amounts of flour when stretching and shaping the dough.
Is the crust supposed to be chewy?
It's normal and desired for the sourdough pizza crust to have a pleasantly chewy texture. The crust should be light, bubbly, airy, crispy, and yet slightly chewy. If the crust is tough and overly chewy, then it's very likely that the dough hasn't developed enough.
Photo tutorial
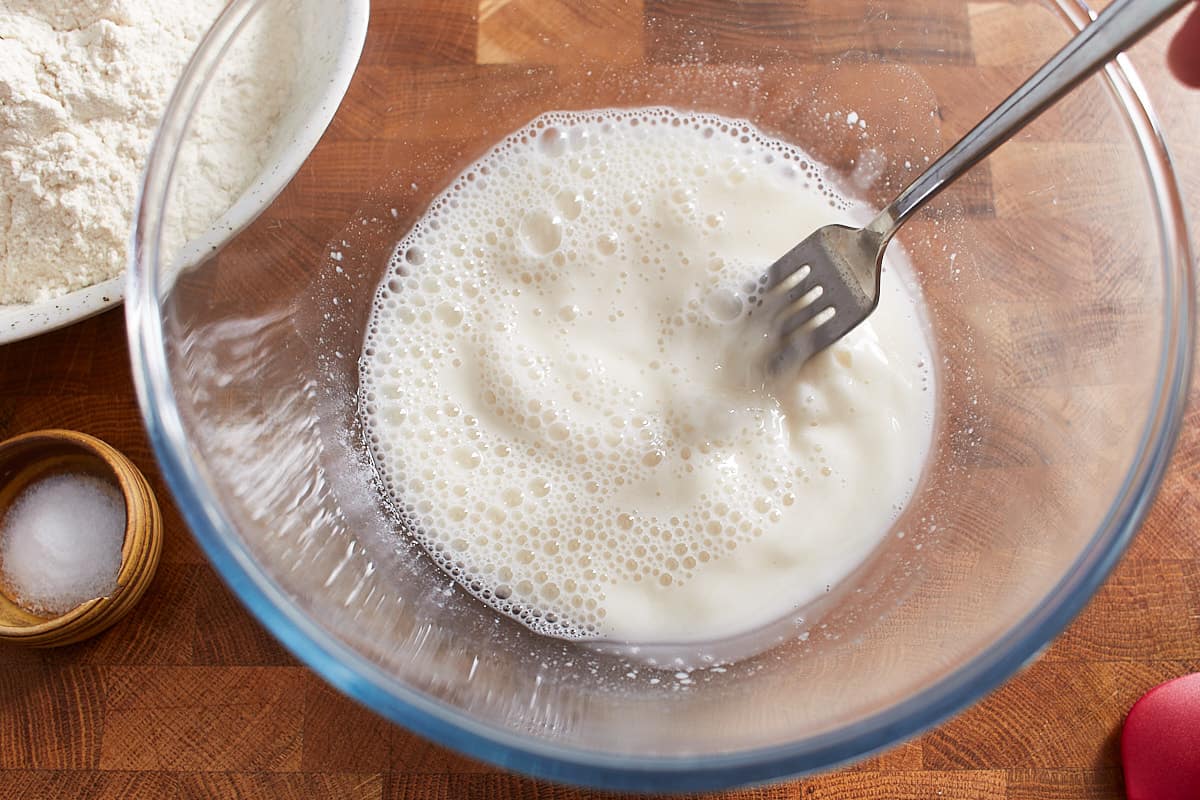
In a large mixing bowl, mix the water and the levain until dissolved.
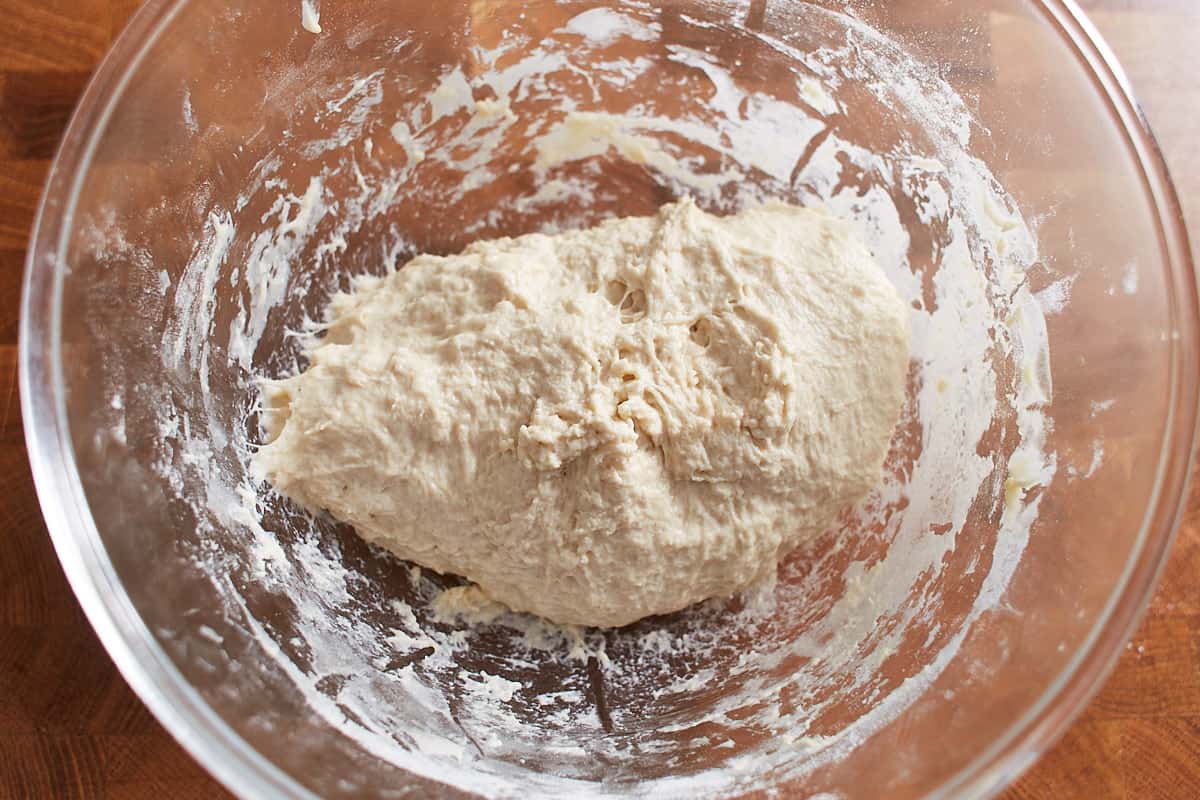
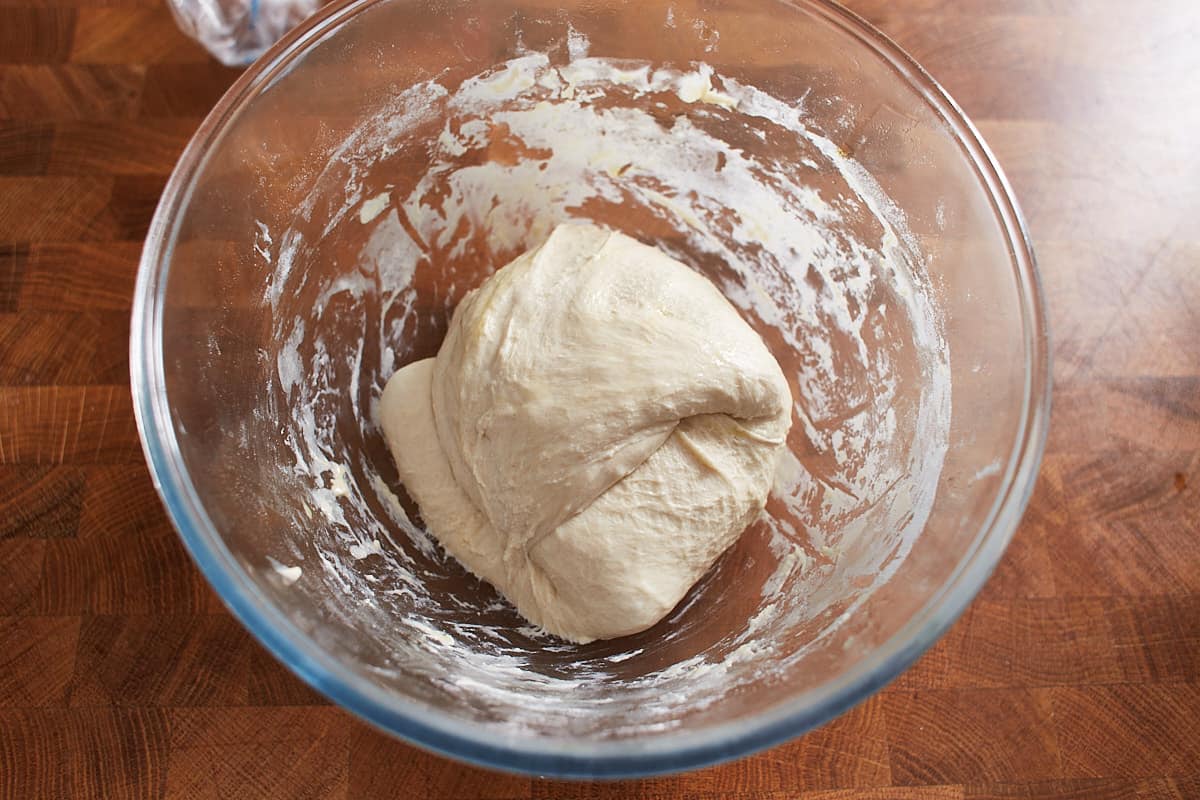
Add the flour and salt, and stir until a shaggy dough forms. Pour a little olive oil in the palm of your hand and knead the dough for a few minutes until it releases from the bowl. Cover and let sit.
Lightly oil your hand, grab one side of the dough, stretch it up, and fold it onto itself.
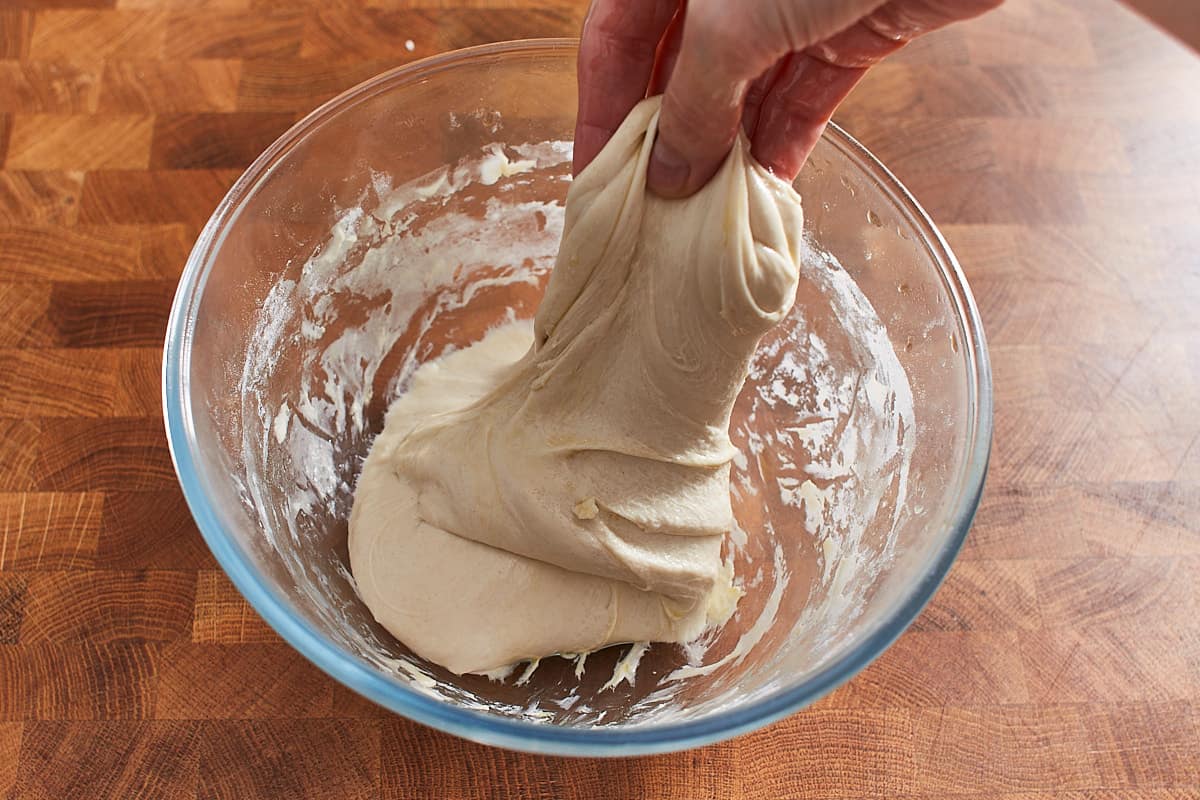
Turn the bowl by 90° and stretch it and fold it again. Repeat two more times. Then cover and let sit.
Repeat three more times until you complete 4 sets of stretch and folds.
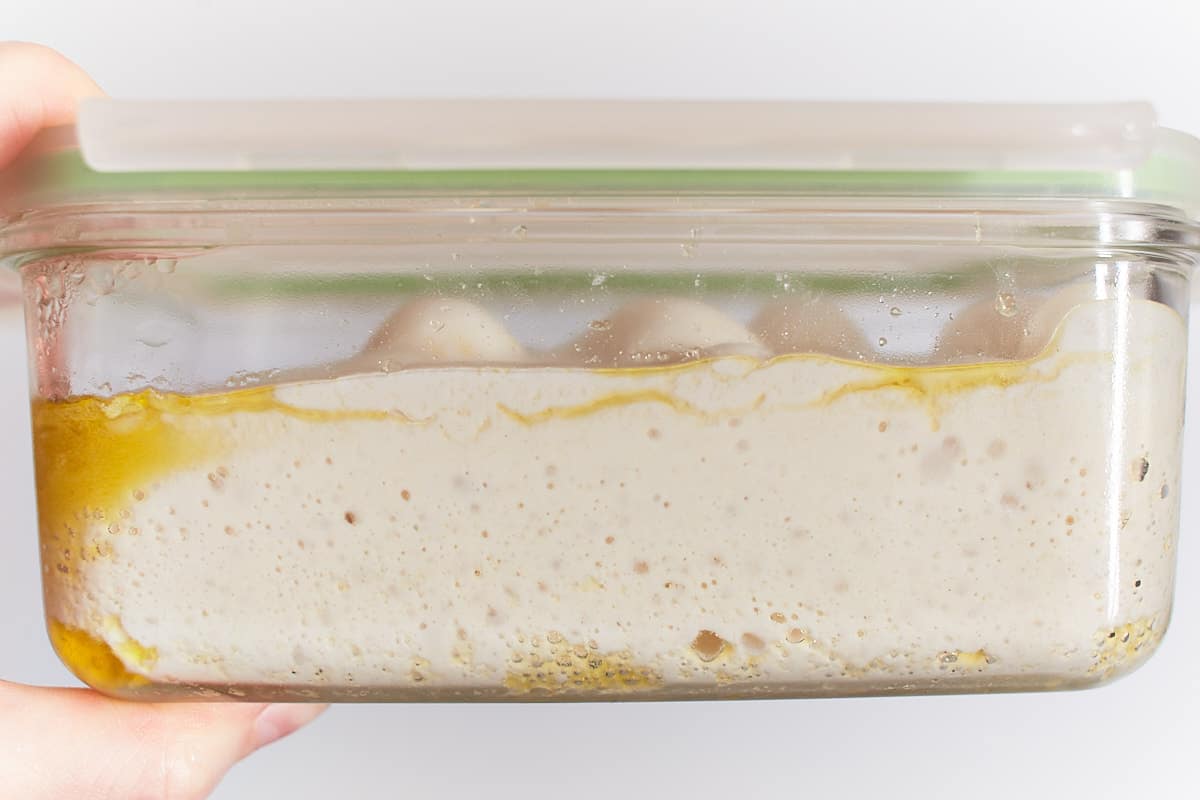
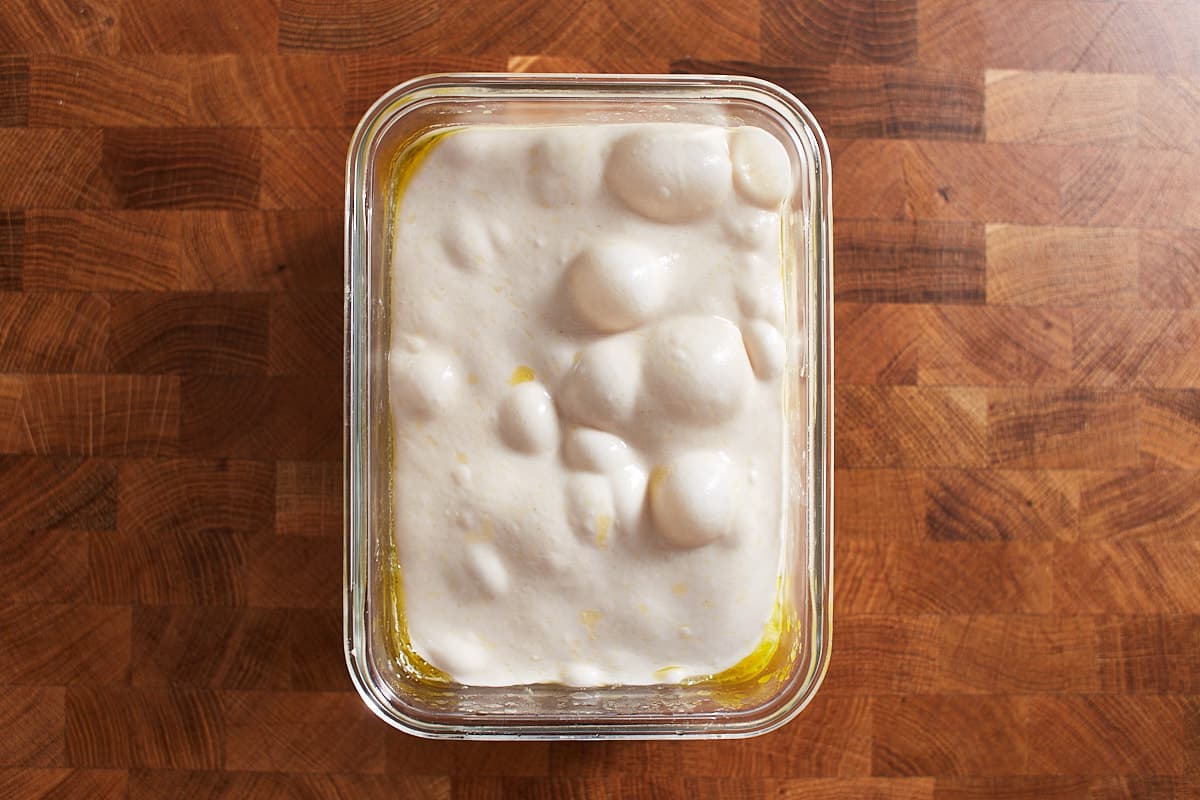
Transfer the dough to a well-oiled container, also oil the top of the dough, cover, and let rise. The dough is sufficiently developed when it has many small and large bubbles and wobbles like jellyfish when you gently shake the container.
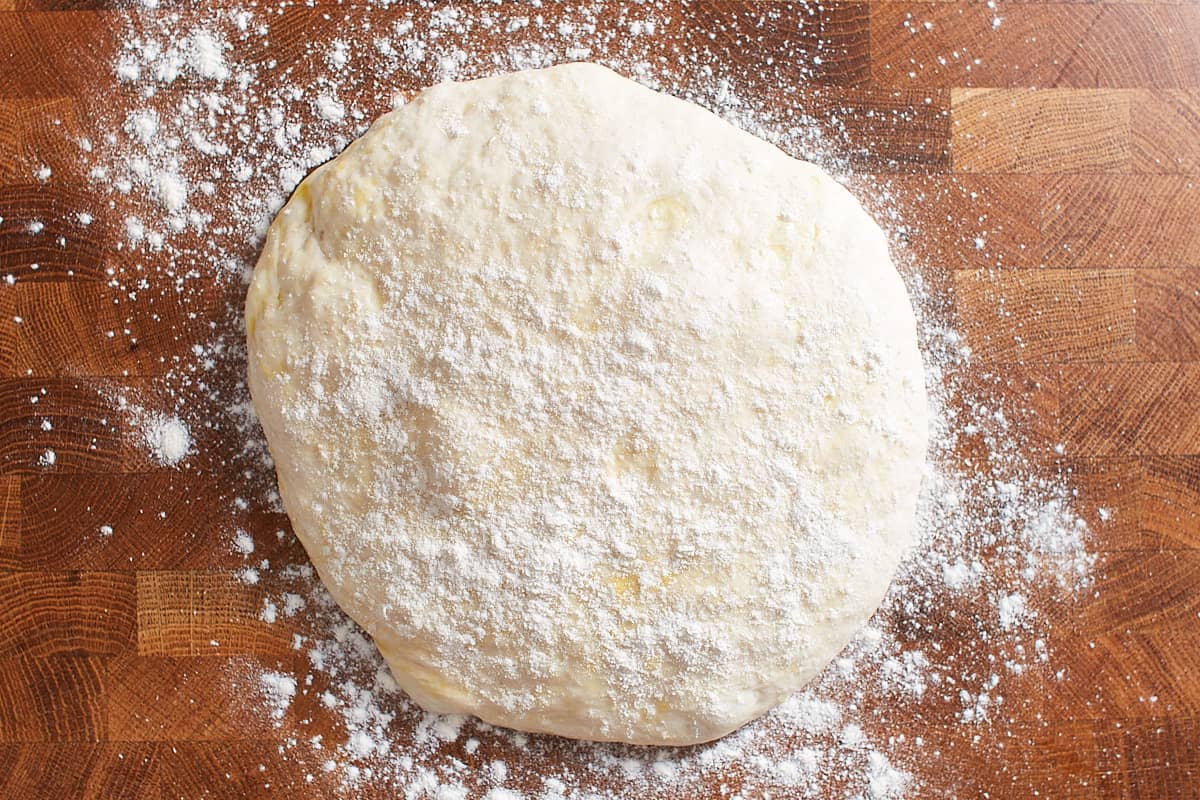
Carefully remove the dough from the container with a dough scraper and place it on a work surface. Cut the dough in half and shape both halves into rounds with as few moves as possible. Then flour the tops of the dough balls and let rest.
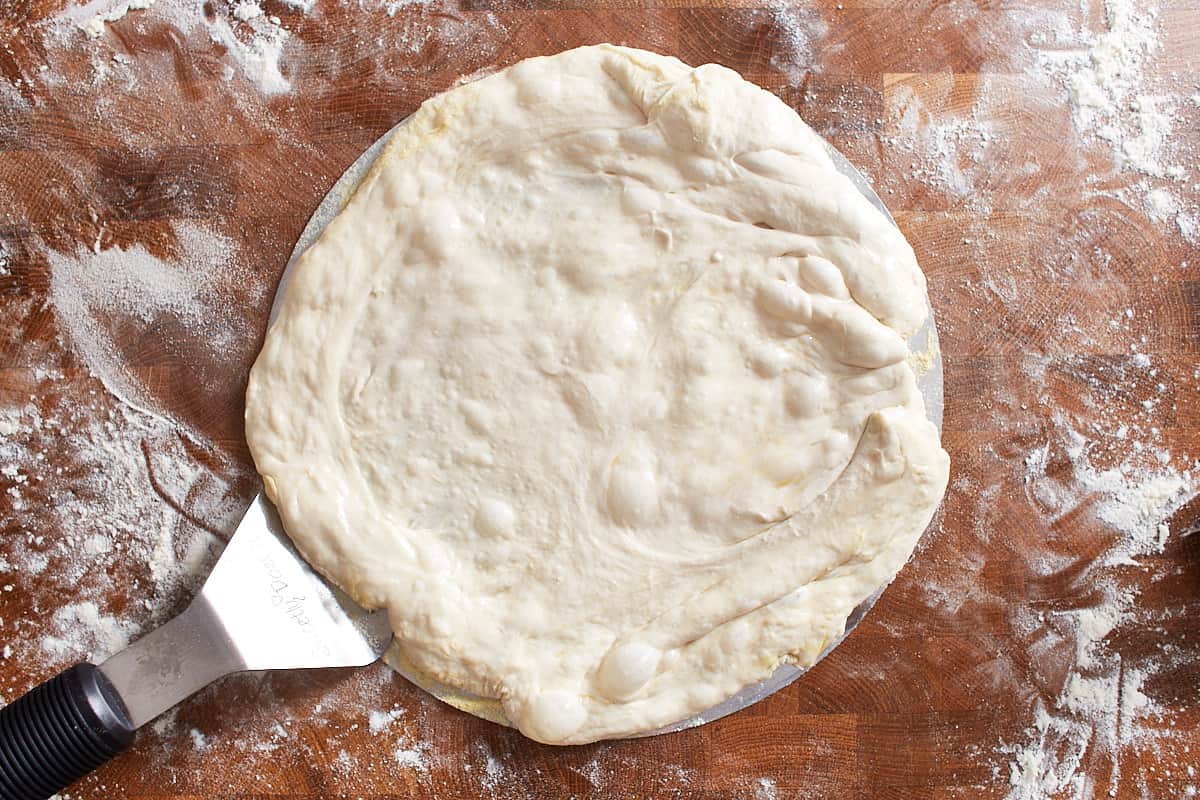
Stretch the dough and shape it with enough flour so that it doesn't stick. Then lift the dough from two opposite sides and transfer it to a pizza peel or baking paper that is floured with semolina flour and shape it into an even round shape.
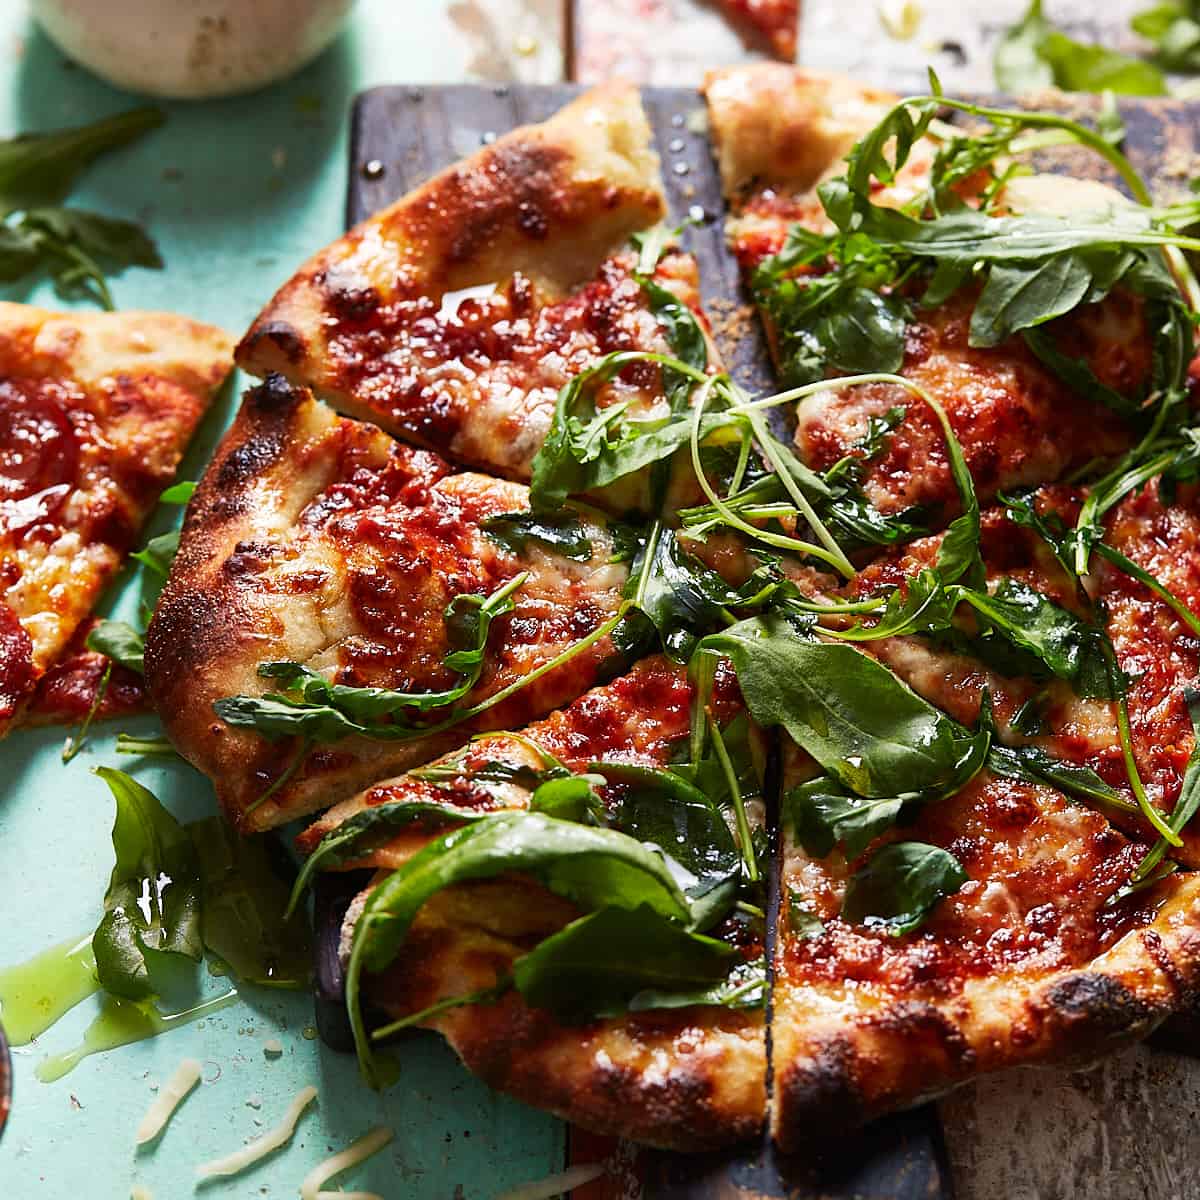
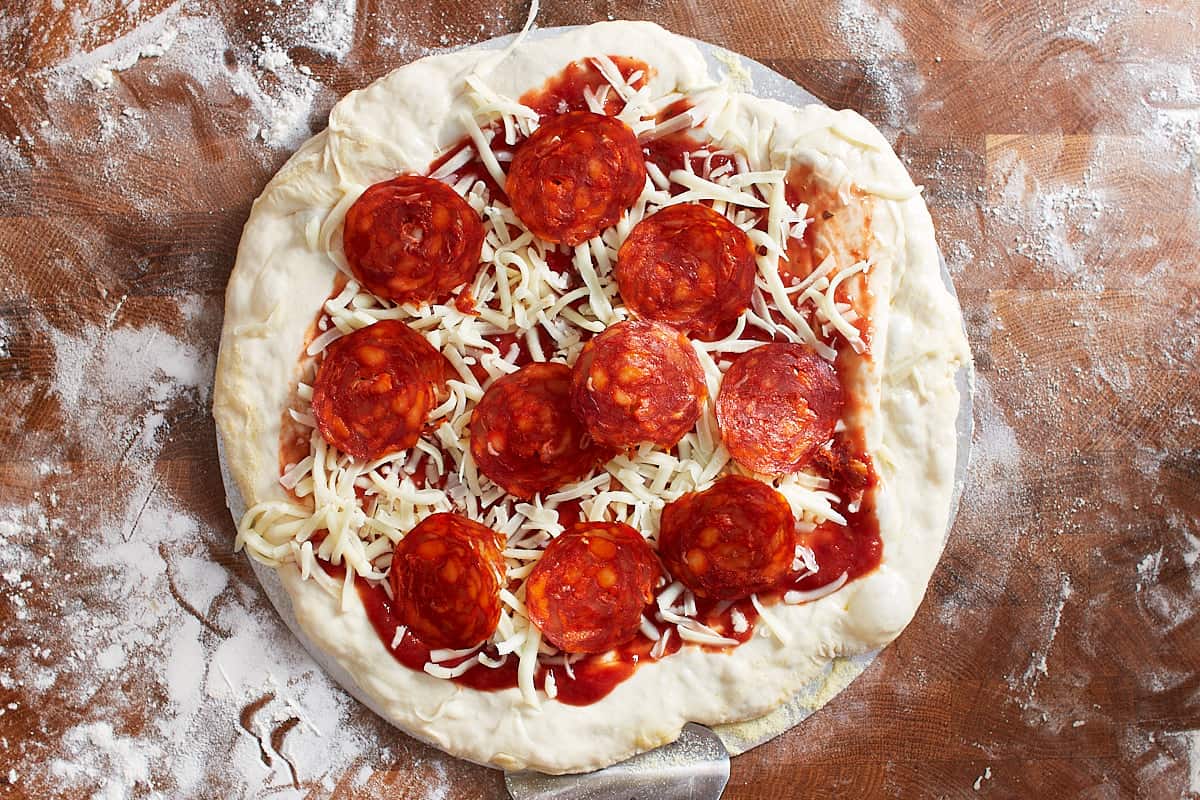
Spread the pizza sauce evenly on the dough, scatter with cheese, top with the pepperoni, and bake.
Note: For a full visual walkthrough, watch the video.
Related recipes
You just love pizza, don't you? Well, I have good news for you. I have some awesome recipes for you to try:
- Air Fryer Pizza
- Air Fryer Pizza Rolls
- Garlic Pizza
- Dessert Pizza
- Air Fryer Garlic Bread (made with pizza dough)
Recipe

Sourdough Pizza Crust
Ingredients
Levain
- 10 g sourdough starter discard
- 50 g filtered water
- 50 g strong white bread flour
Pizza dough (makes 2 pizzas)
- 168 g filtered water
- 50 g levain
- 250 g strong white bread flour
- 5 g salt
- 2-3 tablespoon olive oil for kneading and the dough container
- 2-3 tablespoon semolina flour for the pizza peel or baking paper
Toppings for 2 pizzas
- ⅔ cup pizza sauce (150g)
- 2 cups mozzarella cheese (200g)
- 20 slices pepperoni
- 2 handful rocket
Instructions
Prepare the levain
- Combine the sourdough starter, water, and flour and stir until no lumps remain. Let sit in a warm spot (68-75°F / 20-24°C) until it has risen by 75% and passes the float test, about 4-6 hours.
Prepare the dough
- In a large mixing bowl, mix the water and the levain until dissolved. Add the flour and salt, and stir with a spoon or spatula until a shaggy dough forms. Pour a little olive oil in the palm of your hand and knead the dough for a few minutes until it's smooth and releases from the bowl. Cover and let sit for 30 minutes.
- Lightly oil your hand, grab one side of the dough, stretch it up, and fold it onto itself. Turn the bowl by 90° and stretch it and fold it again. Repeat two more times. Then cover and let sit for 30 minutes. Repeat three more times until you complete 4 sets of stretch and folds.
- Transfer the dough to a well-oiled container, also oil the top of the dough, and cover. Let the dough sit at room temperature for another 1-2 hours until you see small bubbles develop along the sides of the container. Then refrigerate for 4-6 days. The dough is sufficiently developed when it has many small and large bubbles and wobbles like jellyfish when you gently shake the container.
Prepare the pizza
- On baking day, preheat the oven and pizza steel to 485°F (252°C) for 45-60 minutes. If you don't have a pizza steel, preheat the oven and a baking sheet for 20-30 minutes. Place the baking steel or baking sheet in the top third of the oven.
- Remove the dough 30 minutes before baking from the refrigerator and let rest in the container for 10 minutes.
- Carefully remove the dough from the container with a dough scraper and place it on a work surface. Cut the dough in half and shape both halves into rounds with as few moves as possible. This works best with a lightly floured bench knife. Then flour the tops of the dough balls and cover with a dry and clean kitchen towel for 20 minutes.
- In the meantime, cover a pizza peel or baking paper with semolina flour and set aside.
- Flour the work surface and the dough generously and turn one ball over with the bench knife. Lift the dough ball up and place it on your knuckles. Make two fists and stretch the dough, and as the dough expands, gradually open your fists and sprout and stretch your fingers. Then place the dough back on the floured work surface and stretch with your fingers. Let gravity help you stretch the dough. Use enough flour to avoid sticking. Then lift the dough from two opposite sides and transfer it to the prepared pizza peel or baking paper and shape it into an even round shape if necessary.
- Spread the tomato sauce evenly on the dough, scatter with cheese, and top with the pepperoni. Transfer the pizza to the oven and bake for 6-7 minutes if using a pizza steel and 8-12 minutes if using a baking sheet. If your oven has a broiler setting, turn it on after 4 minutes.
- While the first pizza is baking, prepare the second. Then remove the first pizza from the oven and bake the second. Top with the fresh rocket, serve immediately and enjoy.
Notes
For a full visual walkthrough, watch the video.
Adjust the toppings to your liking.
Video
You can find the video in the post above. If you don't see a video, please check your browser settings.
Cat
Hi! This recipe looks so promising. One thing - I used a mix of whole wheat and rye flour and didn’t quite get those large bubbles. Is that going to impact the final result?
Sabine
Every flour is different and leads to different results. So, yes, whole wheat / rye flour pizza crust will be different from a white crust. Rye bread also contains less gluten than white bread flour so you will need to adjust the fermentation time. Certainly, the crust will be denser than a white crust. I hope that helps.