

Looking for the best traditional braided Challah bread recipe? This is a good one to start with! Challah is a traditional Jewish bread with Eastern European origins, often served on Shabbat (Sabbath) and Jewish holidays such as Hanukkah and Rosh Hashanah.
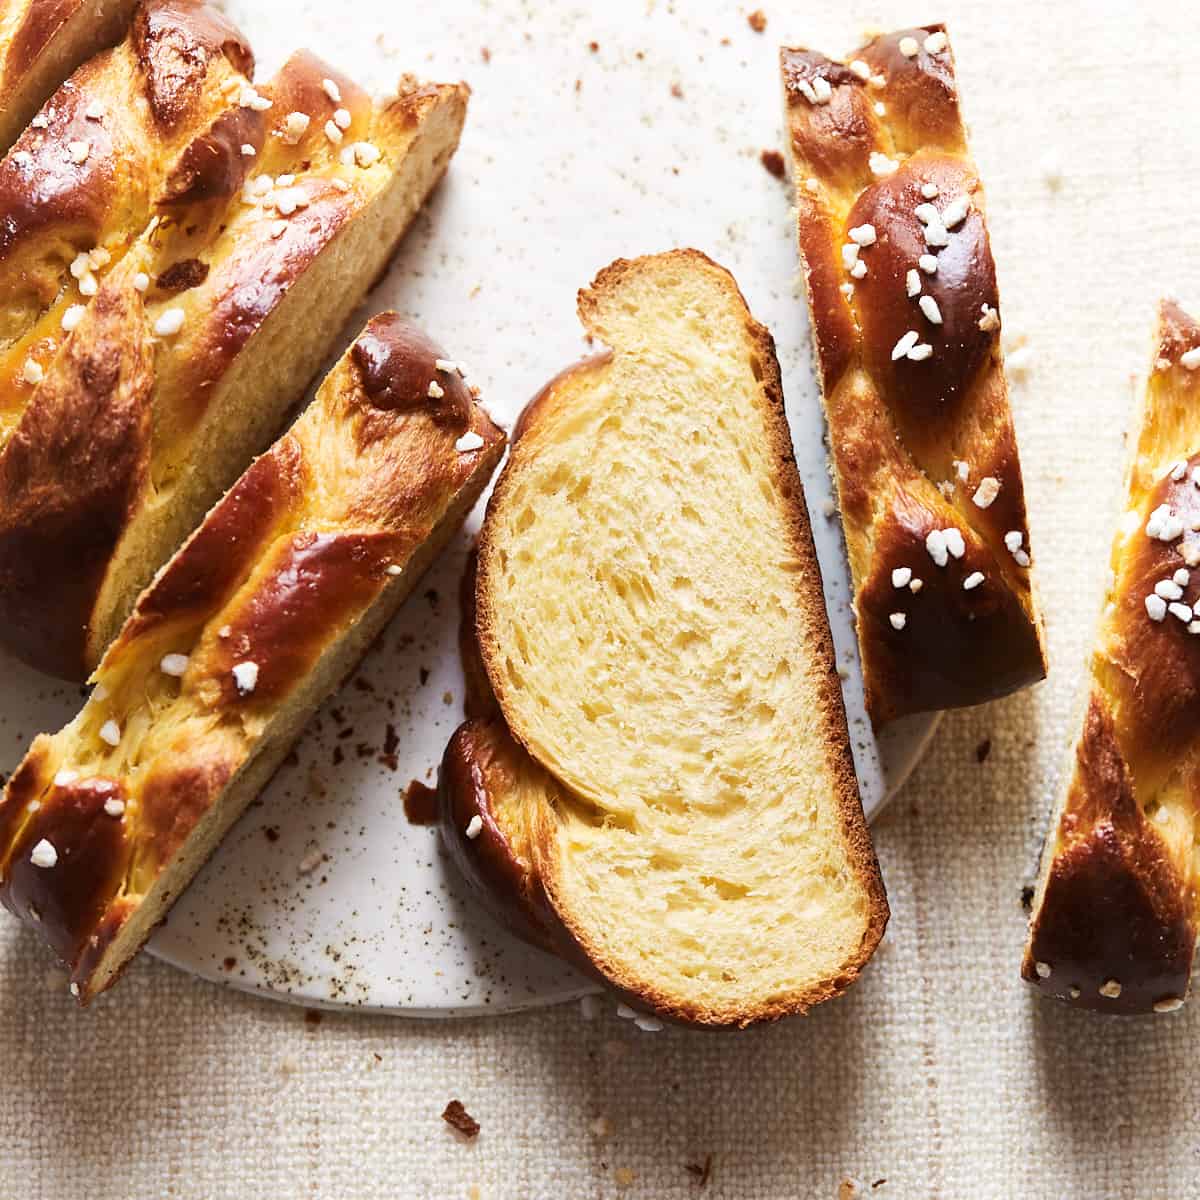
If you enjoy making bread at home, my Brioche Buns are another recipe worth trying. Keep reading because I've broken down the four-strand braid and included a few things that make the dough in this Challah recipe much easier to handle.
Jump to:
Video Instructions
Try This Traditional Braided Challah Bread
The dough is made with eggs and olive oil rather than butter and milk, with honey, orange juice, and vanilla adding a little sweetness and extra flavor. It takes some time because of the rising, but most of that is hands-off, and, in my opinion, it is what makes this the best challah bread recipe ever!
I also wouldn't skip the overnight rise unless I was short on time. The dough is quite soft and a little tacky, and chilling it makes a big difference when I'm trying to roll four even strands.
Why You’ll Love It
- You can do most of the waiting overnight: I like recipes where the fridge can take over for a while. The dough rises for 8-12 hours overnight, so you can come back to it the next day rather than spending the whole day waiting on bread.
- The braid isn't as difficult as it looks: Four strands can seem like a lot at first. The pattern is the same all the way through, though, so once you've done the first few crosses, it gets much easier.
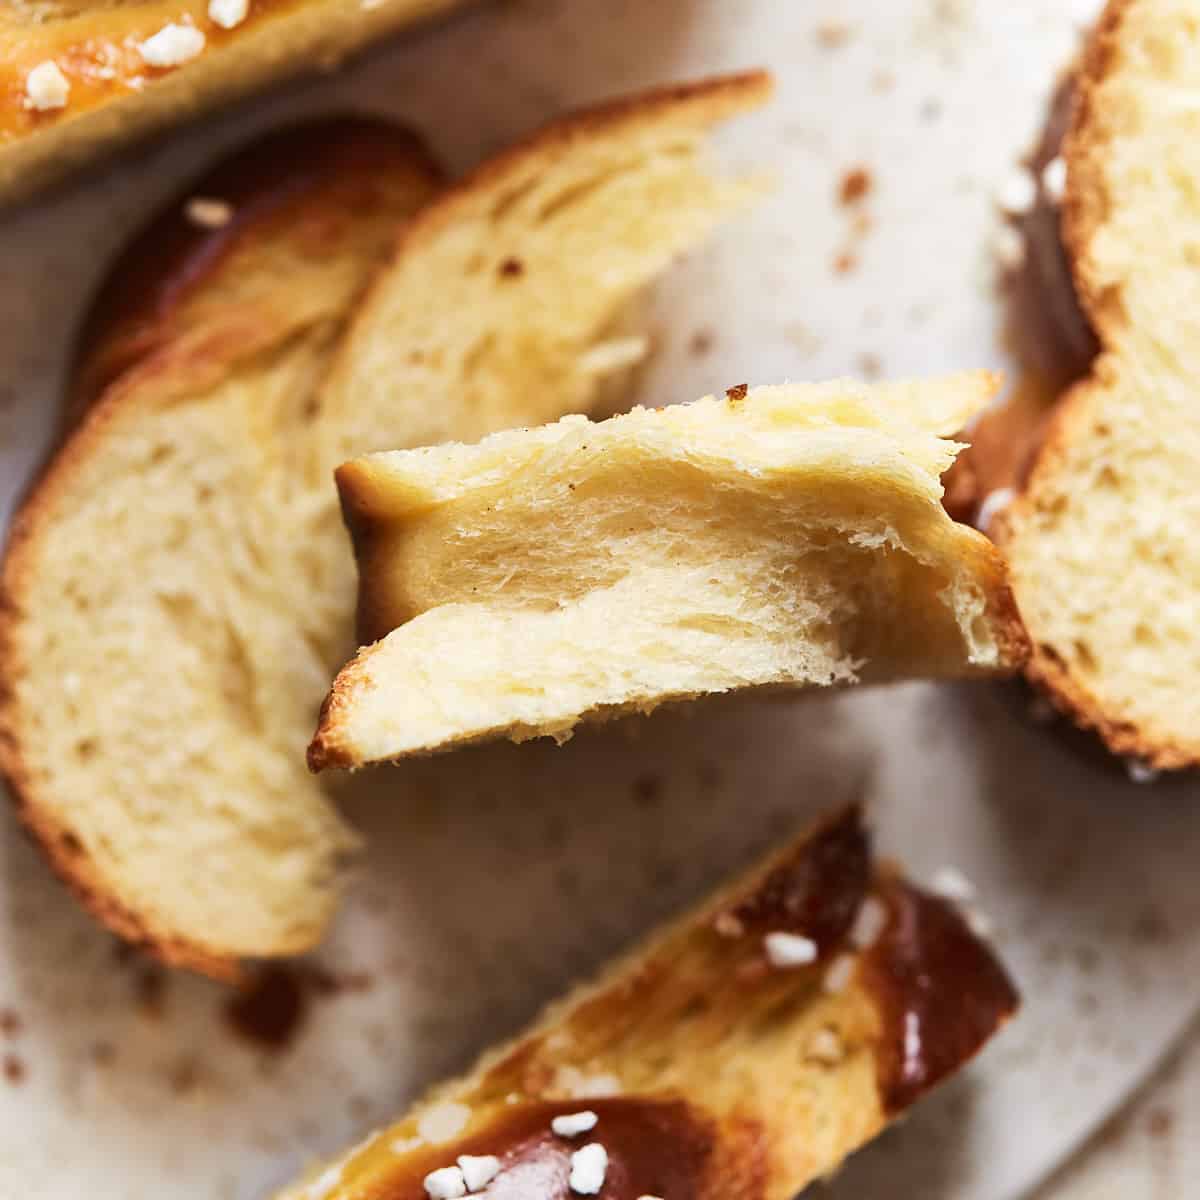
- It stays soft: Eggs and olive oil give this bread a soft crumb without using butter or milk. I also like that it still has some chew instead of feeling like cake.
- You can change the flavor: The basic loaf is only lightly sweet, but you can add raisins, chocolate chips, Kosher salt, cinnamon, sesame seeds, or poppy seeds depending on what you want.
- Leftovers don't go to waste: Challah makes really good French toast, so I'm never too worried if there are a few slices left the next day.
Ingredients

- Bread flour: I use bread flour because I prefer the slightly chewier texture it gives the loaf. You can use all-purpose flour, but you may need another 1-2 tablespoons because it doesn't absorb quite as much liquid.
- Eggs: There are three large eggs in the dough, and they're a big part of the soft texture and richer crumb. This is an enriched dough, so the eggs are doing more than just adding moisture.
- Olive oil: Since there isn't any butter in challah, I don't use a completely flavorless oil if I can help it. A good olive oil gives the bread a little more flavor and also keeps the crumb soft.
- Honey: Three tablespoons give the bread some sweetness without making it a very sweet loaf. I prefer the extra flavor honey adds, but you can substitute sugar 1:1 if that's what you have.
How to Make Traditional Braided Challah Bread
1. In a large bowl of a stand mixer, add the flour, salt, yeast, vanilla, eggs, olive oil, orange juice, and honey, and knead on low speed until it comes together. Scrape down the sides of the bowl halfway through. Let rest for 20-30 minutes.
2. Knead the yeast mixture on high speed with a dough hook until the dough is smooth, releases from the sides of the bowl, and passes the windowpane test. It's a soft, heavy, and smooth dough that is slightly tacky to the touch.

3. Transfer the dough to a lightly oiled container; lightly oil the top of the dough as well. Cover and let rest at room temperature for 1-2 hours until it has doubled. Then put it in the refrigerator and let it rest overnight, about 8-12 hours. It will continue to grow until it has about tripled.
4. Take the dough out of the refrigerator and let it rest at room temperature for about 30 minutes. Remove the dough from the container with a dough scraper and place it on a very lightly oiled work surface. Roughly shape the dough ball into a square and divide it into 4 equal pieces.

5. Apply a little Canola oil to your fingers, place one piece of dough on the lightly oiled work surface in front of you, and use your fingers to flatten it into an 8x13-inch (20x33cm) rectangle that is about ¼-inch thick.
6. Starting from one long side, roll up the dough tightly and seal the edges by pinching them together with your fingertips. Then use your hands to roll the dough into a 15-inch (38cm) long rope. Repeat with the other three pieces of dough.

7. Place all 4 strands side by side and pinch the top of the 4 strands together.
8. To simplify the following explanation, let's number the 4 strands. We're going to use numbers 1, 2, 3, and 4. The leftmost strand is 1, and the rightmost strand is 4. Now take strand number 4 and cross it over strand 3, then under strand 2 and over strand 1. So you basically wove strand number 4 into the others from right to left by going over strand 3, under strand 2, and over strand 1.

9. Start again with the rightmost strand and cross it over, under, and over the other 3 strands from right to left. Continue until all of the bread is braided.
10. Pinch the ends together and tuck the tip under it so it has a nice shape. Then open the top of the loaf where you initially pinched all 4 strands and braid it just like the other end of the loaf to get two nicely braided ends.

11. Transfer to the prepared baking sheet and let rest at a warm room temperature until it has doubled. Then brush with egg wash, sprinkle with sugar, and bake.

12. Remove from the oven and cover with a clean and dry kitchen towel for 15 minutes. Then uncover and transfer to a cooling wire rack to cool completely. Enjoy your homemade challah bread!
Recipe Tips
- Flour doesn't behave exactly the same everywhere. Humidity, temperature, and even altitude can change how much liquid it absorbs, so pay attention to the dough rather than assuming it needs more flour because it's a little sticky.
- The dough is supposed to be soft and slightly tacky. I wouldn't keep adding flour until it stops sticking completely because you'll change the texture of the bread.
- If the dough keeps tearing during the windowpane test, knead it a little longer. If you've already been kneading for a while, give it a short rest first so it doesn't get too hot in the mixer.
- I use oil on my fingers and work surface when shaping. Flour might seem like the obvious solution to sticky dough, but you're also working more flour into the loaf every time you use it.
- Try to make the four ropes roughly the same length and thickness. They don't have to be exact, but reasonably even ropes make the finished braid much neater.
- Give the final rise the time it needs. The recipe gives you 45-60 minutes, but you're also looking for the loaf to double in size.
- Check the loaf after 20 minutes in the oven. If the top already looks dark enough, loosely cover it with foil and let the inside finish baking.
What Can You Serve With This?

- Honey
- Butter or dairy-free spread
- Jam or preserves
- Eggs
- Soup
- Roasted vegetables
- Fresh fruit
- Shabbat or holiday meals
- The best French toast is made with leftover challah
FAQs
No, although they do have a similar soft, rich texture. Brioche contains plenty of butter and usually milk. Challah doesn't contain dairy and generally gets its richness from eggs and oil instead.
A slightly tacky dough is normal for this recipe. I wouldn't immediately add more flour. Lightly oiling your hands and work surface makes it much easier to handle without changing the dough.
I use the windowpane test. Stretch a small piece of dough slowly between your fingers. If you can get it thin enough for light to show through without it tearing, the dough has been kneaded enough.
Yes. You can add 2 teaspoons (5g) cinnamon to the dough. For a cinnamon swirl, sprinkle the rolled-out dough portions with ½ cup (100g) dark brown sugar and 1 tablespoon (8g) cinnamon before rolling them into ropes.
The outside should be deep golden brown, and the loaf should sound hollow when you knock on the bottom. At 400°F (204°C), it should take around 30-35 minutes.



Recipe
The Best Traditional Braided Challah Bread Recipe
Ingredients
- 3 cups bread flour, spooned and leveled
- 1 ¼ teaspoon salt*
- 1 ¾ teaspoon instant dry yeast
- 1 vanilla bean**
- 3 large eggs
- 5 tablespoon olive oil
- ¼ cup orange juice
- 3 tablespoon honey
- egg wash (1 large egg yolk + 1 tablespoon water)
- Optional: coarse nib sugar
Instructions
- In a large mixing bowl, using an electric mixer fitted with a hook attachment, add the flour, salt, yeast, vanilla, eggs, olive oil, orange juice, and honey, and knead on low speed until it comes together about 3-4 minutes. Scrape down the sides of the bowl halfway through. Let rest for 20-30 minutes.
- Knead on high speed for about 6-8 minutes until the dough is smooth, releases from the sides of the bowl, and passes the windowpane test. It's a soft, heavy, and smooth dough that is slightly tacky to the touch.
- Lightly spray a straight-sided container with oil and transfer the dough to the container; lightly oil the top of the dough as well. Cover and let rest at room temperature for 1-2 hours until it has doubled. Then put it in the refrigerator and let rest overnight, about 8-12 hours. It will continue to grow until it has about tripled.
- Take the dough out of the refrigerator and let it rest at room temperature for about 30 minutes.
- In the meantime, line a baking sheet with parchment paper and lightly spray with oil. Set aside.
- Remove the dough from the container with a dough scraper and place it on a very lightly oiled work surface. Roughly shape the dough into a square and divide it into 4 equal pieces.
- Apply a little oil to your fingers, place one piece of dough on the lightly oiled work surface in front of you, and use your fingers to flatten it into an 8x13-inch (20x33cm) rectangle that is about ¼-inch (0.5cm) thick. Starting from one long side, roll up the dough tightly and seal the edges by pinching them together with your fingertips. Then use your hands to roll the dough into a 15-inch (38cm) long rope. Repeat with the other three pieces of dough.
- Place all 4 strands side by side and pinch the top of the 4 strands together. To simplify the following explanation, let's number the 4 strands. We're going to use numbers 1, 2, 3, and 4. The leftmost strand is 1 and the rightmost strand is 4. Now take strand number 4 and cross it over strand 3, then under strand 2 and over strand 1. So you basically weaved strand number 4 into the others from right to left by going over strand 3, under strand 2, and over strand 1. Start again with the rightmost strand and cross it over, under, and over the other 3 strands from right to left. Continue until all of the bread is braided.
- Pinch the end together and tuck the tip under it so it has a nice shape. Then open the top of the loaf where you initially pinched all 4 strands and braid it just like the other end of the loaf to get two nicely braided ends.
- Transfer to the prepared baking sheet and let rest at a warm room temperature (77°F / 25°C is ideal) for 45-60 minutes until it has doubled.
- Preheat the oven to 400°F (204°C) for 15-20 minutes.
- Brush the dough with egg wash, sprinkle with coarse nib sugar if desired, and bake for 30-35 minutes until the loaf is deep golden brown and it sounds hollow when you knock on the bottom of the loaf. To prevent heavy browning, cover loosely with aluminum foil after 20 minutes if necessary.
- Remove from the oven and cover with a clean and dry kitchen towel for 15 minutes. Then uncover and transfer to a cooling rack to cool completely. Store in an airtight container at room temperature for up to 3 days.
Notes
Cooking Time and Temperature
Bake at 400°F (204°C) for 30-35 minutes. The loaf should be deep golden brown and sound hollow when tapped underneath. Loosely cover it with aluminum foil after 20 minutes if the top is getting too dark.Taste & Texture
This challah is lightly sweet from the honey, with a little extra flavor from the orange juice and vanilla. The inside is soft but still has some chew, while the outside gets darker and firmer as it bakes.Storage, Freezing & Reheating
- Room temperature: Keep the challah in an airtight container for up to 3 days.
- Freezer: Wrap the whole loaf or individual slices tightly twice in plastic wrap, then place them in a freezer bag or container. Freeze for up to 3 months.
- Thawing: Unwrap it and leave it at room temperature for a few hours or overnight.
- Reheating: You don't need to reheat challah, but I like warming leftover slices slightly if I'm serving them with honey or jam.
Serving Recommendations
I usually keep it simple with challah because it doesn't need much added to it. A little honey or jam is enough for me, especially when the loaf is still fresh. If there are leftovers, I cut them into thicker slices for French toast. Slightly older challah is actually useful here because it soaks up the egg mixture without falling apart as easily.Recipe Variations and Substitutions
- Cinnamon challah bread: Add 2 teaspoons (5g) cinnamon to the dough. For more cinnamon throughout the loaf, sprinkle the rolled dough with ½ cup (100g) dark brown sugar mixed with 1 tablespoon (8g) cinnamon before rolling the pieces into strands.
- Raisins: Add ½ cup (73g) to the dough, or up to 1 cup (145g) if you want more.
- Chocolate chips: Add 1 cup (170g), or use however much you prefer.
- Sesame seeds: Sprinkle ¼ cup (36g) over the loaf before baking.
- Poppy seeds: Add 2 tablespoons (18g) to the dough or sprinkle 3 tablespoons (27g) over the loaf.
- All-purpose flour: You can use it instead of bread flour, although you may need another 1-2 tablespoons.
- Fruit juice: Pineapple juice or apple juice can replace the orange juice. You can also just use water.
- Honey: Sugar can be substituted 1:1.
- Vanilla: Leave it out if you don't have it or don't want the extra vanilla flavor.
Proper Storage Tips
- Don't pack the loaf away while it's still warm. I wait until it's completely cool so I'm not trapping steam inside the container.
- Keep homemade challah bread airtight once it's cool. Leaving the cut end exposed will dry it out much faster.
- If you've sliced the loaf, keep the slices together rather than spreading them around a large container. There is less exposed surface area that way.
- Freeze whatever you don't think you'll eat within 3 days.
- I find freezing individual slices more practical if you only want one or two at a time.
- Wrap it twice before freezing. Challah is soft, and it picks up freezer odors fairly easily if it isn't properly covered.
Pro Tips
- Don't skip the 20-30 minute rest between the first and second stages of kneading.
- Use the windowpane test rather than relying only on the 6-8 minute kneading time.
- If the dough needs longer in the mixer, give it a short break between kneading periods so it doesn't overheat.
- Don't try to turn slightly tacky dough into dry dough by adding handfuls of flour.
- Oil your hands and work surface before shaping. It makes this dough much less annoying to work with.
- I prefer the 8-12 hour overnight rise when I have the time. Besides the flavor, cold dough behaves much better when I'm trying to get four even ropes out of it.
- Roll each strand to about 15 inches (38cm). Keeping them fairly even makes braiding easier.
- If you lose track while braiding, stop and find the rightmost strand again. Then go back to over, under, over.
- Let the braided loaf double during its 45-60 minute final rise. Don't put it in the oven just because the timer has gone off if it hasn't risen enough yet.
- Start checking the color after 20 minutes in the oven. The loaf still needs its full baking time, so use foil if the outside is getting dark too soon.
- Leave the towel over the baked loaf for the full 15 minutes, then let it finish cooling on a rack before storing it.
Baker's Percentages
This is an enriched bread dough that means that oil and eggs are used, so it’s different from lean sourdough bread, which is just water, flour, and salt.| Ingredient | Weight | Percentage |
| Bread Flour | 375g | 100% |
| Salt | 8g | 2.13% |
| Instant Yeast | 7g | 1.87% |
| Eggs | 180g | 48% |
| Olive Oil | 75g | 20% |
| Orange Juice | 60g | 16% |
| Honey | 63g | 16.8% |
| Vanilla Bean | varies | varies |
Video
You can find the video in the post above. If you don't see a video, please check your browser settings.
Marilyn W, Bay Area CA
I can't wait to try my bread! I started making this morning but my yeast wouldn't "proof." I tried proofing the yeast two times. Then I did some clicking around the internet and found that some honeys will kill yeast because of antibiotic properties. Who knew? Fortunately there was a second jar of a different brand honey in the pantry. I tried that and it proofed. Just wanted to share my experience. I'm sure the bread will be delicious!
Marilyn, Bay
I finished this bread last night and we had some for dessert. Omigosh! My husband said, "This is probably the best thing I have ever tasted." Need I say more?
Sabine
Thank you so much for sharing your experience with us, it's very helpful. I'm happy that you like the recipe and it turned out well for you.
Rosemarie
Excellent recipe! Nice texture and taste. I tweaked it a bit, e.g omitted the coarse sugar on top, kneaded the dough by hand after initial mixing, added ground allspice to the filling, and brushed the baked loaf with melted butter to maintain its moisture. I will definitely make this bread again. Thanks for the recipe.
Arlene Sandgarten
This was delicious! BUT....the filling oozed out of the seams of the braid. I can't seem to pinch the seams so this doesn't happen. It oozed out the bottom & was burnt. Any suggestions?
Sabine
For easier handling, you could mix the brown sugar and cinnamon and set it aside. Then spread the butter (at room temperature) over the dough and sprinkle the brown sugar mixture on top. You could also place the mixed filling in the fridge for 10-15 minutes until the butter firms up a little and is spreadable. That makes it easier to pinch the seams. Hope that helps!
Hydee
This recipe sounds delicious and perfect for Rosh Hashana. Would I be able to use this recipe in my bread machine?? Any changes I would need to make (other than using the right yeast for my machine)? Thank you!
Sabine
I'm sorry but I've never tried this recipe in a bread machine. So, I can't give you a recommendation for this.
Abby
Would rapid rise yeast suffice? I can’t find active dry yeast during this quarantine!
Sabine
Yes, these two types of yeast can be used interchangeably.
Tony
I never tried the proofing in the warmed oven. I was scared it was going to bake it prematurely, but it was perfect! Beautiful and tasty bread! Thank you so much for sharing!
Sabine
I'm happy that you like it and it turned out great! This technique is the fastest and best I know and use it for almost all my recipes which contains yeast. You are welcome, Tony! Thank you so much for your nice feedback!
Karly
This looks delicious! I'm saving this one for later!
Sabine
Thank you, Karly! Let me know what you think. Have a great Sunday.
2pots2cook
So happy to find you ; you do amazing creations ! Thank you for sharing !
Sabine
Thank you so much! I'm always happy to share my recipes with you!