
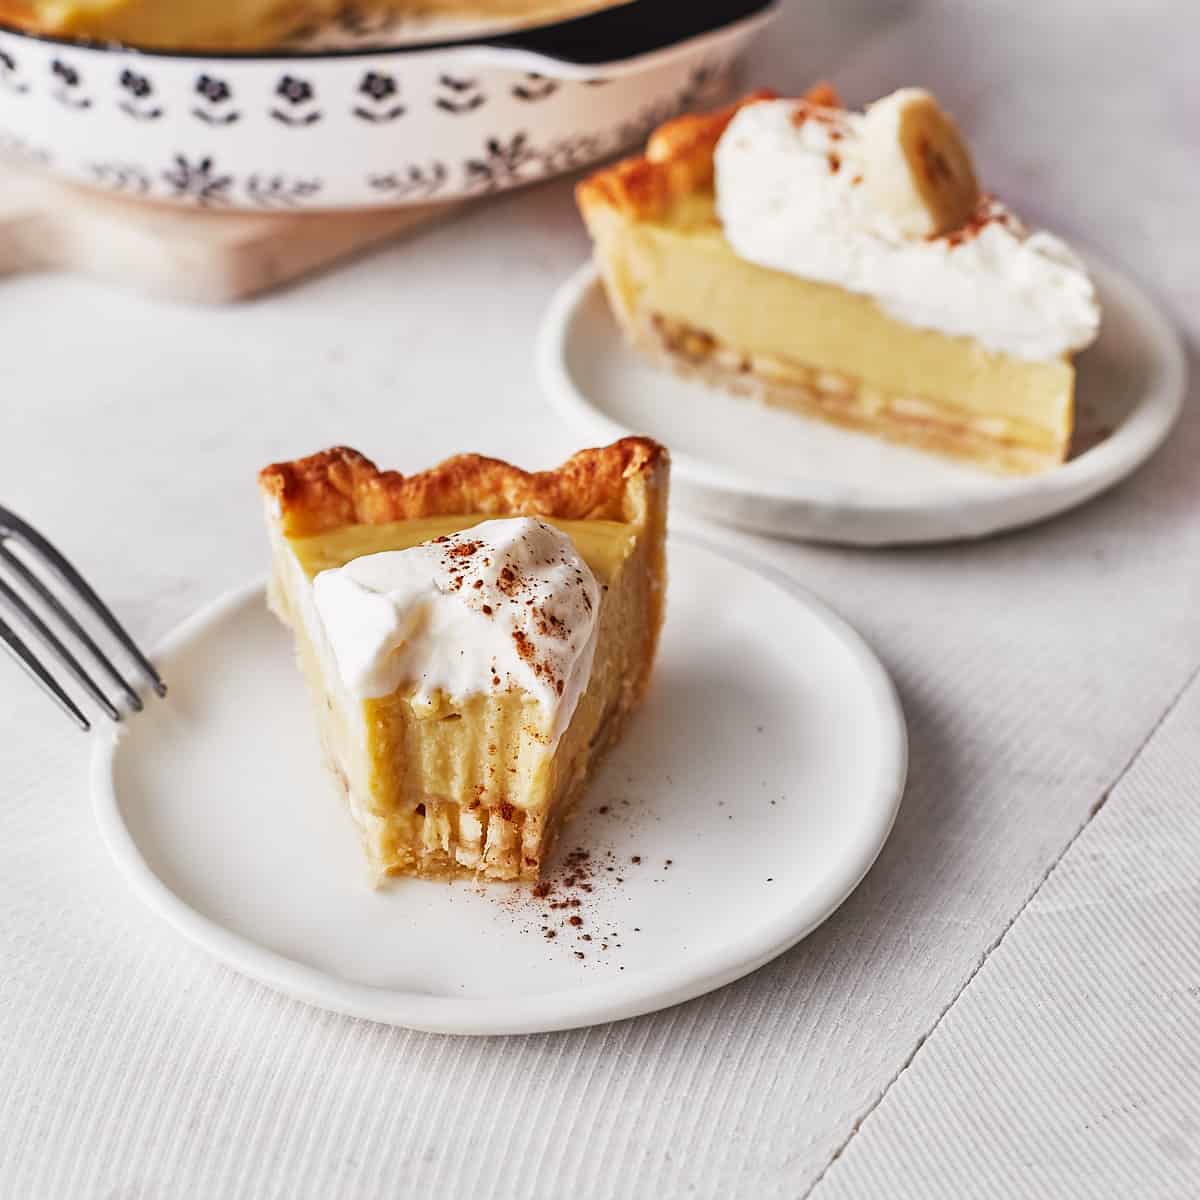
This banana cream pie recipe is easy to make and 100% homemade. Super flaky pie crust filled with from-scratch made banana pudding and fresh banana slices. Top it with your favorite toppings like whipped cream or meringue. By the way, have you tried my chocolate cream pie?
Jump to:
Ingredient notes
- Butter: I recommend using only unsalted butter since you add salt.
- Egg yolks: Use fresh unpasteurized egg yolks. You can use the egg whites for angel food cake.
- Milk: I recommend using whole milk or at least 2%.
- Bananas: Use only very ripe bananas. When the banana skin has lots of brown spots or is almost black, it's the best. The riper they are, the more taste they provide. Tip: If you have tons of barely ripe bananas, make bananas foster cake.
Photo instructions
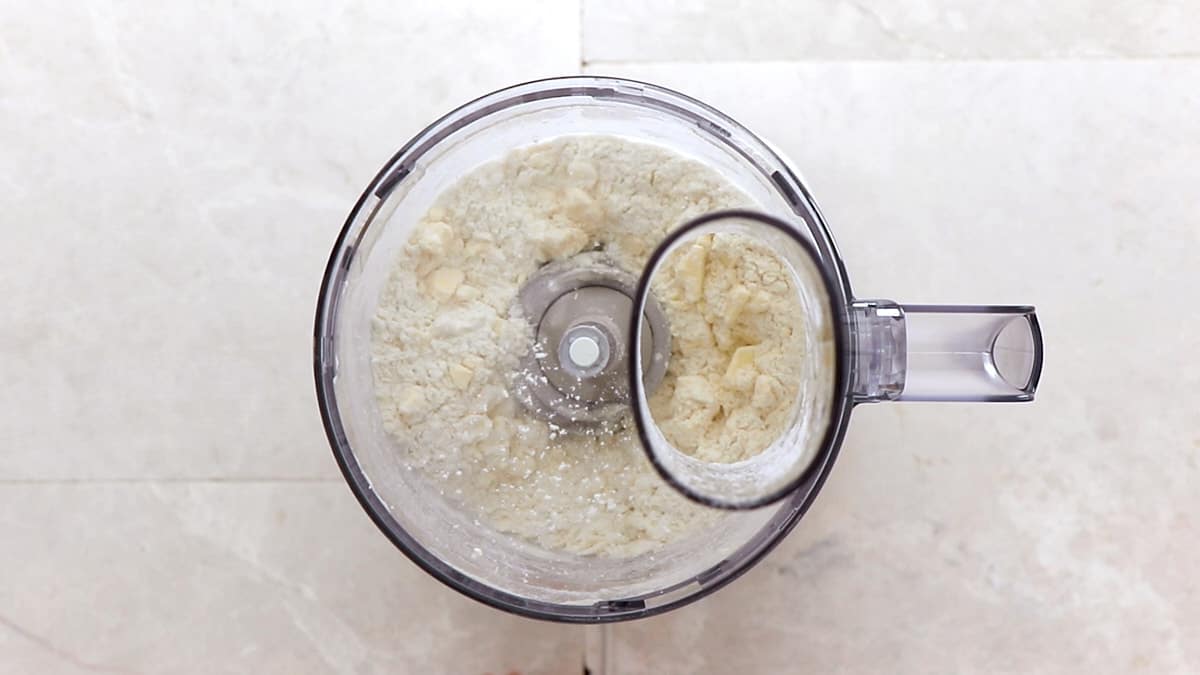
Start with the pie crust. In a food processor, combine the flour, sugar, salt, and butter and pulse 4 or 5 times, or until pea or thumb-sized butter pieces are still visible, as shown in the picture below.
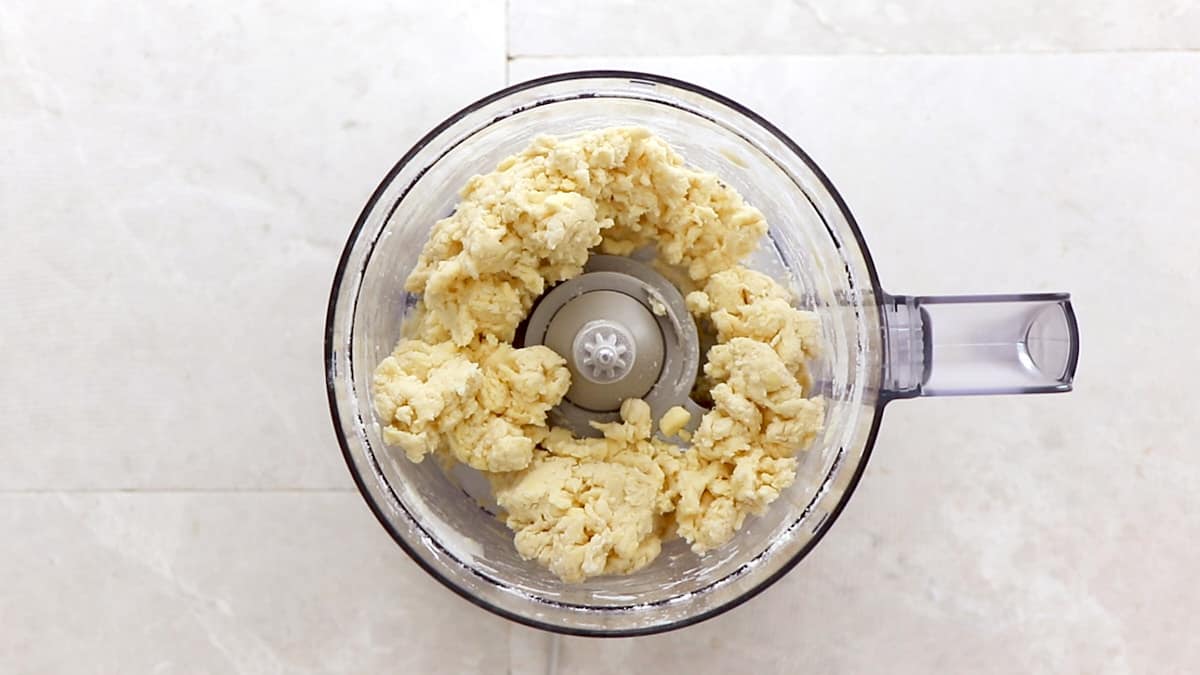
Add 1 tablespoon (15 ml) of cold water at a time, pulsing one or two times after each addition. Stop adding water and pulsing when you notice that the dough comes together and starts to clump and looks like below.
Without kneading the dough, transfer it to a sheet of plastic wrap and form into a 1 to 1½-inch (2.5-4cm) thick disk. Wrap tightly with plastic wrap and refrigerate for at least 2 hours or up to 2 days.

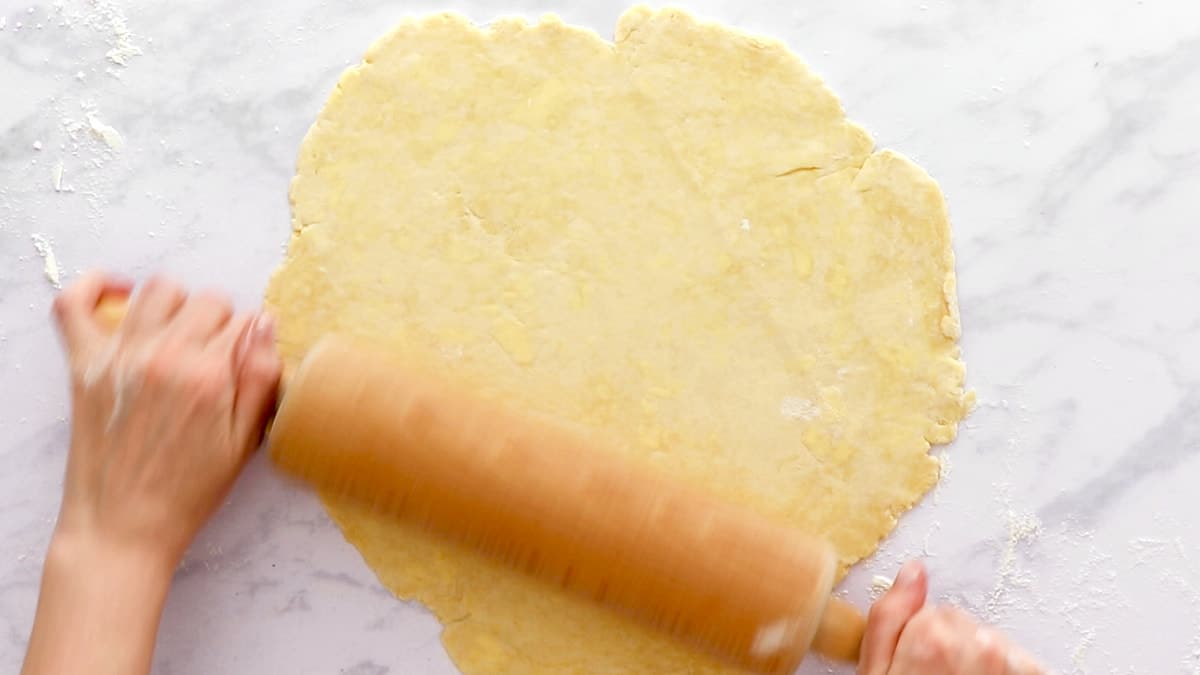
On a lightly floured surface, roll out the dough into an 11-inch (28cm) even circle after chilling. Be careful that you don't overwork the dough and that it doesn't get too soft. As you see in the picture below, butter flakes are still visible after rolling the dough out. That is the key to an ultra flaky pie crust.
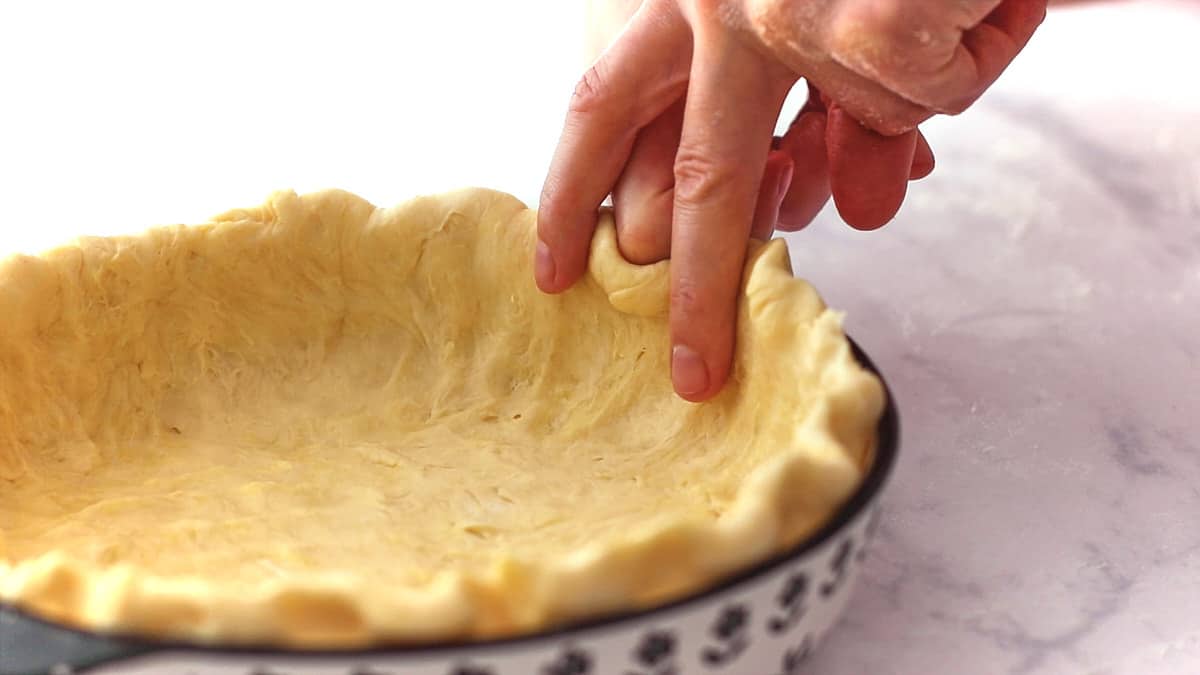
Transfer the dough to a 9-inch (23cm) pie dish. Evenly press the dough into the bottom and against the pie dish's sides and flute the edges with your knuckles. Freeze for 30 minutes.
While the crust is in the freezer, preheat the oven to 375°F (190°C).
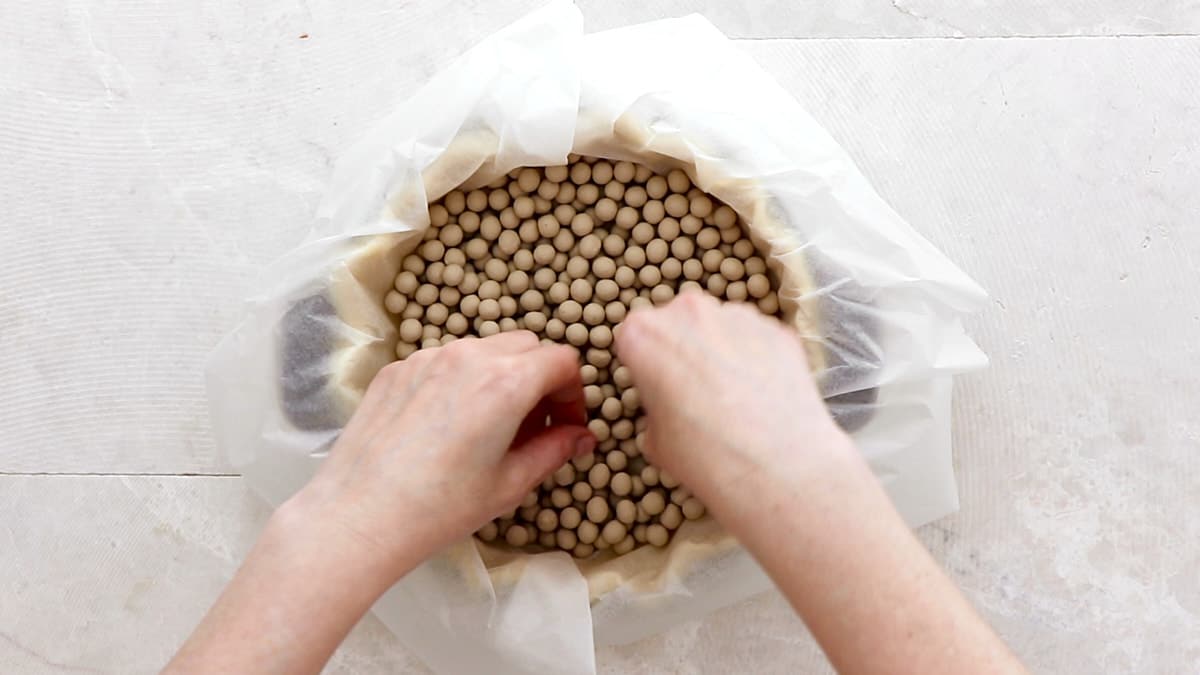
Line the chilled pie crust with parchment paper, weigh it down with pie weights, dry rice, or beans, distribute them evenly, and press them lightly against the sides to prevent the sides from shrinking down too much.
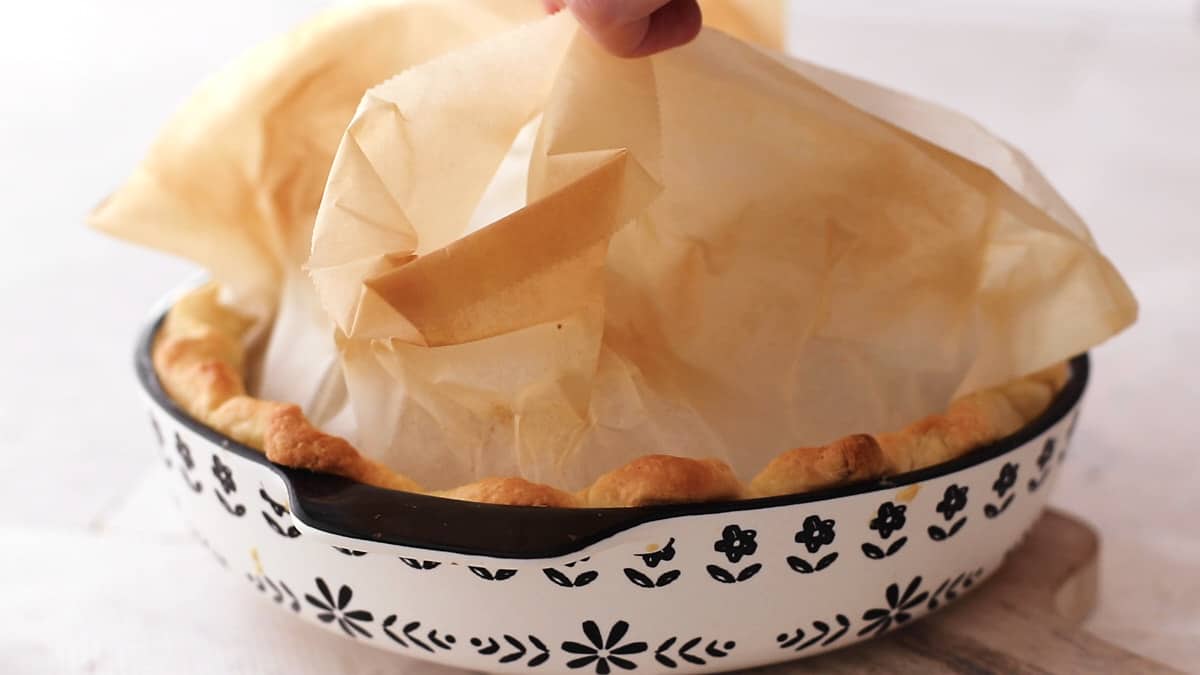
Bake for 25 minutes. Then, remove the pie crust from the oven and, being careful not to burn yourself, remove the pie weights along with the paper. It's easiest to take the paper on all 4 corners and lift it out of the pie crust, as shown below.
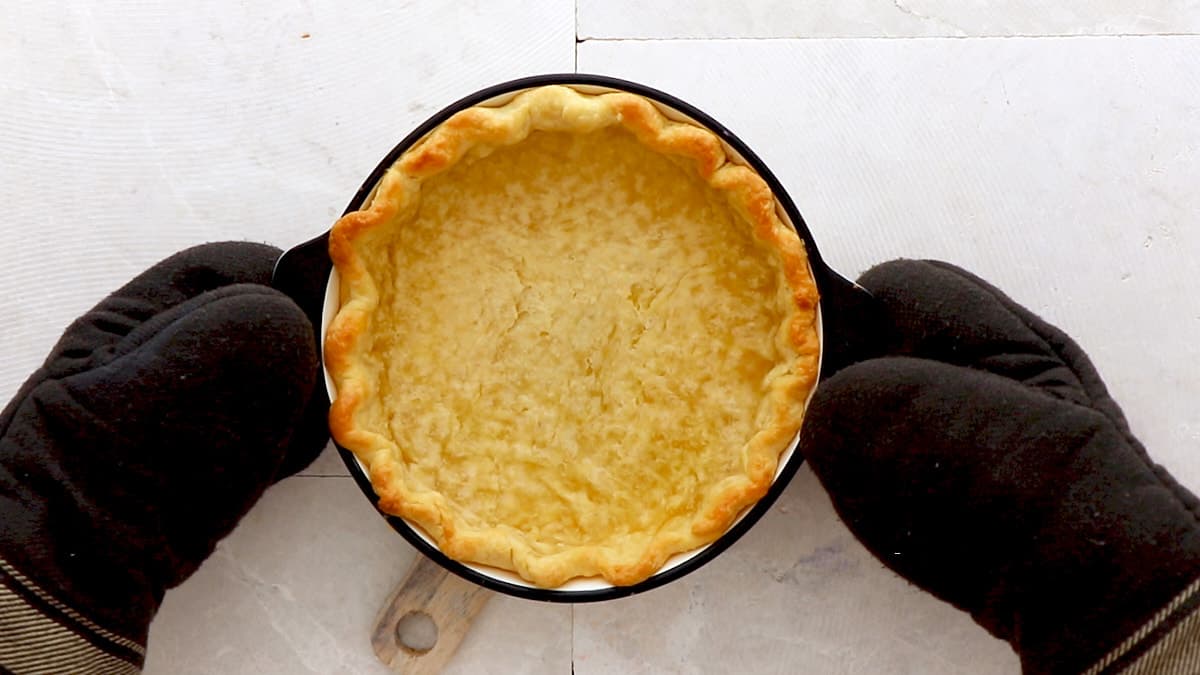
Return the crust to the oven to bake for an additional 5 minutes, then remove from the oven and let cool for 30 minutes.
While the pie crust is chilling, prepare the banana pudding. Therefore, in a medium heatproof bowl, whisk together the egg yolks and cornstarch and set aside.
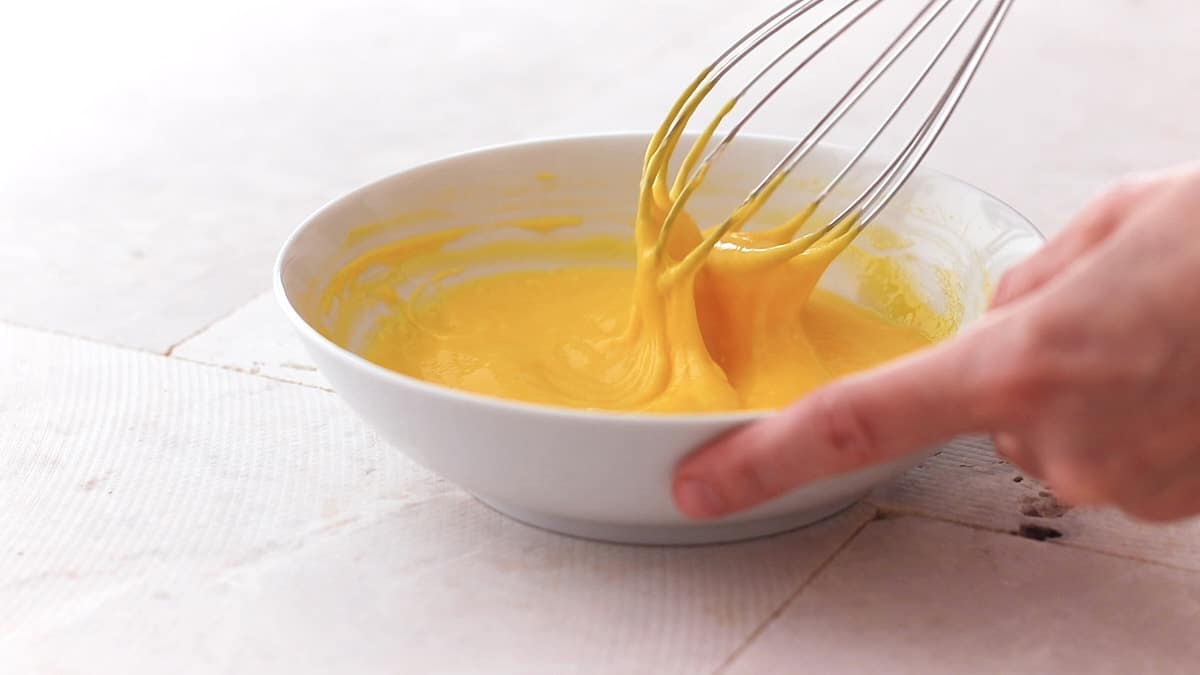
In a heavy-bottomed saucepan over medium heat, bring the milk, heavy cream, sugar, and salt to a simmer and cook for 2 minutes, stirring constantly. Turn the heat down to low and slowly spoon ½ cup (120 ml) of the hot milk into the egg yolk mixture, whisking as you go. Whisk constantly until the egg yolks and milk are well combined and smooth.
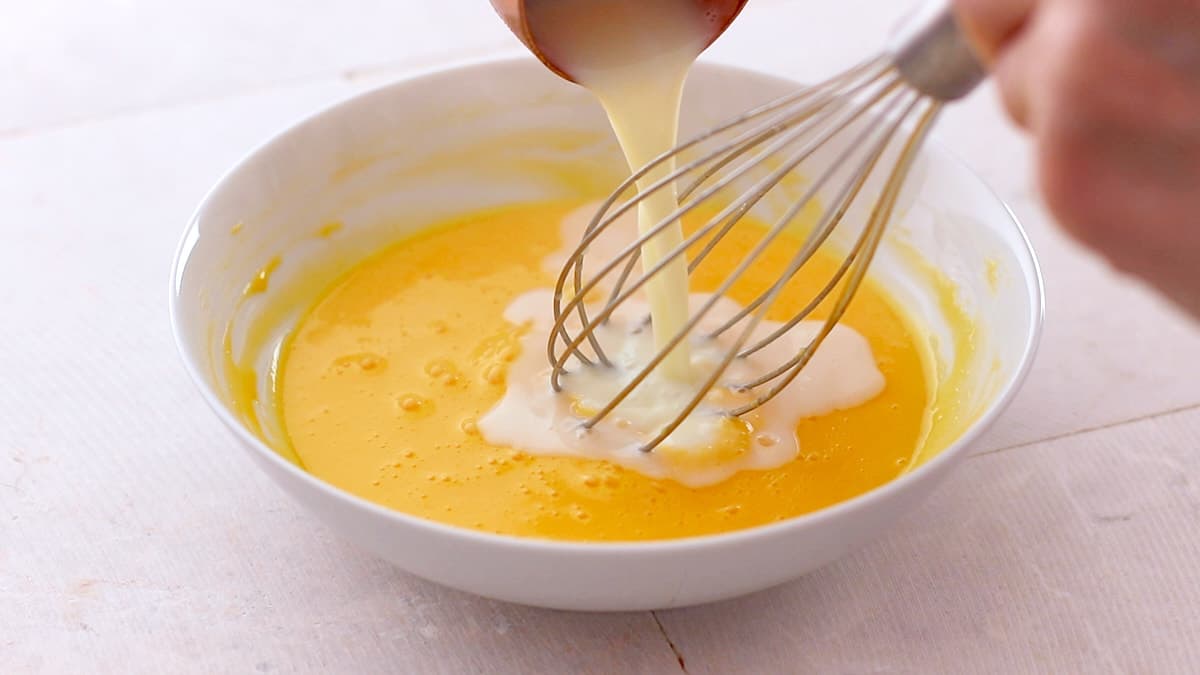
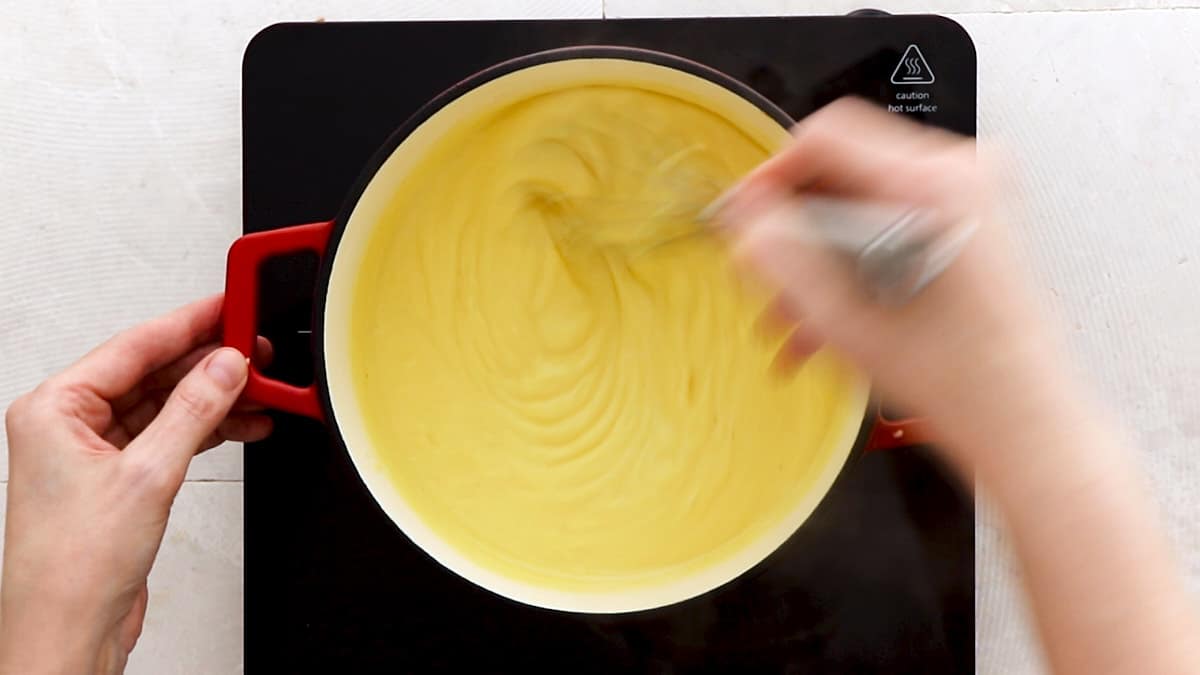
Then, slowly whisk the egg yolk mixture into the remaining hot milk mixture until well combined. Add the mashed banana and turn the heat up to medium-high. Cook the mixture until it thickens and looks like pudding, about 2-3 minutes, constantly stirring without stopping because it can burn quickly.
Remove the cooked filling from the heat and pour through a mesh strainer into a heatproof bowl, pressing the mixture through the strainer with a rubber spatula.
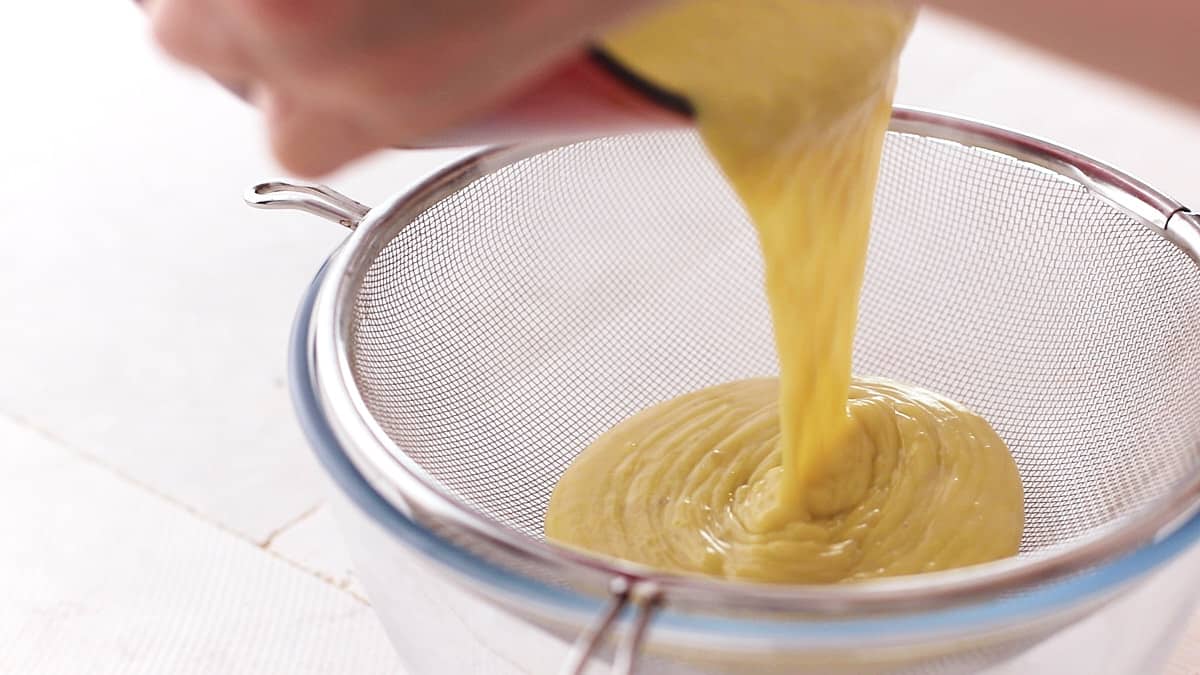
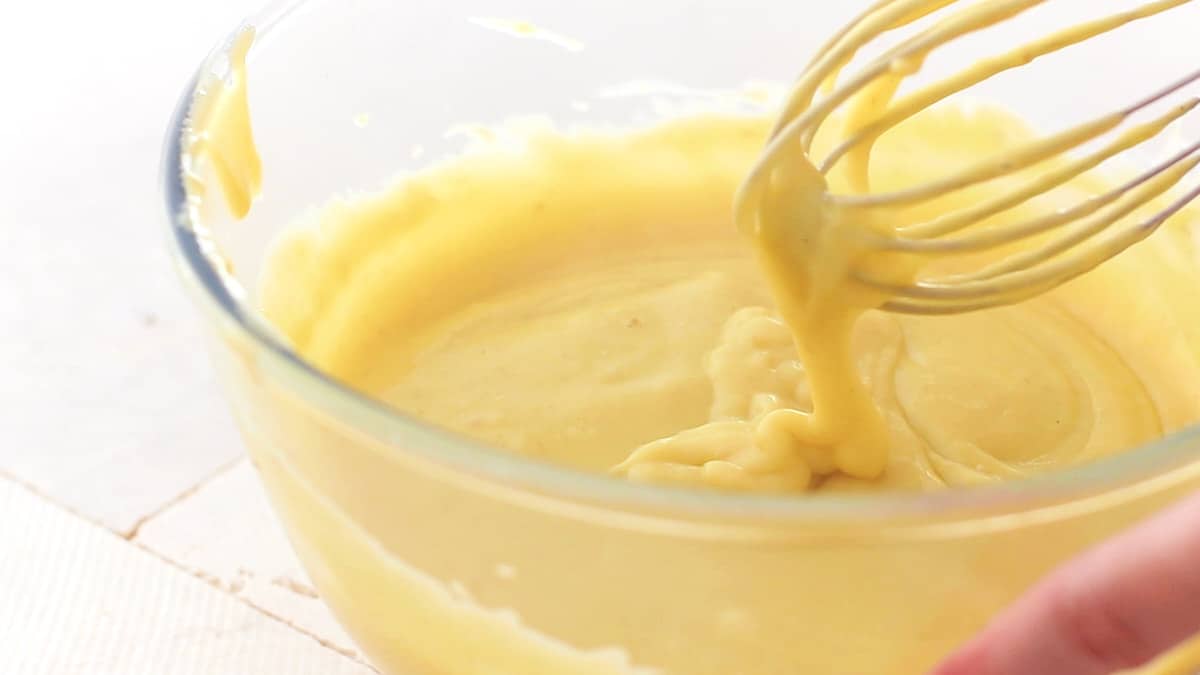
Whisk in the vanilla and butter until it is melted and incorporated. In the picture below, you see the required consistency of the banana pudding.
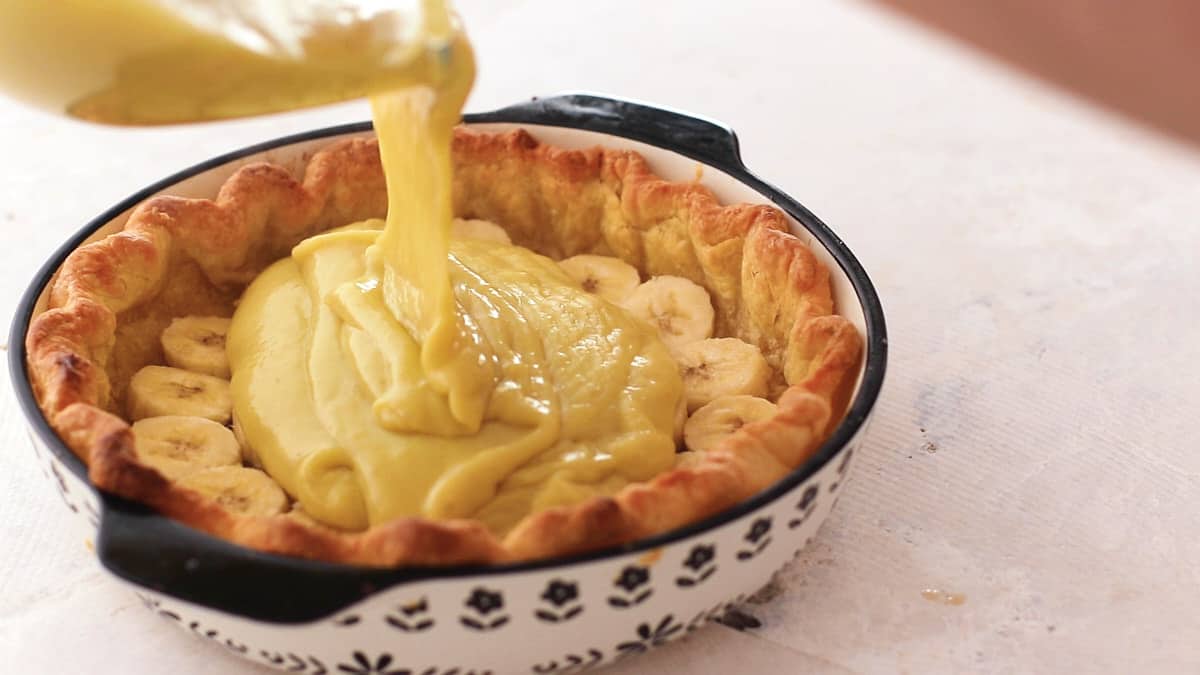
Place the banana slices in the baked and cooled pie crust, pour the filling on top of the banana slices, and spread evenly.
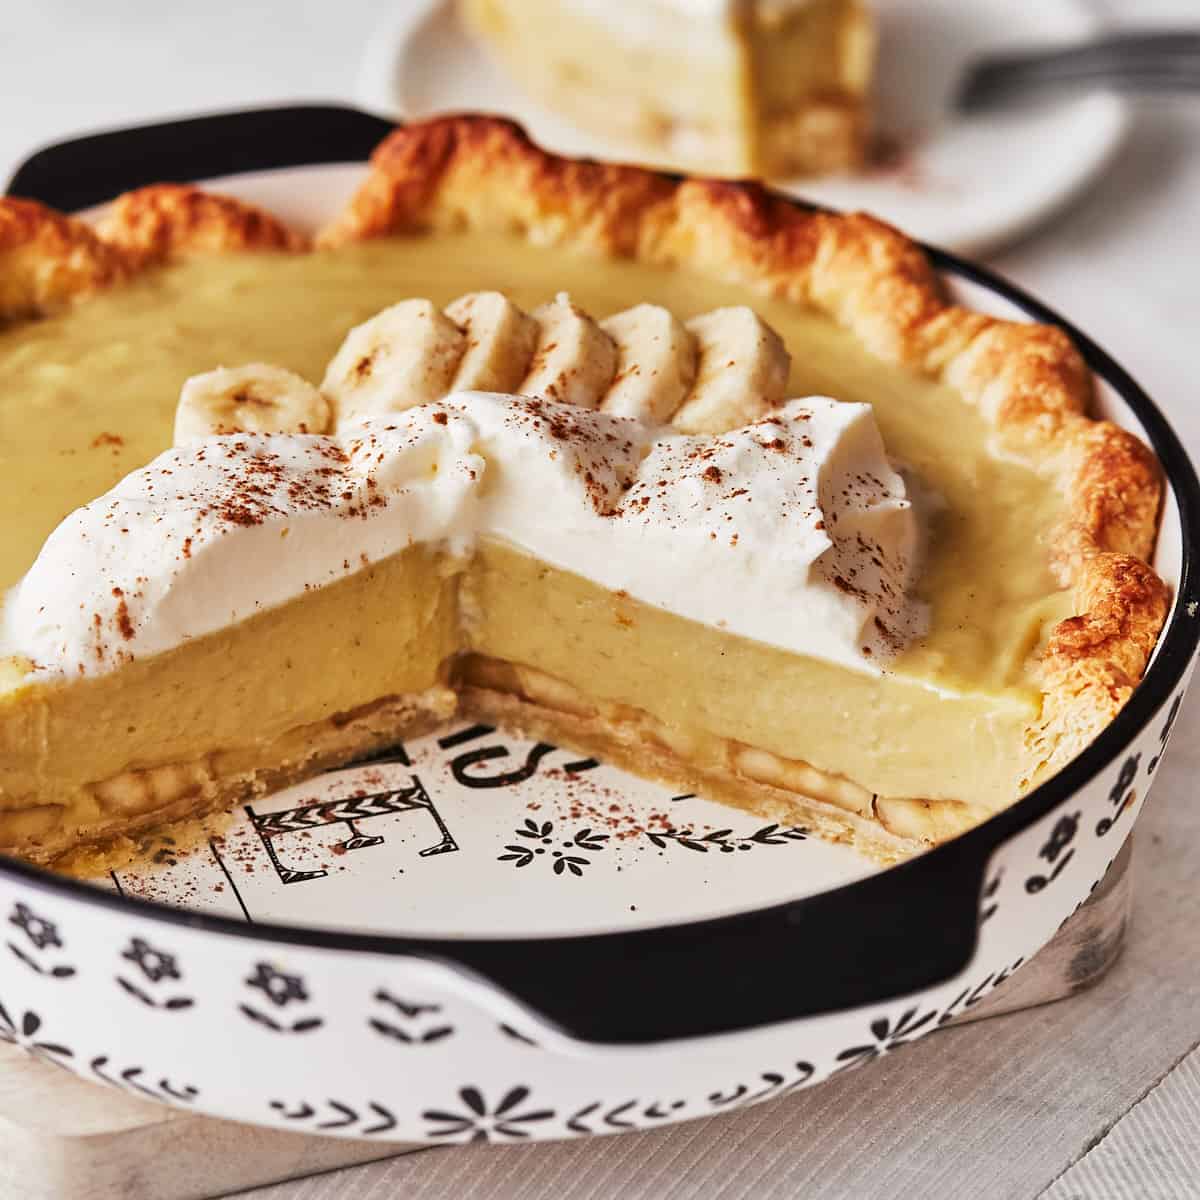
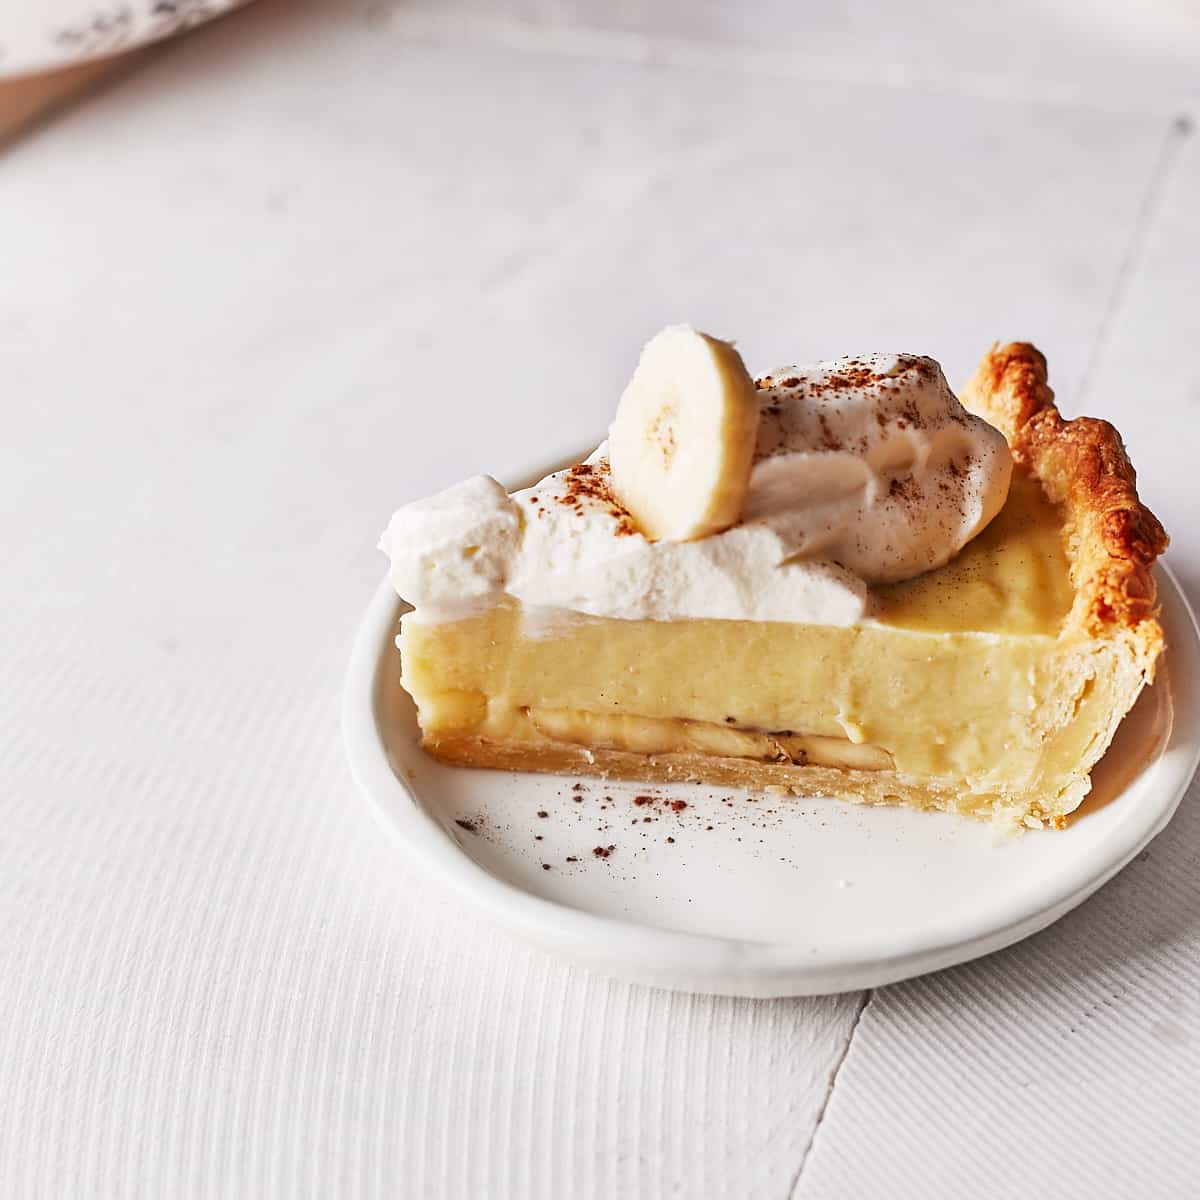
Then cover the filling with plastic wrap and chill the pie in the fridge for at least 4 hours or preferably overnight. According to your taste, cut the chilled pie into slices and serve with whipped cream and fresh bananas.
Top tips
- Don't overwork the pie crust; otherwise, it won't be as flaky as desired. Butter flakes must still be visible when rolling out the pie crust. This is the key to a flaky pie crust.
- Use pie weights, dry beans, or rice to weigh down the pie crust. Make sure that the weights also push against the sides of the crust as well. Otherwise, the sides will shrink down too much during baking, and the filling won't fit in.
- Don't skip tempering the egg yolks with hot milk. If the egg yolks get too fast too hot, you will end up with scrambled eggs.
- Cook the filling long enough until it looks like firm and thick pudding. If the pudding is undercooked, the filling won't set and will be too soft to cut and serve slices.
- Give it enough time to set in the fridge. At least 4 hours but preferably overnight. Don't speed up the chilling time by putting it in the freezer.
Variations
- Replace the pie crust with a no-bake graham cracker crust.
- Make the filling with vanilla pudding mix according to the directions on the package.
FAQ's and troubleshooting
Why is my pudding runny and not setting?
The number one reason for runny and soupy pudding filling is undercooking the filling. Make sure that you cook it long enough that it looks like firm spoonable pudding. Otherwise, it won't set. Other than that, the measuring of the ingredients was incorrect, and either too much milk or whipping cream or too little cornstarch has been used.
How to thicken pudding?
If you notice that your filling didn't set and is runny after chilling it overnight, you can spoon the pudding out of the crust and put it back on the stove. Over medium-high heat, bring it to a boil and cook for 1-2 minutes, whisking constantly. Watch closely that it doesn't burn.
If it still doesn't firm up after a few minutes, remove the pot from the heat and spoon ¼ cup of the pudding into a heat-proof bowl and whisk in 2 tablespoon of cornstarch (16g) until no lumps remain. Then pour the cornstarch-pudding mixture back into the pot and cook another 1-2 minutes. Then pour back into the crust and chill again.
Make ahead instructions
You can prepare the pie crust for up to 2 days in advance or freeze up to 3 months. To thaw, place it in the fridge overnight. It's also possible to blind bake the crust 1 day ahead and store it in an airtight container at room temperature. I don't recommend to prepare the filling in advance because it will firm up while storing it in the fridge.
Storage
The banana pie will stay fresh for up to 3 days in the fridge. Store it in an airtight container that no odors from the fridge can come inside the filling. I don't recommend storing it at room temperature.
Because of the sliced bananas, this pie doesn't freeze very well. You could skip the fresh banana slices to be able to thaw it. You can freeze it for up to 1 month. Thaw covered in the fridge overnight. However, the texture of the banana pudding suffers a little when freezing and thawing it.
More pie recipes
Looking for more pie recipes? Try my apple pie, pumpkin pie, pineapple pie, or custard pie. Or what about strawberry chocolate pop tarts made with pie crust? You also find a lot of pies in my cookbook.
Recipe

Banana Cream Pie
Ingredients
Pie Crust
- 1 ¼ cups all-purpose flour, spooned and leveled
- ¼ teaspoon granulated white sugar
- ¼ teaspoon salt
- ½ cup cold unsalted butter, chopped
- 4-6 tablespoon cold water
Banana Pudding
- 5 large egg yolks
- ¼ cup cornstarch
- 2 cups milk
- ¼ cup heavy cream
- ¾ cup sugar
- ¼ teaspoon salt
- ¼ cup mashed banana (about 1 medium banana)
- 2 teaspoon pure vanilla extract
- 2 tablespoon unsalted butter
- 1 large very ripe banana, cut into ⅛ to ¼-inch (3-6 mm) slices
Instructions
Pie crust
- In a food processor, combine the flour, sugar, salt, and butter and pulse 4 or 5 times, or until pea-sized butter pieces are still visible. Add 1 tablespoon (15 ml) of the cold water at a time, pulsing one or two times after each addition. Stop adding water and pulsing when you notice that the dough comes together and starts to clump.
- Without kneading the dough, transfer it to a sheet of plastic wrap and form into a 1 to 1½-inch (2.5-4cm) thick disk. Wrap tightly with plastic wrap and refrigerate for at least 2 hours or up to 2 days.
- After chilling, on a lightly floured surface, roll out the dough into an 11-inch (28cm) even circle and transfer to a 9-inch (23cm) pie dish. Evenly press the dough into the bottom and against the sides of the pie dish and flute the edges. Freeze for 30 minutes.
- While the crust is in the freezer, preheat the oven to 375°F (190°C).
- Line the chilled pie crust with parchment paper, weigh it down with pie weights, distribute them evenly, and press them lightly against the sides to prevent the sides from shrinking down too much.
- Bake for 25 minutes. Then, remove from the oven and, being careful not to burn yourself, remove the pie weights along with the paper. Return the crust to the oven to bake for an additional 5 minutes, then remove from the oven and let cool for 30 minutes.
Filling
- In a medium heatproof bowl, whisk together the egg yolks and cornstarch and set aside.
- In a heavy-bottomed saucepan over medium heat, bring the milk, heavy cream, sugar, and salt to a simmer and cook for 2 minutes, stirring constantly.
- Turn the heat down to low and slowly spoon ½ cup (120 ml) of the hot milk into the egg yolk mixture, whisking as you go. Whisk constantly until the egg yolks and milk are well combined and smooth.
- Then, slowly whisk the egg yolk mixture into the remaining hot milk mixture until well combined. Add the mashed banana and turn heat up to medium-high. Cook the mixture until it thickens and looks like pudding, about 2-3 minutes, constantly stirring without stopping because it can burn quickly.
- Remove from the heat and pour through a mesh strainer into a heatproof bowl, pressing the mixture through the strainer with a rubber spatula. Whisk in the vanilla and butter until it is melted and incorporated.
- Place the banana slices in the baked and cooled pie crust, pour the filling on top of the banana slices, and spread evenly. Cover the filling with plastic wrap and chill the pie in the fridge for at least 4 hours or preferably overnight.
- According to your taste, cut the chilled pie into slices and serve with whipped cream and fresh bananas. Store in an airtight container in the fridge for up to 3 days.
Notes
Video
You can find the video in the post above. If you don't see a video, please check your browser settings.
Travis Kvanvig
It's the best Banana Cream pie I've ever made! Amazing recipe!
Suzanne Miller
Hands down the best banana pie filling I’ve ever tasted! So very simple to make. I didn’t make the pie crust as I had a Graham cracker one . Even though I’m feeling run down and a bad headache the pie filling was a breeze to make. Thank you for the fantastic recipe.. it is now my go to recipe and will be making several pies for my family members once I’m up to par.😊
Gretchen
It's the best banana pie I've ever made. The homemade banana pudding is genius and I'm impressed how easy it is to make. I will add a layer of chocolate the next time. Thank you for this great recipe.
Sabine
Thank you so much! I'm happy that you like this recipe. The chocolate addition sounds delicious.