
These soft and delicious pretzel buns go well with dinner or brunch and can be used as burger buns, sandwich buns, or hot dog buns! It's the perfect bun if you want to upgrade your hamburgers and make pretzel burgers as their taste is incredibly delicious.
This German recipe uses baking soda instead of lye to create the signature deep brown crust. It's an easy-to-follow recipe so you can make your own pretzel buns at home!
Jump to:
Baking soda vs food lye
We all love pretzel buns for their dark brown, shiny, and delicious crust. But have you ever wondered how pretzels get their glossy brown surface? Professional bakers commonly use food lye to create the signature dark brown crust on pretzels. Lye helps speed up the Maillard process, which is an essential part of baking bread and gives food a distinctive brown color.
Since working with food lye requires safety measures, such as wearing protective goggles and gloves, and using special equipment, alternatives for home baking are often preferred. Experts agree that you don't need lye to make good pretzels. Baking soda is a good alternative to an alkaline solution.
Although the results won't be the same, you get very good results by boiling the pretzel dough in a baking soda solution. Although lye is more alkaline than baking soda, baking soda produces a similar effect in terms of the color, appearance, and taste of the crust. The advantage of using baking soda instead of food-grade lye is that baking soda is widely and readily available and safer to use.
For these reasons, I decided to make this traditional German pretzel bun recipe (Laugensemmel in German) without lye but with a baking soda solution. However, if you are looking for an authentic Bavarian Oktoberfest experience, this recipe works wonderfully with the traditional food lye method.
Bread flour
The best flour for pretzel rolls is, without a doubt, bread flour. It makes for a tender crumb and a great mouthfeel. I recommend any bread flour with 12.5% - 14.5% protein content. If you don't have bread flour available, you can use all-purpose flour or bread flour substitute, but the result may not be quite as good.
Note: If you use all-purpose flour, you may need to add 1-2 tablespoons more because all-purpose flour doesn't absorb as much liquid as bread flour.
Instant yeast
I prefer instant quick yeast for all my bread recipes because it can be added to the flour without activating it first in lukewarm liquid and sugar. However, this recipe works with both yeasts, and it depends on personal preference regarding which type of yeast you want to use.
If you are baking with active dry yeast, warm the water and milk until it's about 110°F (43°C). Then add the sugar and 2 ½ teaspoon of active dry yeast. Let sit for 5-10 minutes until the surface starts to look foamy. Then proceed with the recipe as directed.
Baker's percentages
This is a lightly enriched bread dough that uses milk, butter, and honey, so it’s different from lean sourdough bread, which is just water, flour, and salt.
| Ingredient | Weight | Percentage |
| Bread Flour | 438g | 100% |
| Salt | 9g | 2.05% |
| Instant Dry Yeast | 8g | 1.83% |
| Milk | 120g | 27.40% |
| Water | 120g | 27.40% |
| Honey | 21g | 4.79% |
| Unsalted Butter | 35g | 7.99% |
Tip: For perfect results, use a kitchen scale and weigh all the ingredients. Grams are more accurate than cups.
Same day preparation
Preparing the dough the day before and letting it rise overnight in the refrigerator improves both the texture and the taste of the pretzel rolls. It's the procedure chosen in this recipe, and you can find the detailed instructions at the end of this post.
However, you can prepare the dough and bake the rolls the same day. In this case, let the dough rise at room temperature (the warmer the temperature, the faster it rises) until it doubles (approx. 1-2 hours, depending on the dough and the ambient temperature). Then shape the rolls, let rest, boil, and bake.
Pretzel hot dog buns
You can use this dough to make pretzel hot dog buns. Only the shaping of the dough is a little different, but the rest of the recipe is the same.
To make hot dog rolls, prepare, refrigerate, and divide the dough as directed. Then place one piece of dough on the work surface in front of you, and use your fingers to flatten it into a 5x6-inch (13x15cm) rectangle that is about ⅛-¼-inch (0.3-0.6cm) thick. Starting from one short side, roll up the dough tightly and seal the edges by pinching them together with your fingertips. Proceed with the recipe as described.
Note: For visual instructions, visit my hot dog buns post.
Storage and freezing instructions
Pretzel buns are best eaten fresh, but you can store them in an airtight container at room temperature for up to 2 days or freeze them for 2 months. You can freeze them by wrapping them tightly with plastic wrap and placing them in freezer bags or containers. To thaw, unwrap and let sit for 2 hours at room temperature or place in an airtight container overnight. If desired, warm up or toast and serve warm.
Note: Instead of freezing leftover pretzel buns, you can use them to make breadcrumbs or bread and butter pudding.
Expert tips for success
- Flours can absorb water differently in different climates and environments. This means you may need to hydrate your dough more or less depending on the humidity, temperature, and altitude - all of which vary depending on the climate and environment.
- If you find that you need to knead the dough a little longer to pass the windowpane test, let it rest a few minutes in between kneading so that the dough doesn’t overheat. Otherwise, the yeast could cripple.
- Don't boil the buns longer as recommended, otherwise they will be too chewy.
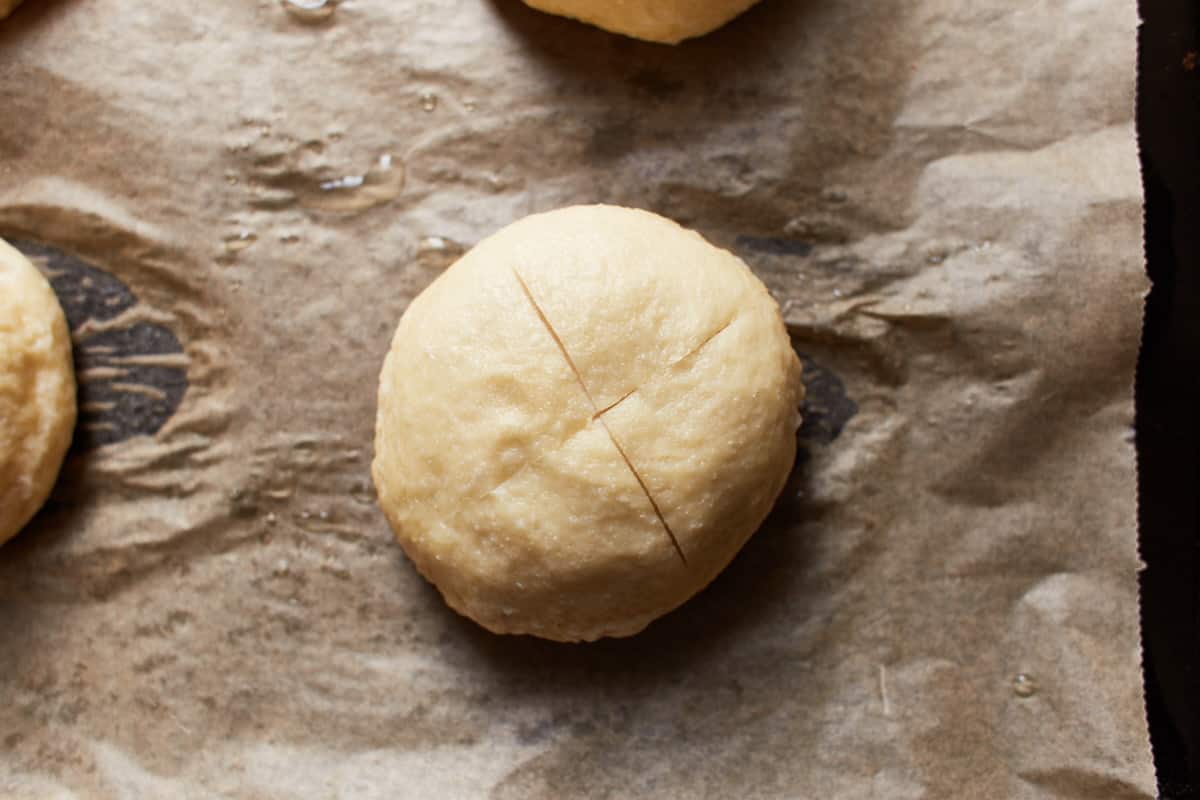
- Make sure to score the dough after boiling and before baking so that the rolls can rise nicely.
Photo tutorial
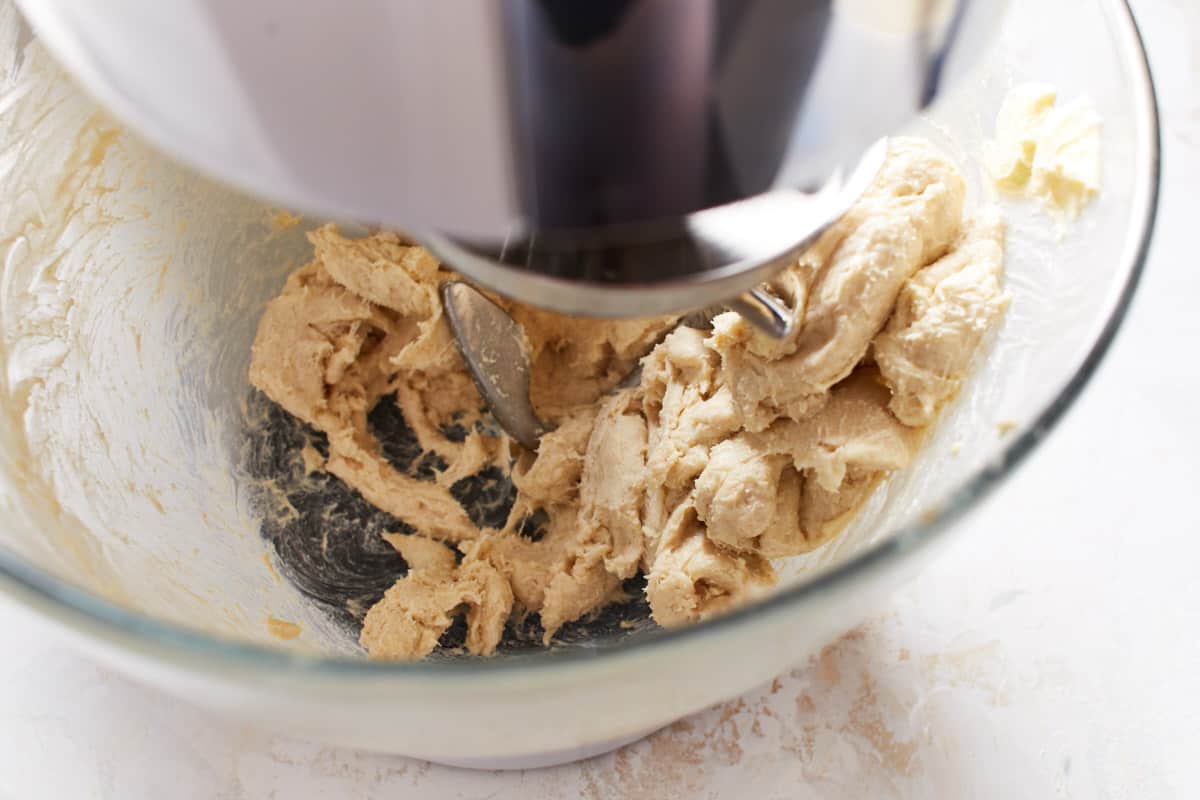
In a large bowl, using an electric mixer fitted with a hook attachment, add the bread flour, salt, yeast, water, milk, and honey and knead on low speed until it comes together about 3-4 minutes.

Gradually add the butter and knead on low until it is completely incorporated.
Note: You may notice that the dough starts to kind of separate, but this is nothing to worry about. I will come together once the butter is incorporated.
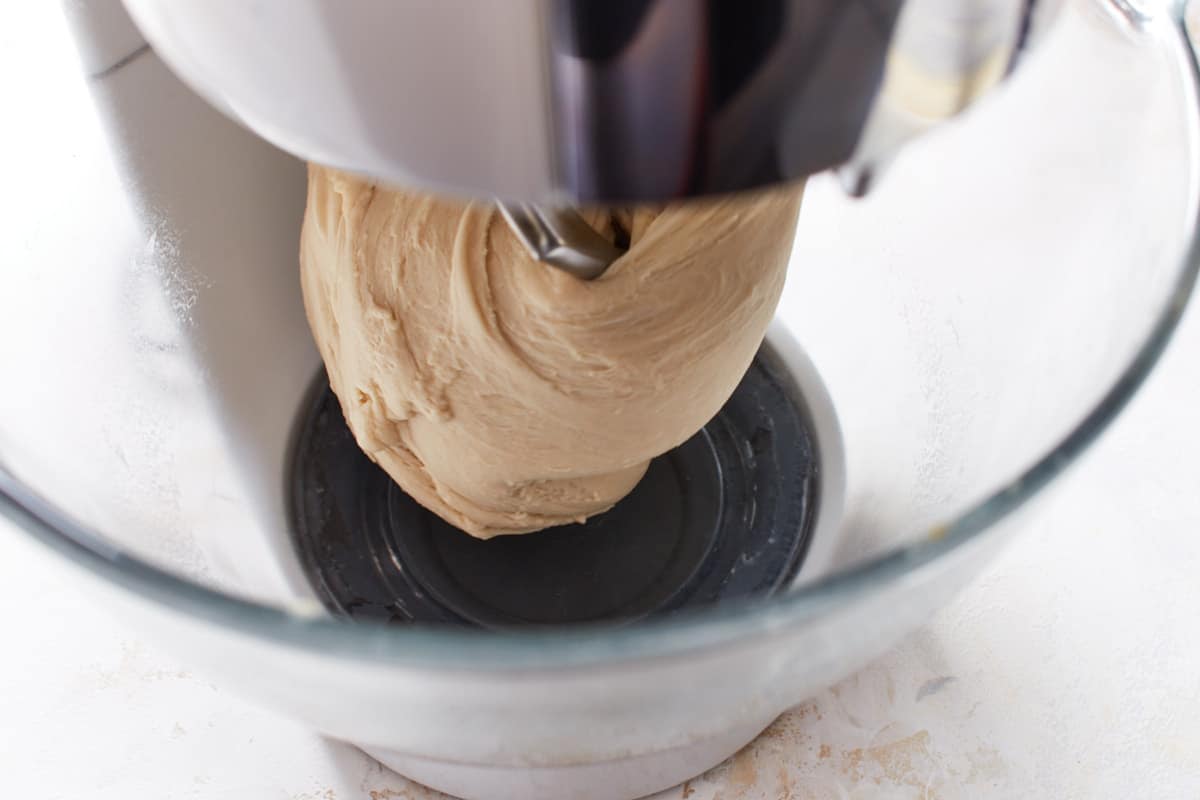
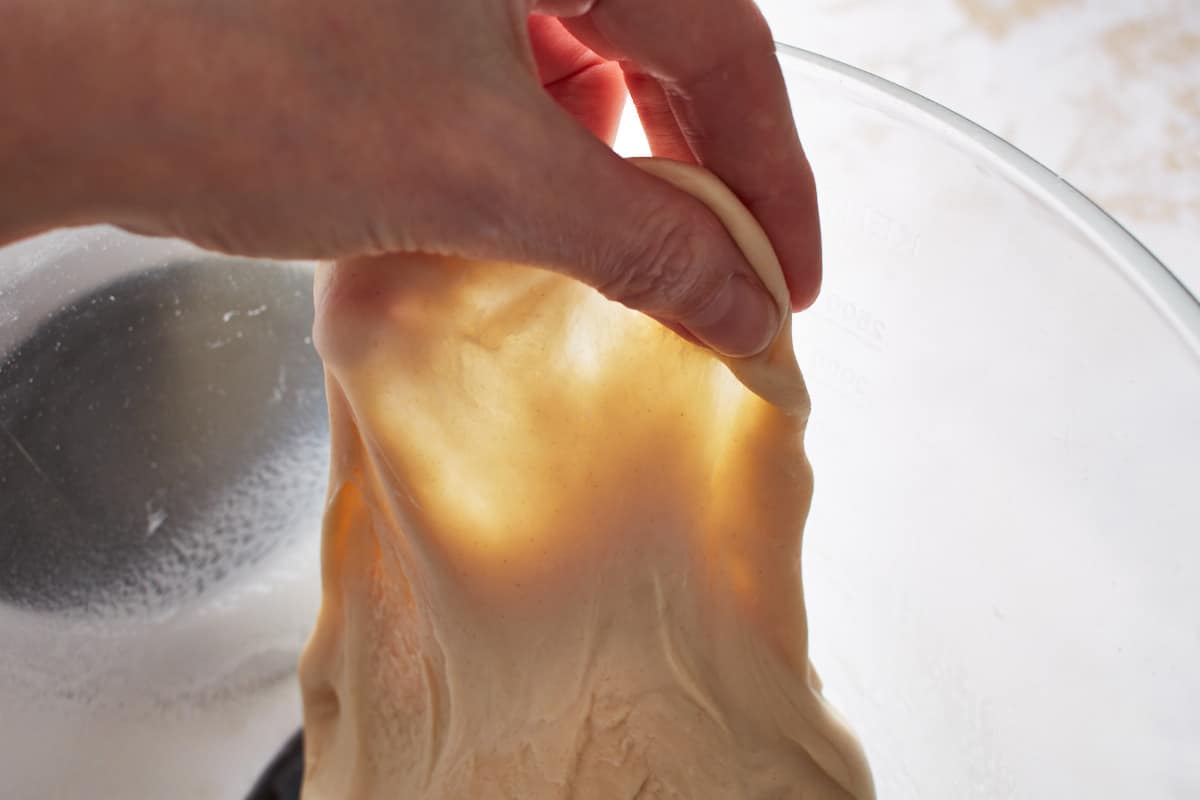
Once all of the butter is incorporated, increase the speed to medium-high and knead for about 8-10 minutes until the dough is smooth and soft, feels like clay, and passes the windowpane test.
How to do the windowpane test?
To do the windowpane test, let the dough rest for about 1 minute after mixing. Then take a small portion of the dough between your fingers and slowly stretch it until the center is very thin and light can shine through without tearing. This means that you have kneaded and developed the dough sufficiently. If it doesn't pass the windowpane test and it tears, knead for 1-2 minutes longer.
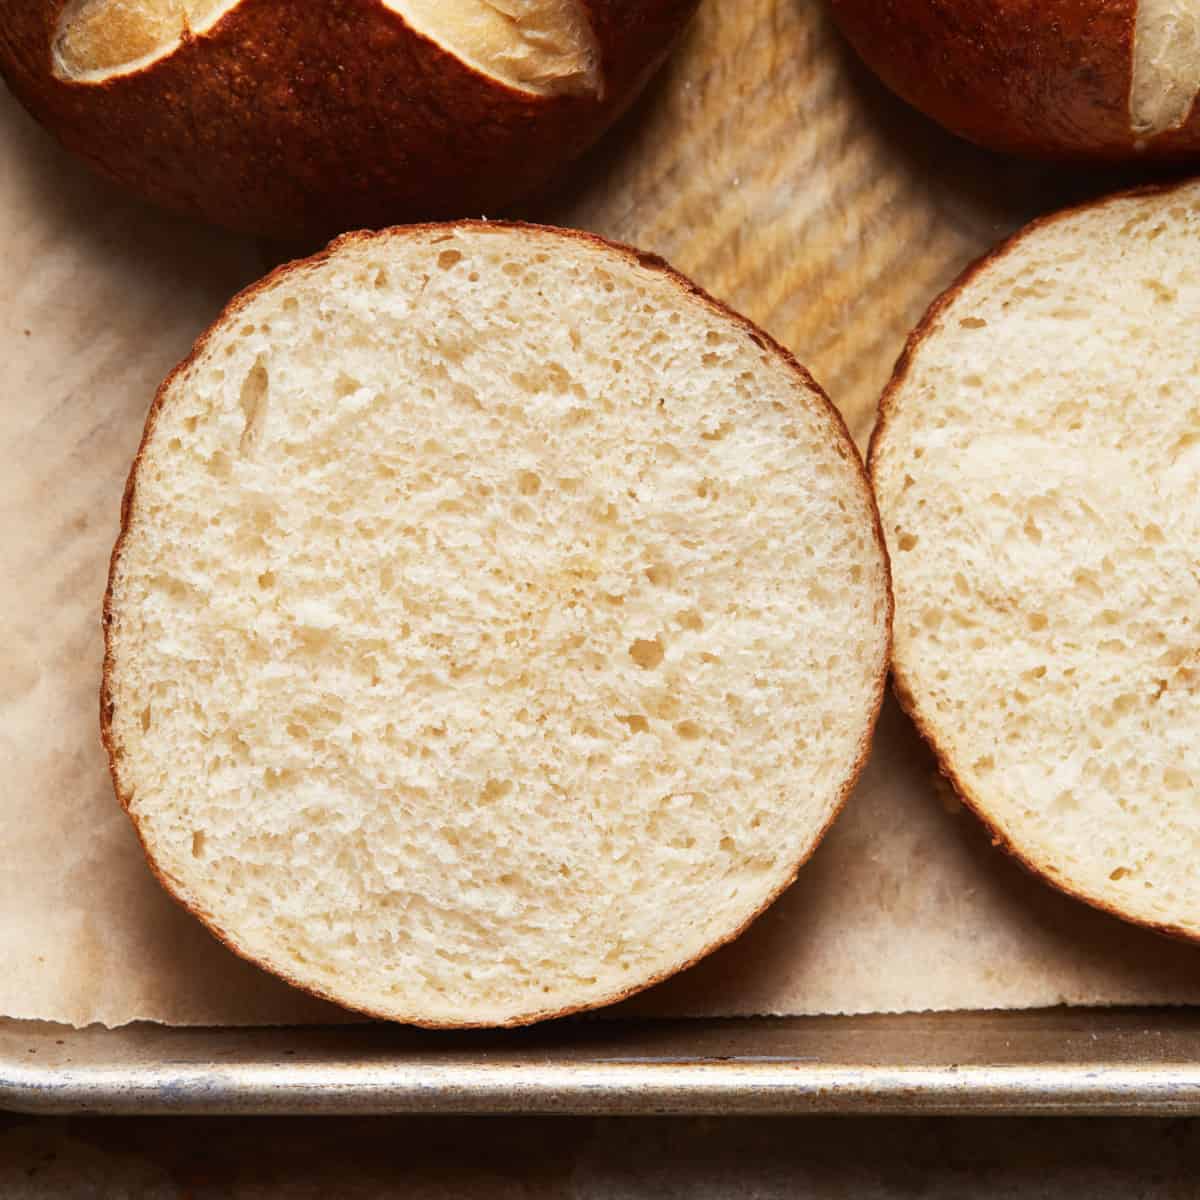
It's a satiny and soft dough that is stiff and holds its shape.
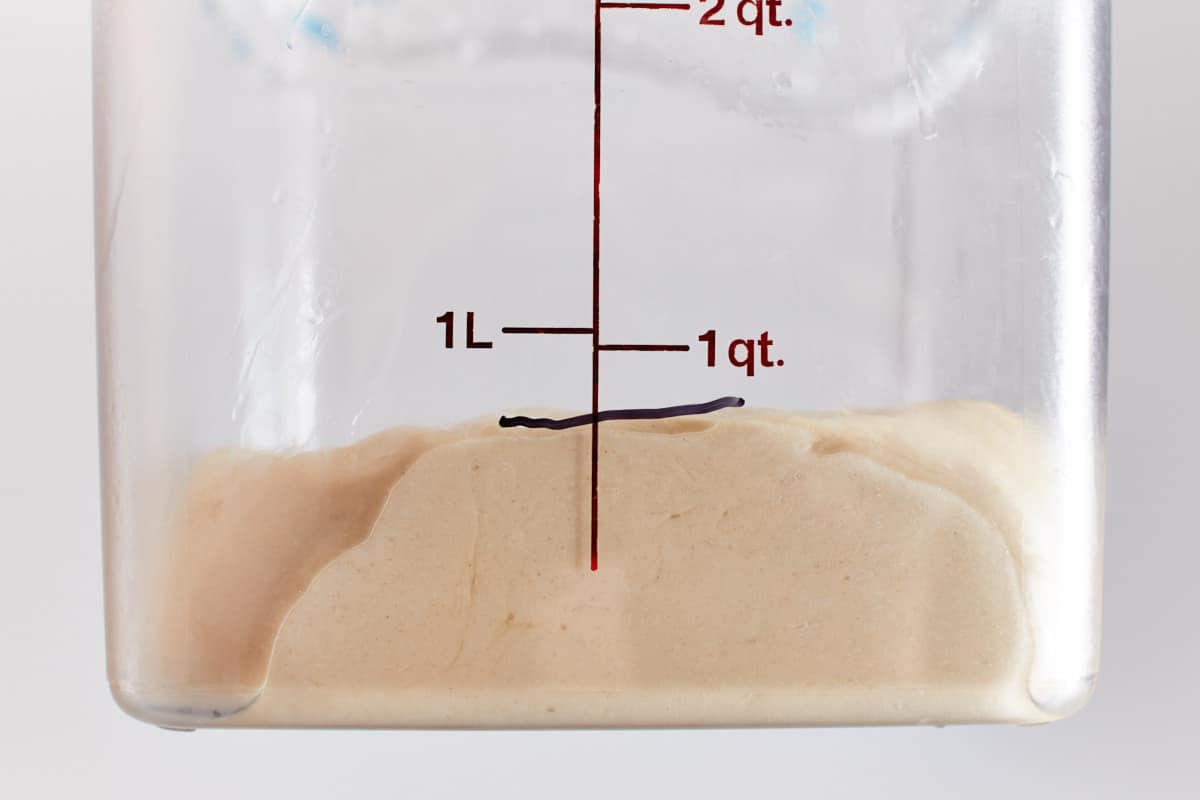
Lightly spray a straight-sided container with oil, roll the dough into a ball, and place the dough in the container. Turn the dough a few times until it is lightly covered with oil on all sides. Cover and refrigerate overnight.
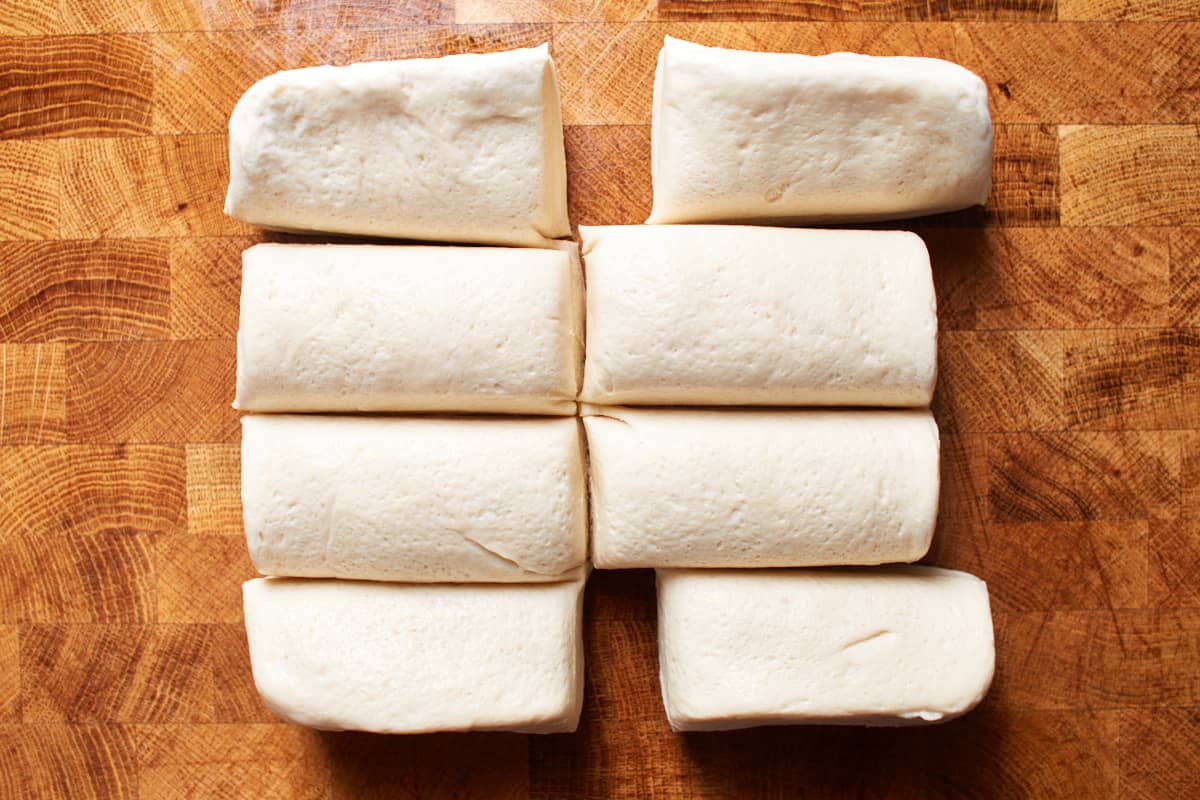
Take the dough out of the refrigerator and let it rest at room temperature for about 45-60 minutes. Remove the dough from the container, roughly shape it into a square and divide into 8 equal pieces.
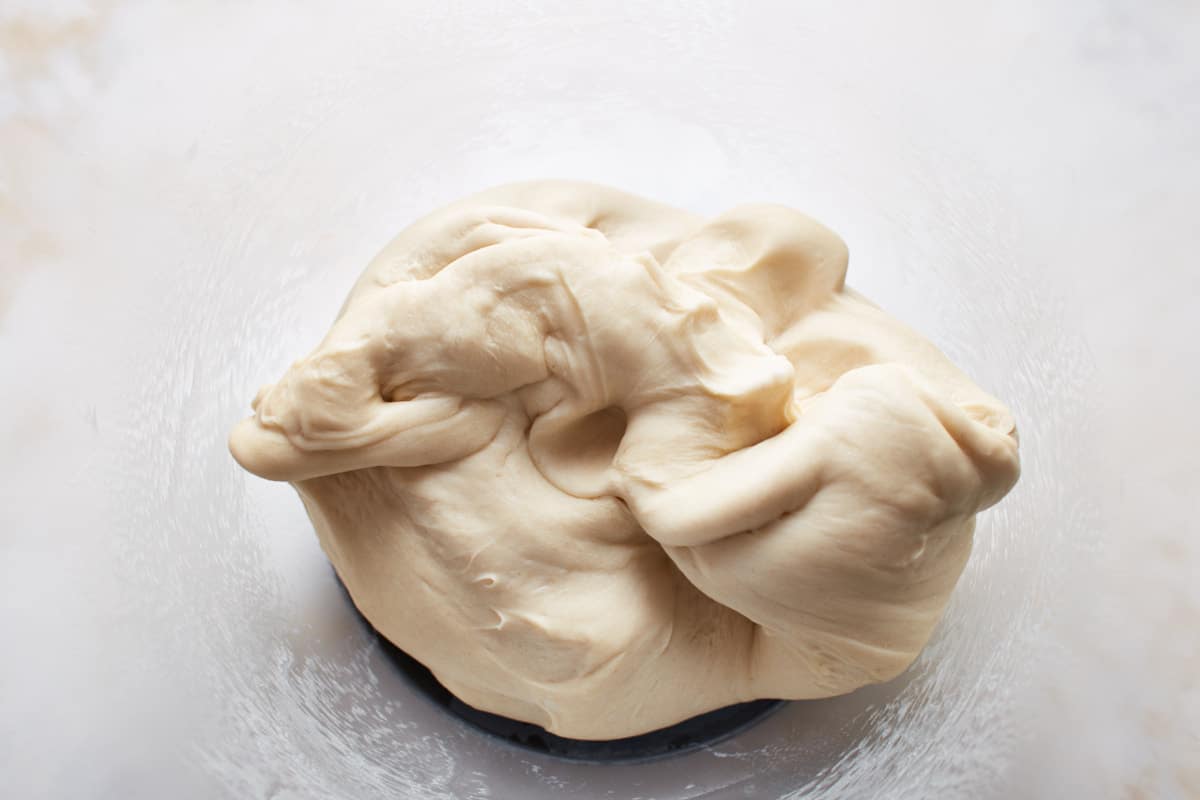
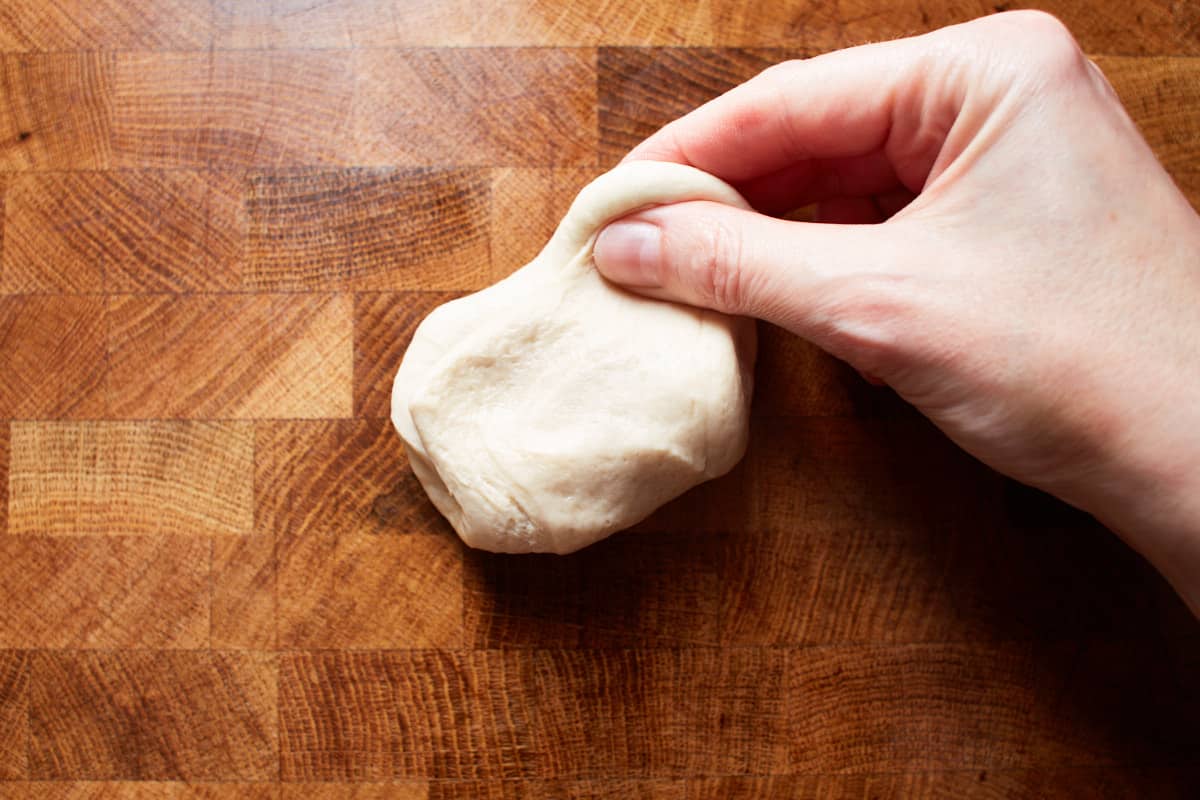
Take one piece of dough, roll it into a ball, and deflate it while you roll it up. Then stretch up the dough on the side farthest away from you and fold over the center.
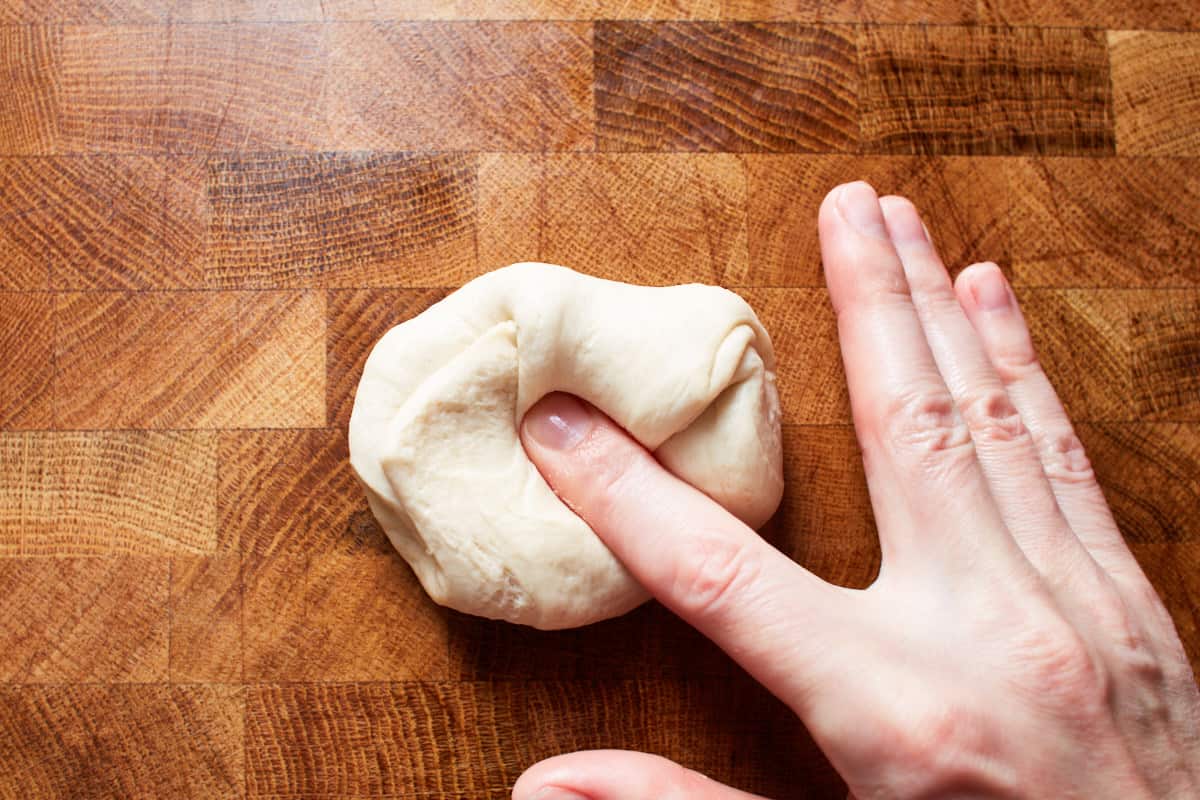
Then rotate the dough by about 45°, stretch the dough farthest away from you and fold it over the previous fold and over the center. Repeat this 6-8 times. You will notice that the dough builds up tension and becomes firmer with every fold. The goal is to have a round ball with all the seams on one side.

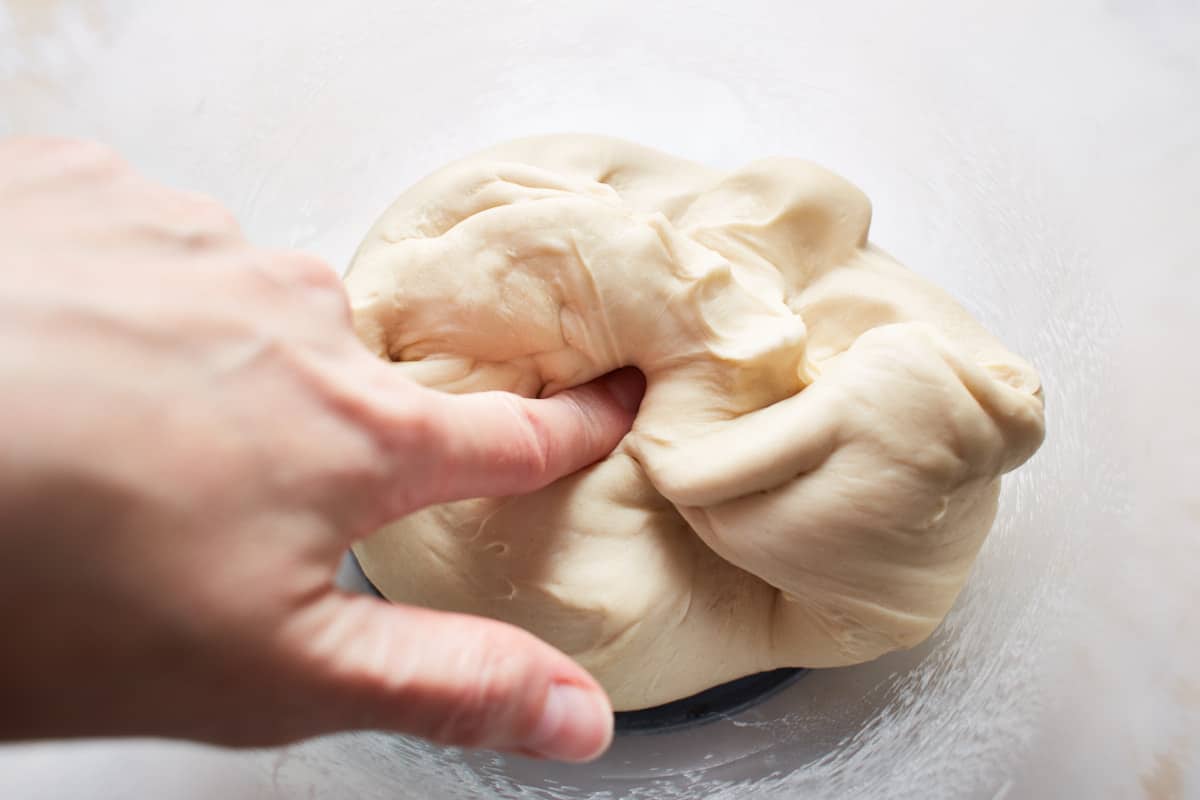
Then place the dough ball seam side down, gently cup it with one hand, and form a C-shape with your hand.
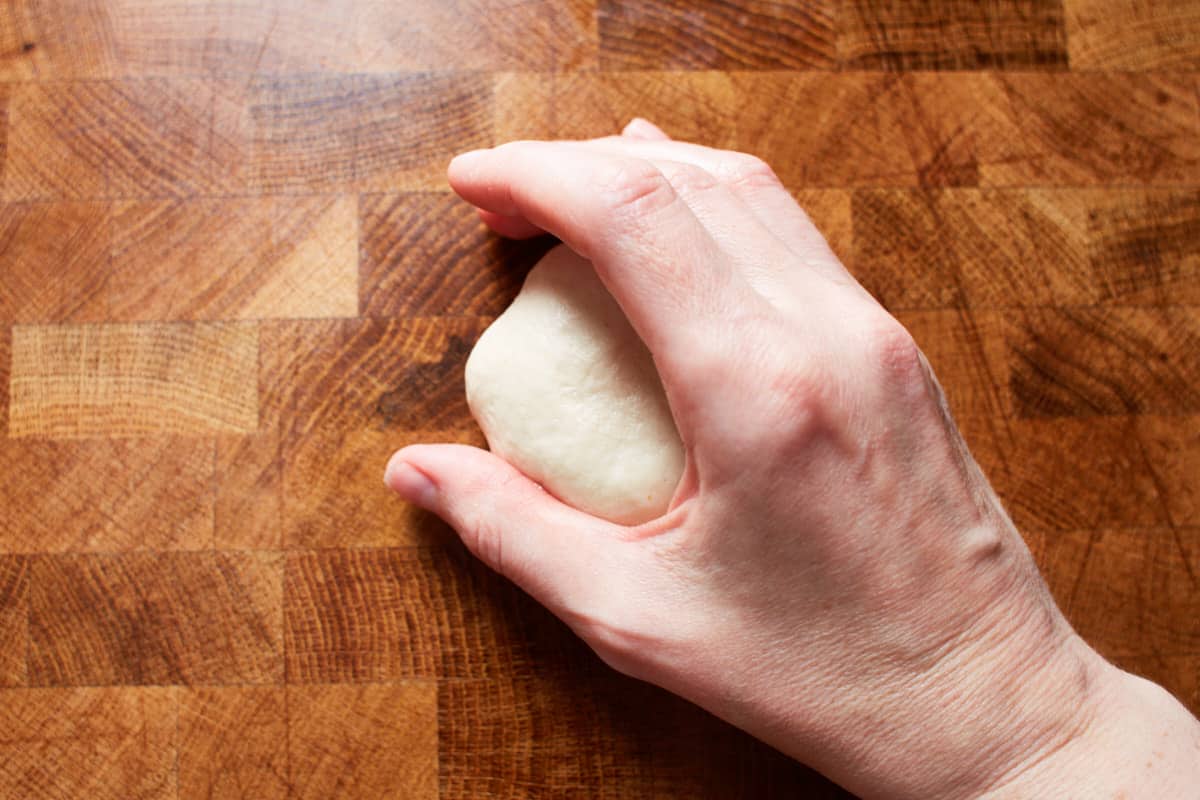
Move the dough with your hand in a circular motion and gently press it against the work surface to build tension, stretch the surface of the dough, and close the seams at the bottom. Do this gently without tearing the surface of the dough, and don't overwork the dough.
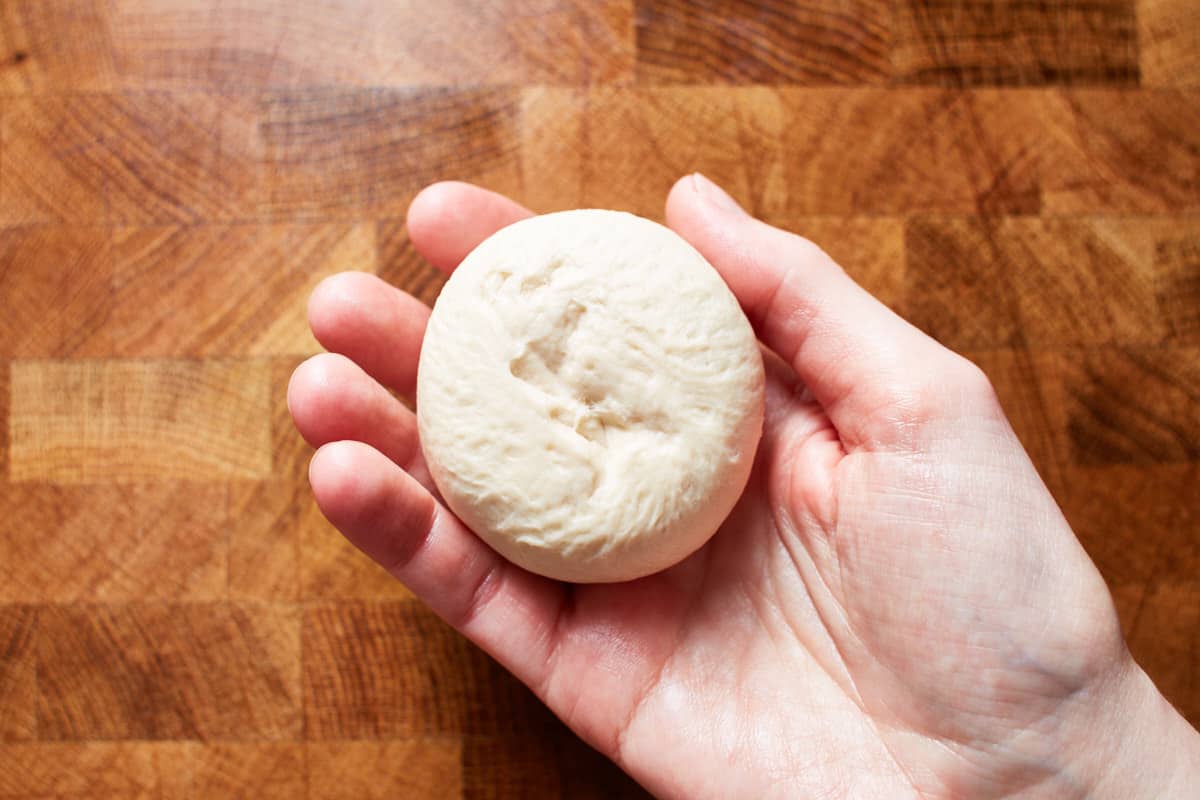
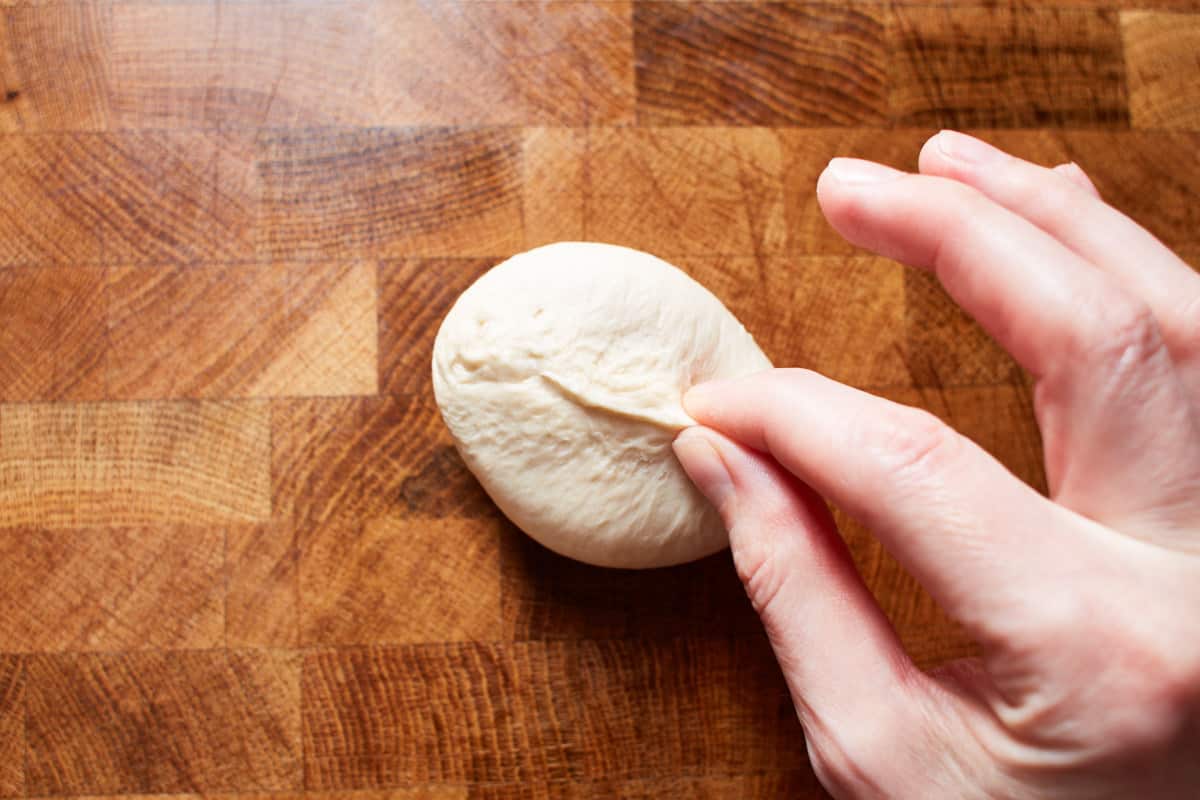
If necessary, seal the seams with your fingers by pinching the dough.
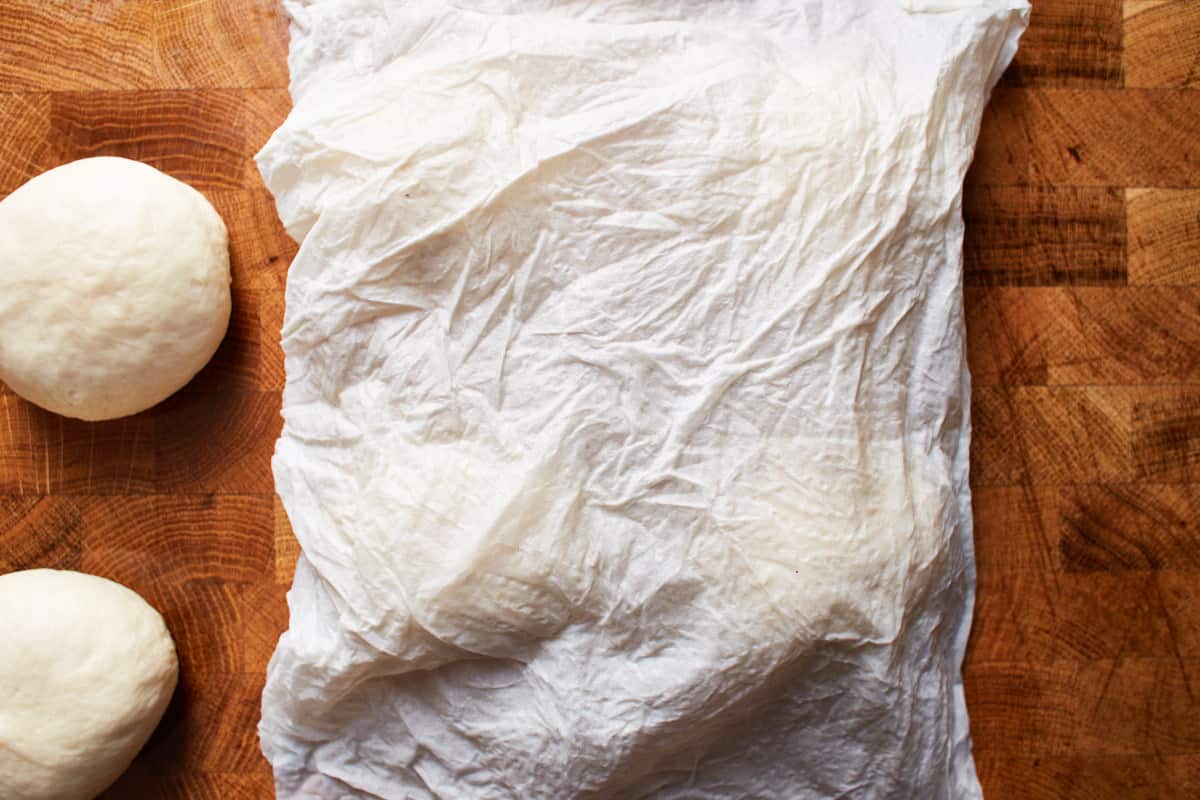
Cover the balls of dough with a slightly damp paper towel, and let rest for about 30 minutes until they have risen by about 50%.
Bring water and baking soda to a rolling boil over high heat and boil the buns for 30 seconds on each side. Don't crowd the pot and work in batches.
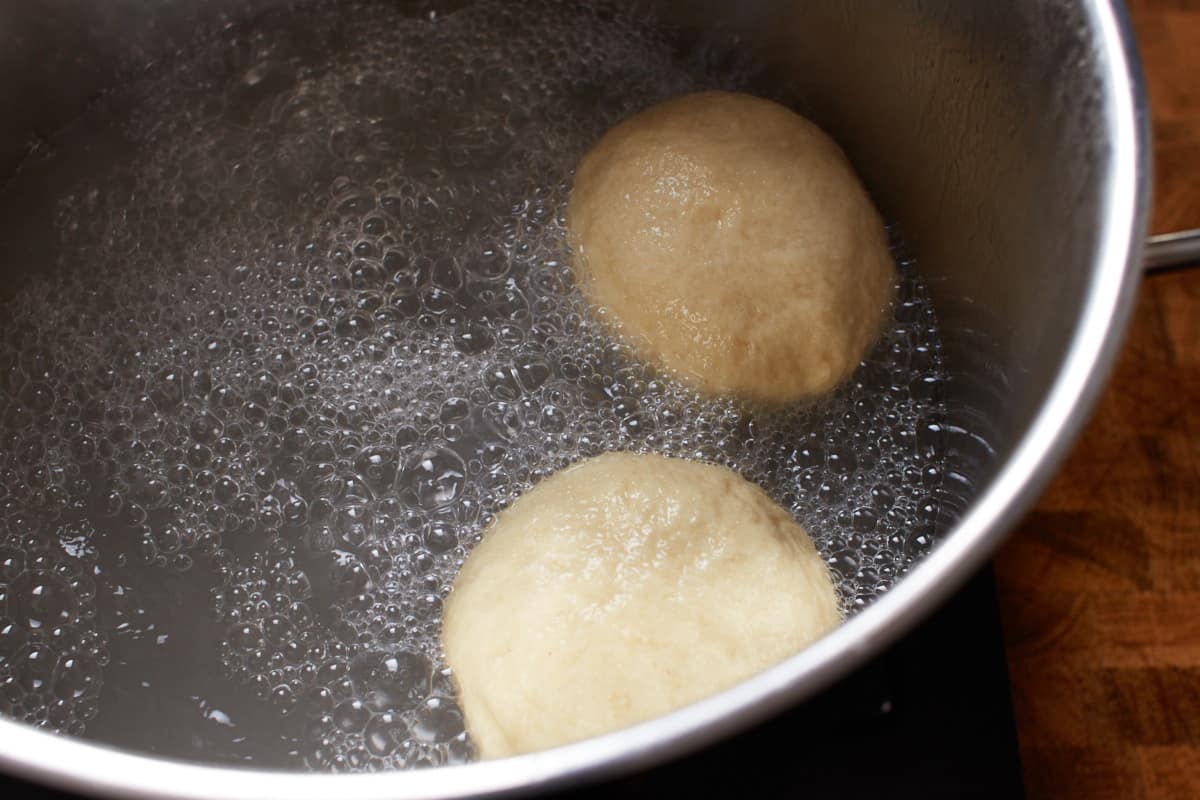
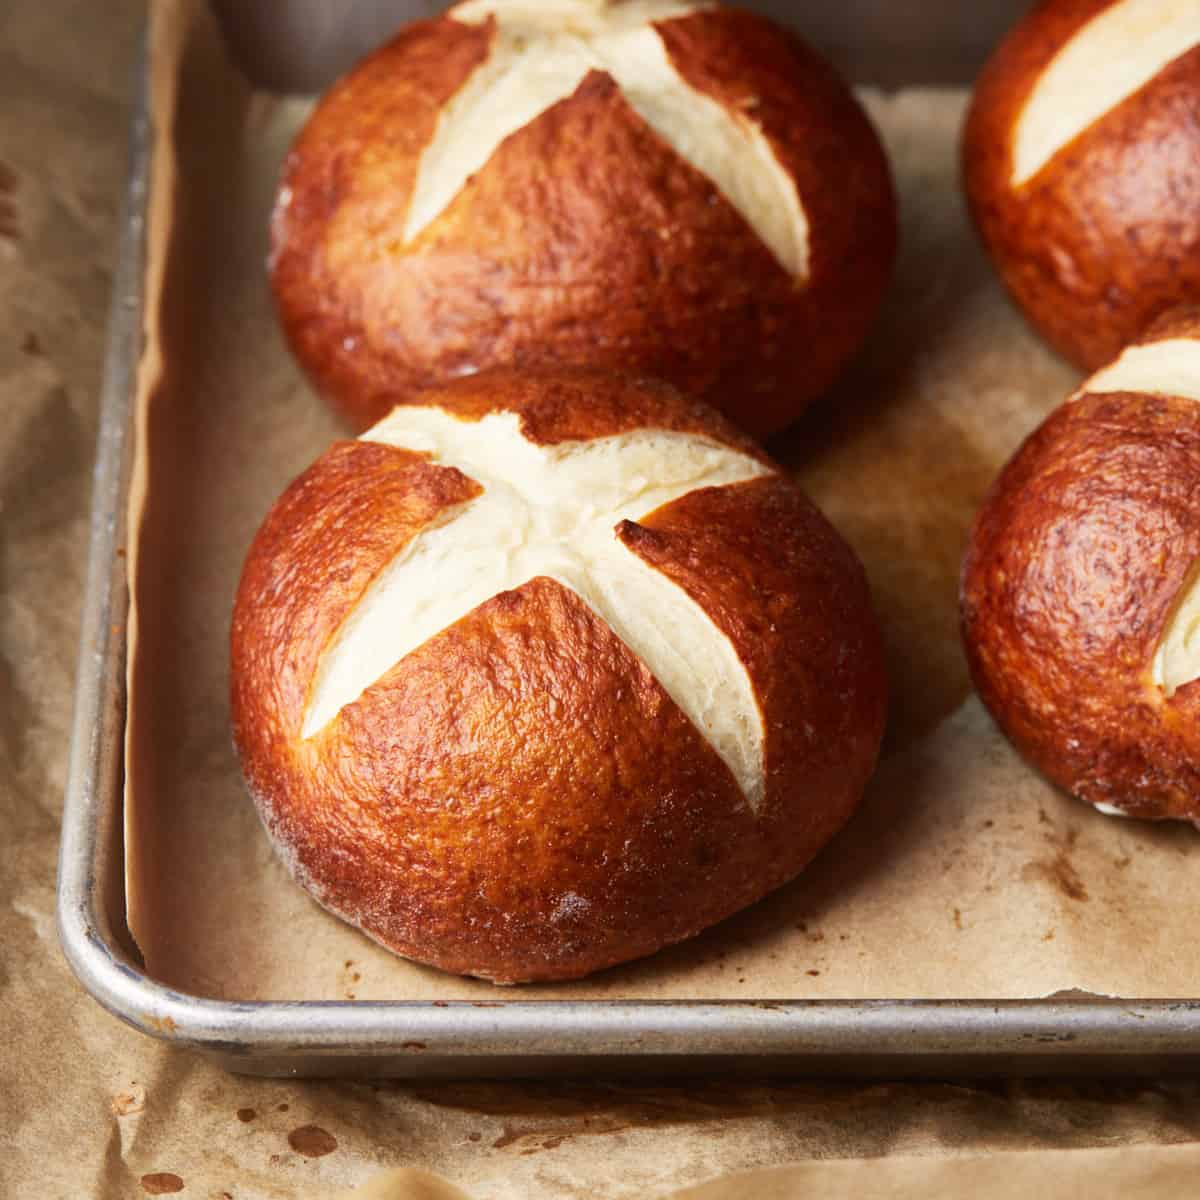
Remove the buns from the water with a spider skimmer and place them on a parchment paper-lined baking sheet about 4-inch (10cm) apart. The surface will look uneven and bumpy, but that is normal. Score the buns with a razor blade or very sharp knife. Cut a large x across the surface from edge to edge, about ⅛ to ¼-inch deep (3-6mm).
Bake for 16-19 minutes until deep brown. Remove from the oven and let cool completely.

More bread recipes to try
If you love baking bread loaves and buns, you've come to the right place. Give the following recipes a try!
Recipe
Pretzel Buns (German Recipe Without Lye)
Instructions
- In a large bowl, using an electric mixer fitted with a hook attachment, add the bread flour, salt, yeast, water, milk, and honey and knead on low speed until it comes together about 3-4 minutes.
- Gradually add the butter and knead on low until it is completely incorporated. You may notice that the dough starts to kind of separate, but this is nothing to worry about. I will come together once the butter is incorporated.
- Once all of the butter is incorporated, increase the speed to medium-high and knead for about 8-10 minutes until the dough is smooth and soft, feels like clay, and passes the windowpane test. It's a satiny and soft dough that is stiff and holds its shape. If you find that you need to knead a few minutes longer to pass the windowpane test, give the dough a short break for a few minutes to avoid overheating the dough. Otherwise, the yeast could cripple.
- Lightly spray a straight-sided container with oil, roll the dough into a ball, and place the dough in the container. Turn the dough a few times until it is lightly covered with oil on all sides. Cover and let rest at room temperature for 10-20 minutes until it has grown by about 10-20%. Then put it in the refrigerator and let rest overnight, about 8-12 hours. It will at least double in this time.
- Take the dough out of the refrigerator and let it rest at room temperature for about 45-60 minutes.
- Remove the dough from the container, roughly shape it into a square and divide into 8 equal pieces.
- Take one piece of dough, roll it into a ball, and deflate it while you roll it up. Then stretch up the dough on the side farthest away from you and fold over the center. Then rotate the dough by about 45°, stretch the dough farthest away from you and fold it over the previous fold and over the center. Repeat this 6-8 times. You will notice that the dough builds up tension and becomes firmer with every fold. The goal is to have a round ball with all the seams on one side.
- Then place the dough ball seam side down, gently cup it with one hand, and form a C-shape with your hand. Move the dough with your hand in a circular motion and gently press it against the work surface to build tension, stretch the surface of the dough, and close the seams at the bottom. Do this gently without tearing the surface of the dough, and don't overwork the dough. If necessary, seal the seams with your fingers by pinching the dough.
- Cover the balls of dough with a slightly damp paper towel, and let rest for about 30 minutes until they have risen by about 50%.
- In the meantime, line a baking sheet with parchment paper and set aside. Also, preheat the oven to 400°F (204°C).
- To prepare the alkaline solution, add the water and baking soda to a large pot and bring to a rolling boil over high heat.
- Boil the buns in the baking soda solution for 30 seconds on each side. Don't crowd the pot and work in batches. Remove the buns from the water with a spider skimmer and place them on the prepared baking sheet about 4-inch (10cm) apart. The surface will look uneven and bumpy, but that is normal.
- Score the buns with a razor blade or very sharp knife. Cut a large x across the surface from edge to edge, about ⅛ to ¼-inch deep (3-6mm). Bake for 16-19 minutes until deep brown.
- Remove from the oven and let cool completely. Store in an airtight container at room temperature for up to 2 days.
Video
You can find the video in the post above. If you don't see a video, please check your browser settings.
Eryc
My buns came out looking almost like the picture! I was worried when, after 60 minutes out of the fridge, the dough was still chilly and clammy, but I soldiered through. I was worried again where, in the water bath, the bottoms where I had carefully, firmly pinched... All opened up like a flower! But - they all came out just fine! I think next time I'll make 6, as these are more "slider" sized than regular "burger" sized. I also will try the lye method one of these (brave) days. Thanks!
Sia Renz
Hello and thanks for the recipe !
Do you allow the buns to cool down after the boil ?
Sabine
No, I bake them immediately. I hope that helps!
Andrea
Hi Sabine,.you didn't write the amount of butter needed for the recipe. Have a good day!
Sabine
Hey Andrea, Thank you so much for letting me know and sorry for the mistake. I just updated the ingredients list. Have a good one!